What is Splunk On-Call?
Splunk On-Call is incident management software that allows teams to maintain a culture of high availability without slowing down the innovation process. The moment something goes wrong, Splunk On-Call will spring people to action, automatically.
Where can I get help? – If at any point you find yourself needing additional help, please contact support (victorops-support@splunk.com). Our 24/7 support team is on-call when you are. You can even initiate a Live Chat (within business hours,8:00 A.M.-5:00 P.M. Mountain Time) or submit a ticket via our Contact Support page.
Mobile App Download – iOS & Android
We offer two getting started guides: one for admins and one for users.
Getting Started Guide – Admins
Team Page Layout

Set-up
Add Users – The most important first step of setting up Splunk On-Call is adding users.
To add new users:
- Leverage their email address in the portal (Users -> Invite User)
- Utilize our API (ID & Key required, can be found in Integrations -> API)
*Uploading a lot of users? Reach out to us, and we’ll help you out!
Create Teams – Teams hold user lists, on-call shifts, and escalation policies.
To create a team, head to the “Teams” section from the top nav bar. From the ‘Teams’ page click the “Add Team” button. Then choose a name.
- We recommend standardizing your team names to clearly delineate across teams. You can choose team names based on service, internal team name, etc.—whatever makes sense to your organization, just aim for consistency.
Invite Users and Declare Admins – Once you’ve built a few teams, the next step is to add people. You can add invited users. Then, establish a hierarchy of users based on user roles, e.g, Admins, Users, and Team Admins.
Build Rotations – Rotations are your recurring on-call schedules—basically groups of on-call shifts. A shift is shared across a number of people.
- You can also reach out to us for help setting up your custom rotation.
*Note: A scheduled rotation doesn’t automatically mean you’re on-call; rotations need to be tied to an escalation policy.
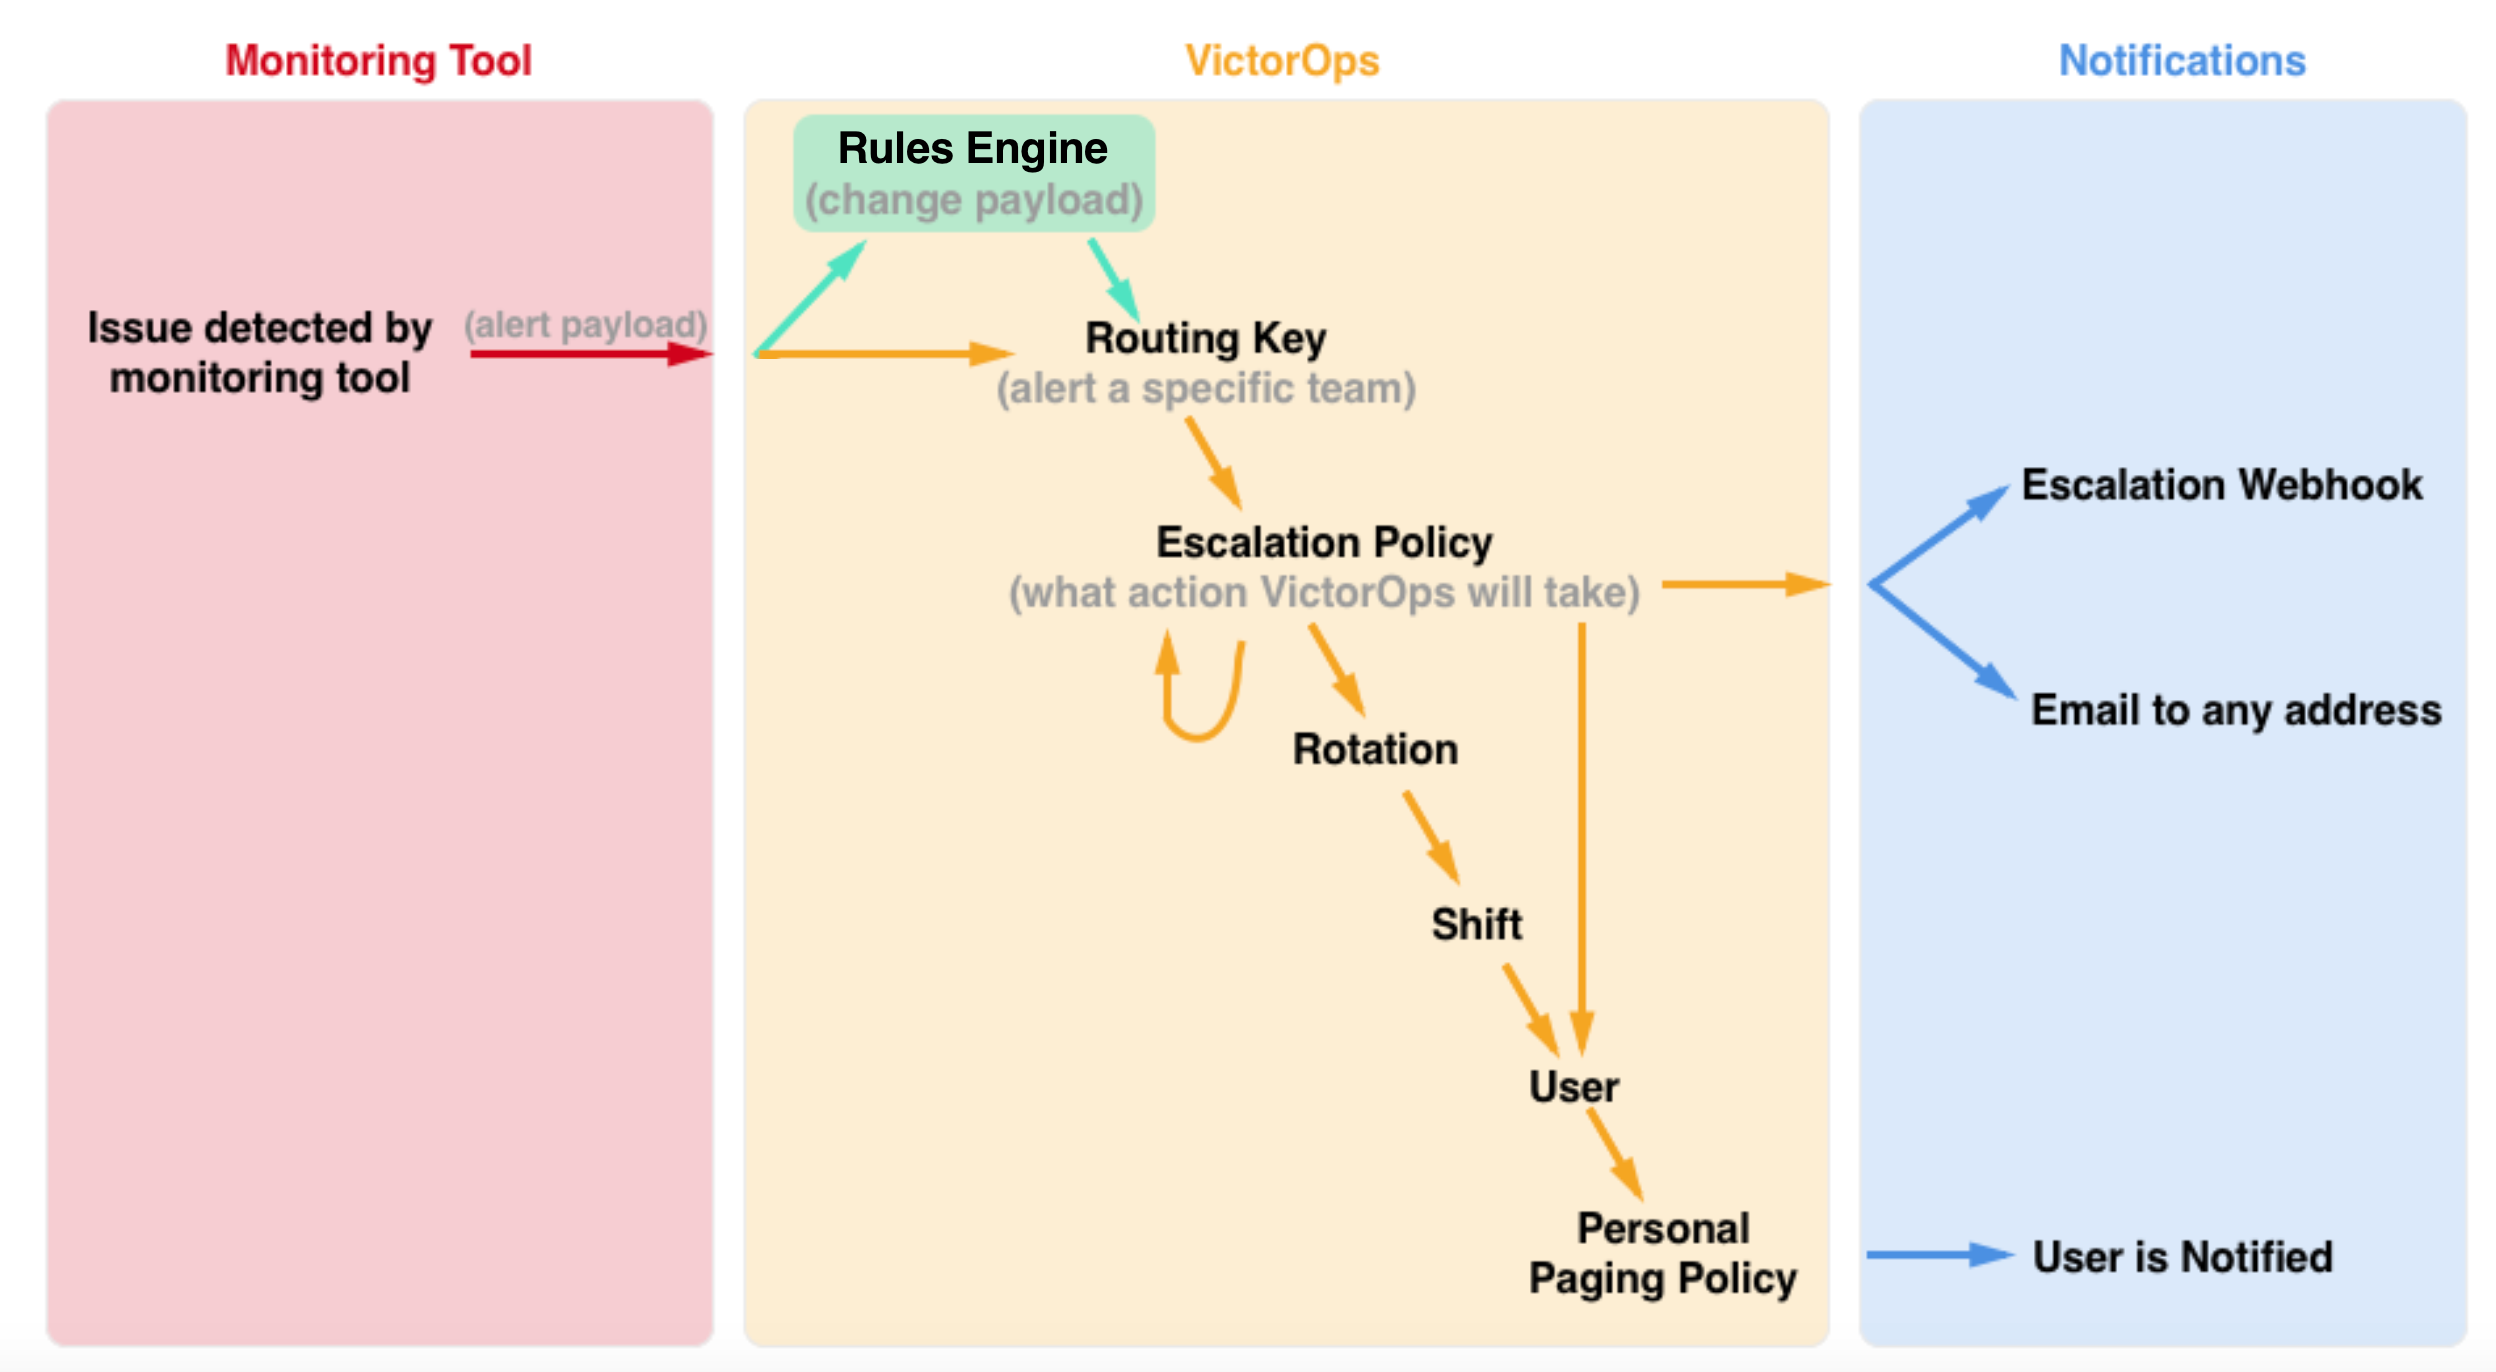
Create Escalation Policies – Escalation policies determine which incidents are routed, to whom they are routed, and how they are escalated. Essentially, an escalation policy is how Splunk On-Call escalates a triggered event.
- Best practice for setting up your escalation policy is to establish a minimum of three escalation paths: on-duty user, previous/next user in a rotation, and manager/team lead.
- Read this post for more tips and tricks on how to manage multiple alert behaviors within a single team.
Configure Routing Keys – Routing keys tie the alerts from your monitoring tools to the specific team (or escalation policy) in Splunk On-Call—this helps get the right person on the problem and reduce alert noise for those unrelated to a specific incident. These can be found by navigating to Settings -> Routing Keys.
- Keep them simple! Use the name of the team/policy that is handling the alerts, the service/host for the alert, monitoring tool the alert is coming from. Although routing keys are case insensitive, we recommend using all lowercase letters to prevent alerts from going to the default routing team.
- Matching team name: CloudOps (team) = cloudops (routing key)
- Matching monitoring tool: Splunk (tool) = splunk (routing key)
Integrations – The final piece is to set up your custom integrations. Integrations will feed alerts into Splunk On-Call in order to create incidents which will then page out.
- For a full list of integrations—plus more information on how to set them up—check here. Can’t find what you’re looking for? Check out our generic email or REST endpoints!
- We recommend setting up any chat integrations or non-alerting integrations before setting up your alerting integrations.
Rules Engine – The Rules Engine is a Full-Stack service level feature. It is, essentially, a rules engine that allows you to set set certain conditions, and trigger custom actions – such as annotating alerts with images/links/notes, overwrite alert fields or add new fields – when those conditions are met.
Reporting on Team Activity and Performance
As an admin, it is important that you are able to track and report out on team activity and performance in order to continuously improve. Navigate to the ‘Reports’ page in the top nav-bar.
- Post Incident Review – gain historical insight on incidents and a documented account of how you solved the problem.
- Performance (MTTA/MTTR) Report – tells the story of your investment in Splunk On-Call and the practice of DevOps.
- On-Call Report – take a look into time spent on-call and number of incidents worked by team/user.
- Incident Frequency Report – analyze the flow of incidents after the fact so you can go upstream to solve the incident causing the problem in your system.
Adjusting License Numbers
If you ever need to significantly increase or decrease your Splunk On-Call license numbers, please reach out to your Regional Sales Manager or Customer Success Manager. If you are unsure of who to engage, please send your inquiry to victorops-sales@splunk.com.
Getting Started Guide – Users
Mobile Activation Process
Main Dashboard View Layout
Single Sign On (SSO) – if your org is using SSO, please check this article for setup instructions and the step-by-step process in order to link your Splunk On-Call user to your org’s IDP.
Personal Paging Policies – Your Personal Paging Policy is your definition of how you’d like to be notified by Splunk On-Call when an incident is routed to you. Your options for notifications are push, email, SMS, and phone call.
- Custom (Time Based) – Custom policies are restricted to certain times of the day/week. When you are being paged for an incident, we will execute the first matching policy in the list top to bottom. Your Primary policy will be used if none of your custom policies match the current time.
- Best Practice: The more diverse your paging policies, in terms of steps and methods of contact, the better.
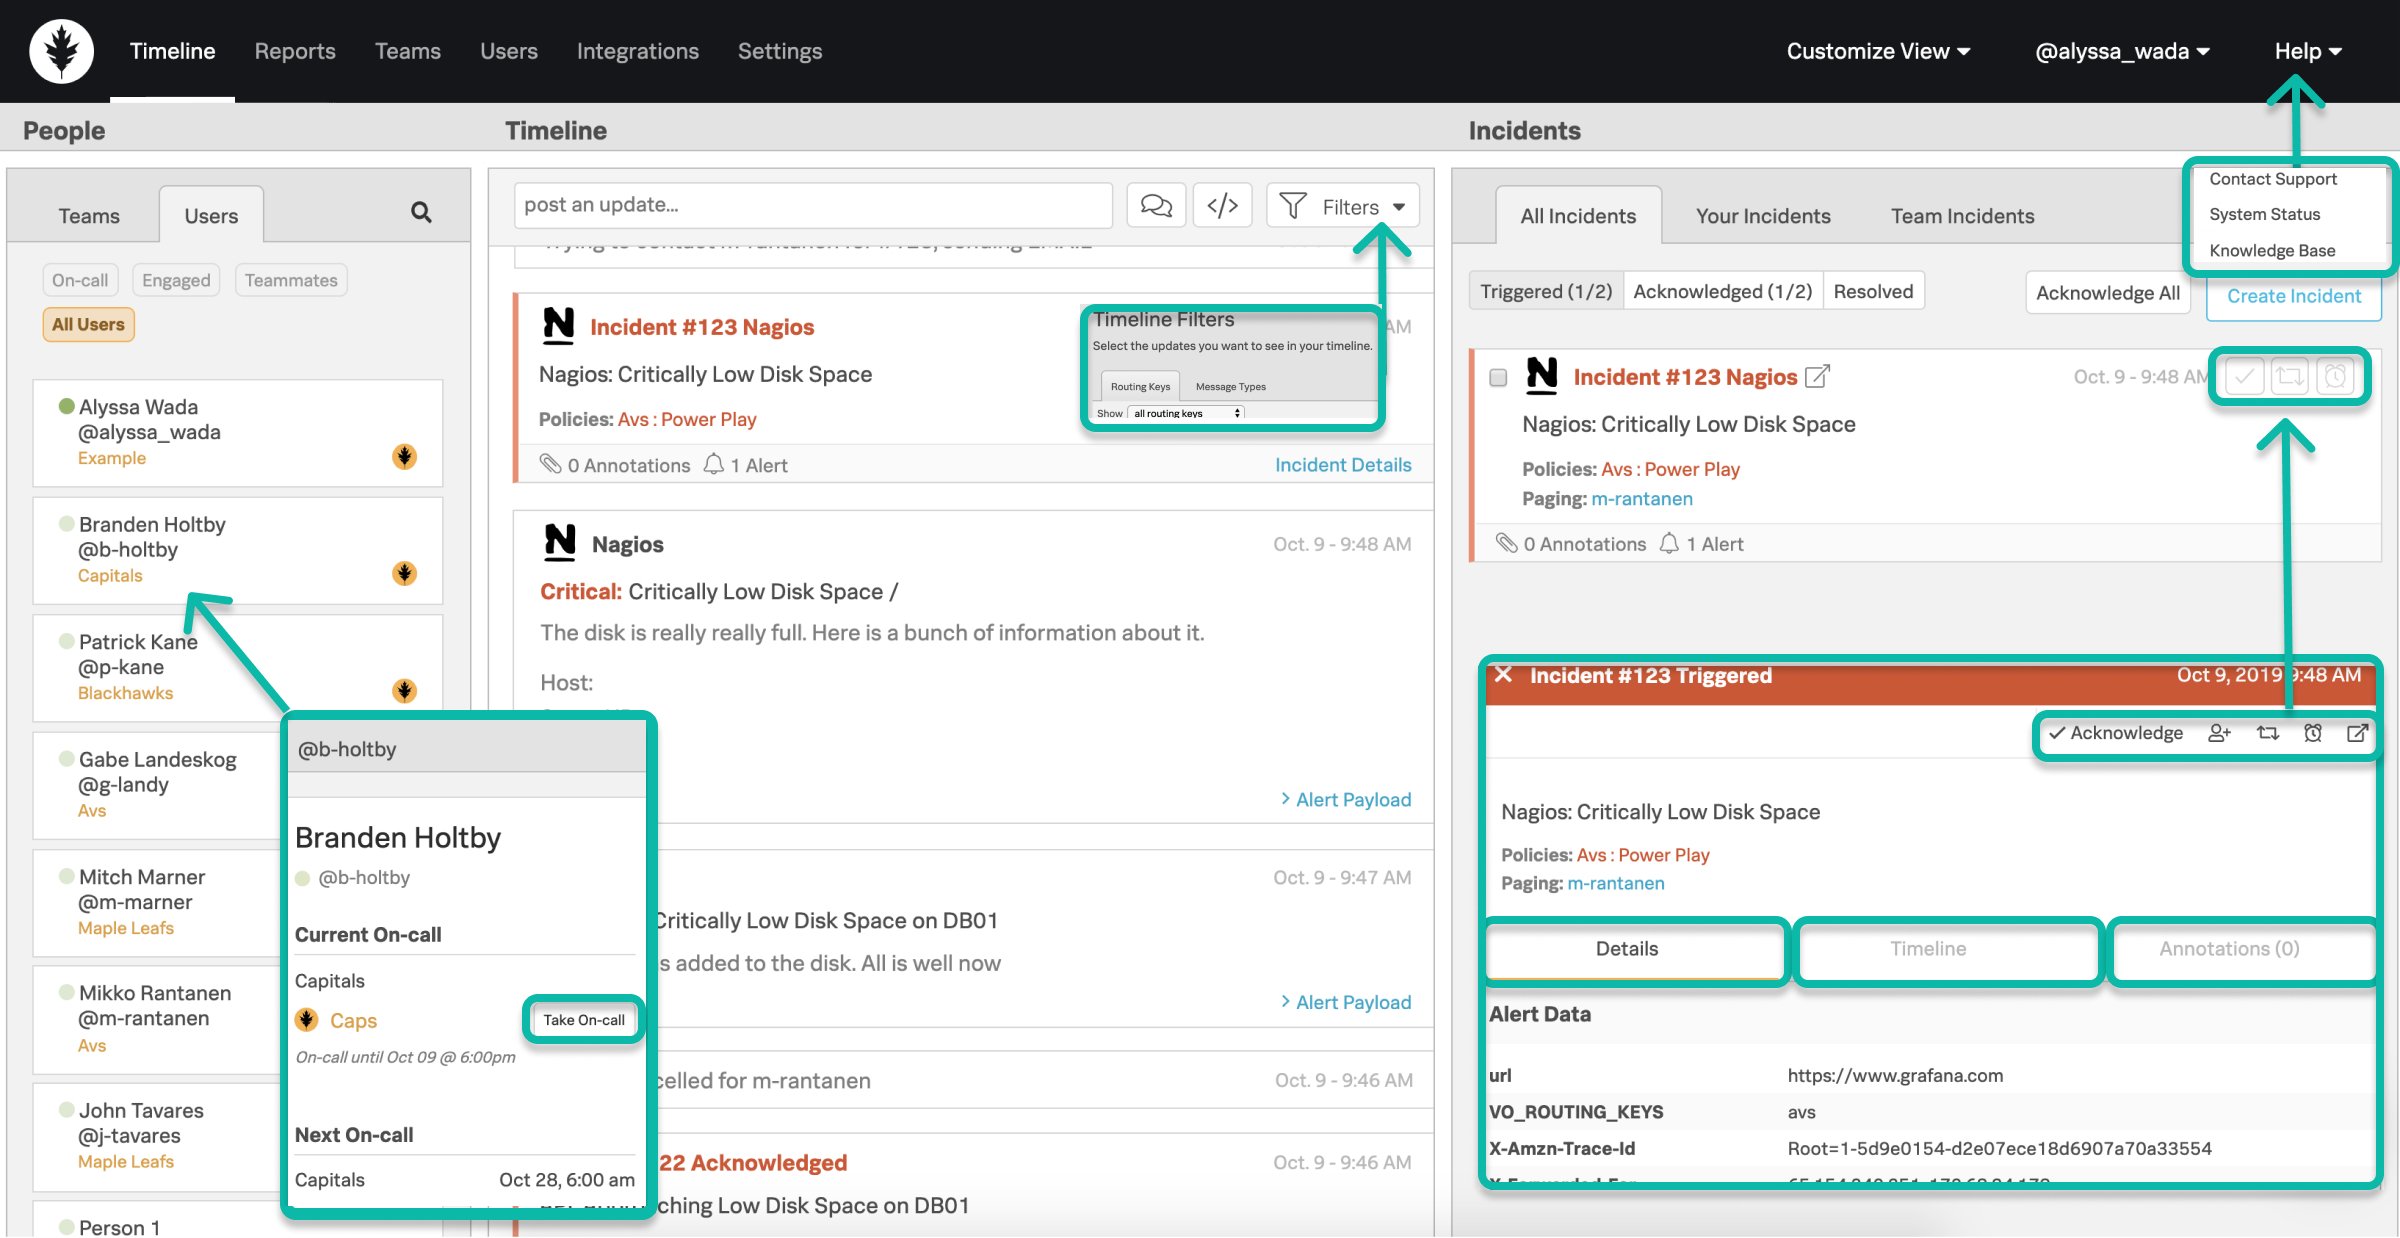
Incident Actions
Different scenarios require different actions when dealing with an incident.
- Acknowledgment – can be executed via Push, SMS, or Phone notification & within the web/mobile clients. Will cease paging and assign you to the incident.
- Snooze – can be executed within the web/mobile clients. Will cease paging of an incident for a defined time period. When the time period is reached, the incident will then be retriggered and begin paging out again.
- Reroute – can be executed within the web/mobile clients. Redirects an incident to a user(s) or escalation policy(s).
- Resolve – can be executed via Push, SMS, or Phone notification & within the web/mobile clients. Will end the incident as being complete – no further action needed.
Processing Incidents in Splunk On-Call
How to find the right incident information:
- Details/Payload – contains preconfigured alert data from your monitoring tools related to the incident.
- Incident Specific Timeline – captures all Splunk On-Call events related to the incident.
- Annotations – additional context added by the Rules Engine rules you’ve setup. Can annotate links, notes, and images to be delivered in hand with the alert payload.
On-call Awareness
- When am I on-call? – your user card within the People Pane will display your current and upcoming on-call shift information. Your profile also contains an on-call calendar export link for 3rd party calendars.
- Who else is on-call with me? – the Splunk On-Call oak leaf icon on a user card in the People Pane denotes a person as being on-call currently.
- Team’s Schedule – your team’s schedule can be found in the Settings page and by selecting the dropdown icon in line with your team.
- Escalation Policy Awareness – when on-call, it is important to know how your team’s escalation policies are structured and who exactly an incident may escalate to and when if you do not respond. You can find these within each team.
Coverage Activities
- Scheduled Overrides – allow users to request on-call coverage for any planned absence.
- Manual Take On-Call – take someone’s on-call shift one-off — on-call personnel change in real time.
How does an incident get to me?