The Splunk On-Call and Webex Teams integration allows you to surface incidents from your Splunk On-Call account in Webex Teams, notifying you where you’re already working and reducing tool switching during firefights.
- Enterprise level Splunk On-Call Account and Global or Alert Admin permissions
- Webex Teams Account and Moderator permissions
In Webex Teams
To start, navigate to the Incoming Webhooks app on the Webex App Hub and click the green Connect button. Authenticate as required, then click Accept.
Occasionally, this opens a new Webex tab that spins incessantly. Disregard this, navigate back to the Incoming Webhooks app tab, and refresh. The green Connect button should be replaced with a Disconnect button and towards the bottom of the screen, you’ll be prompted to provide a Webhook name and to select a Space for the webhook.
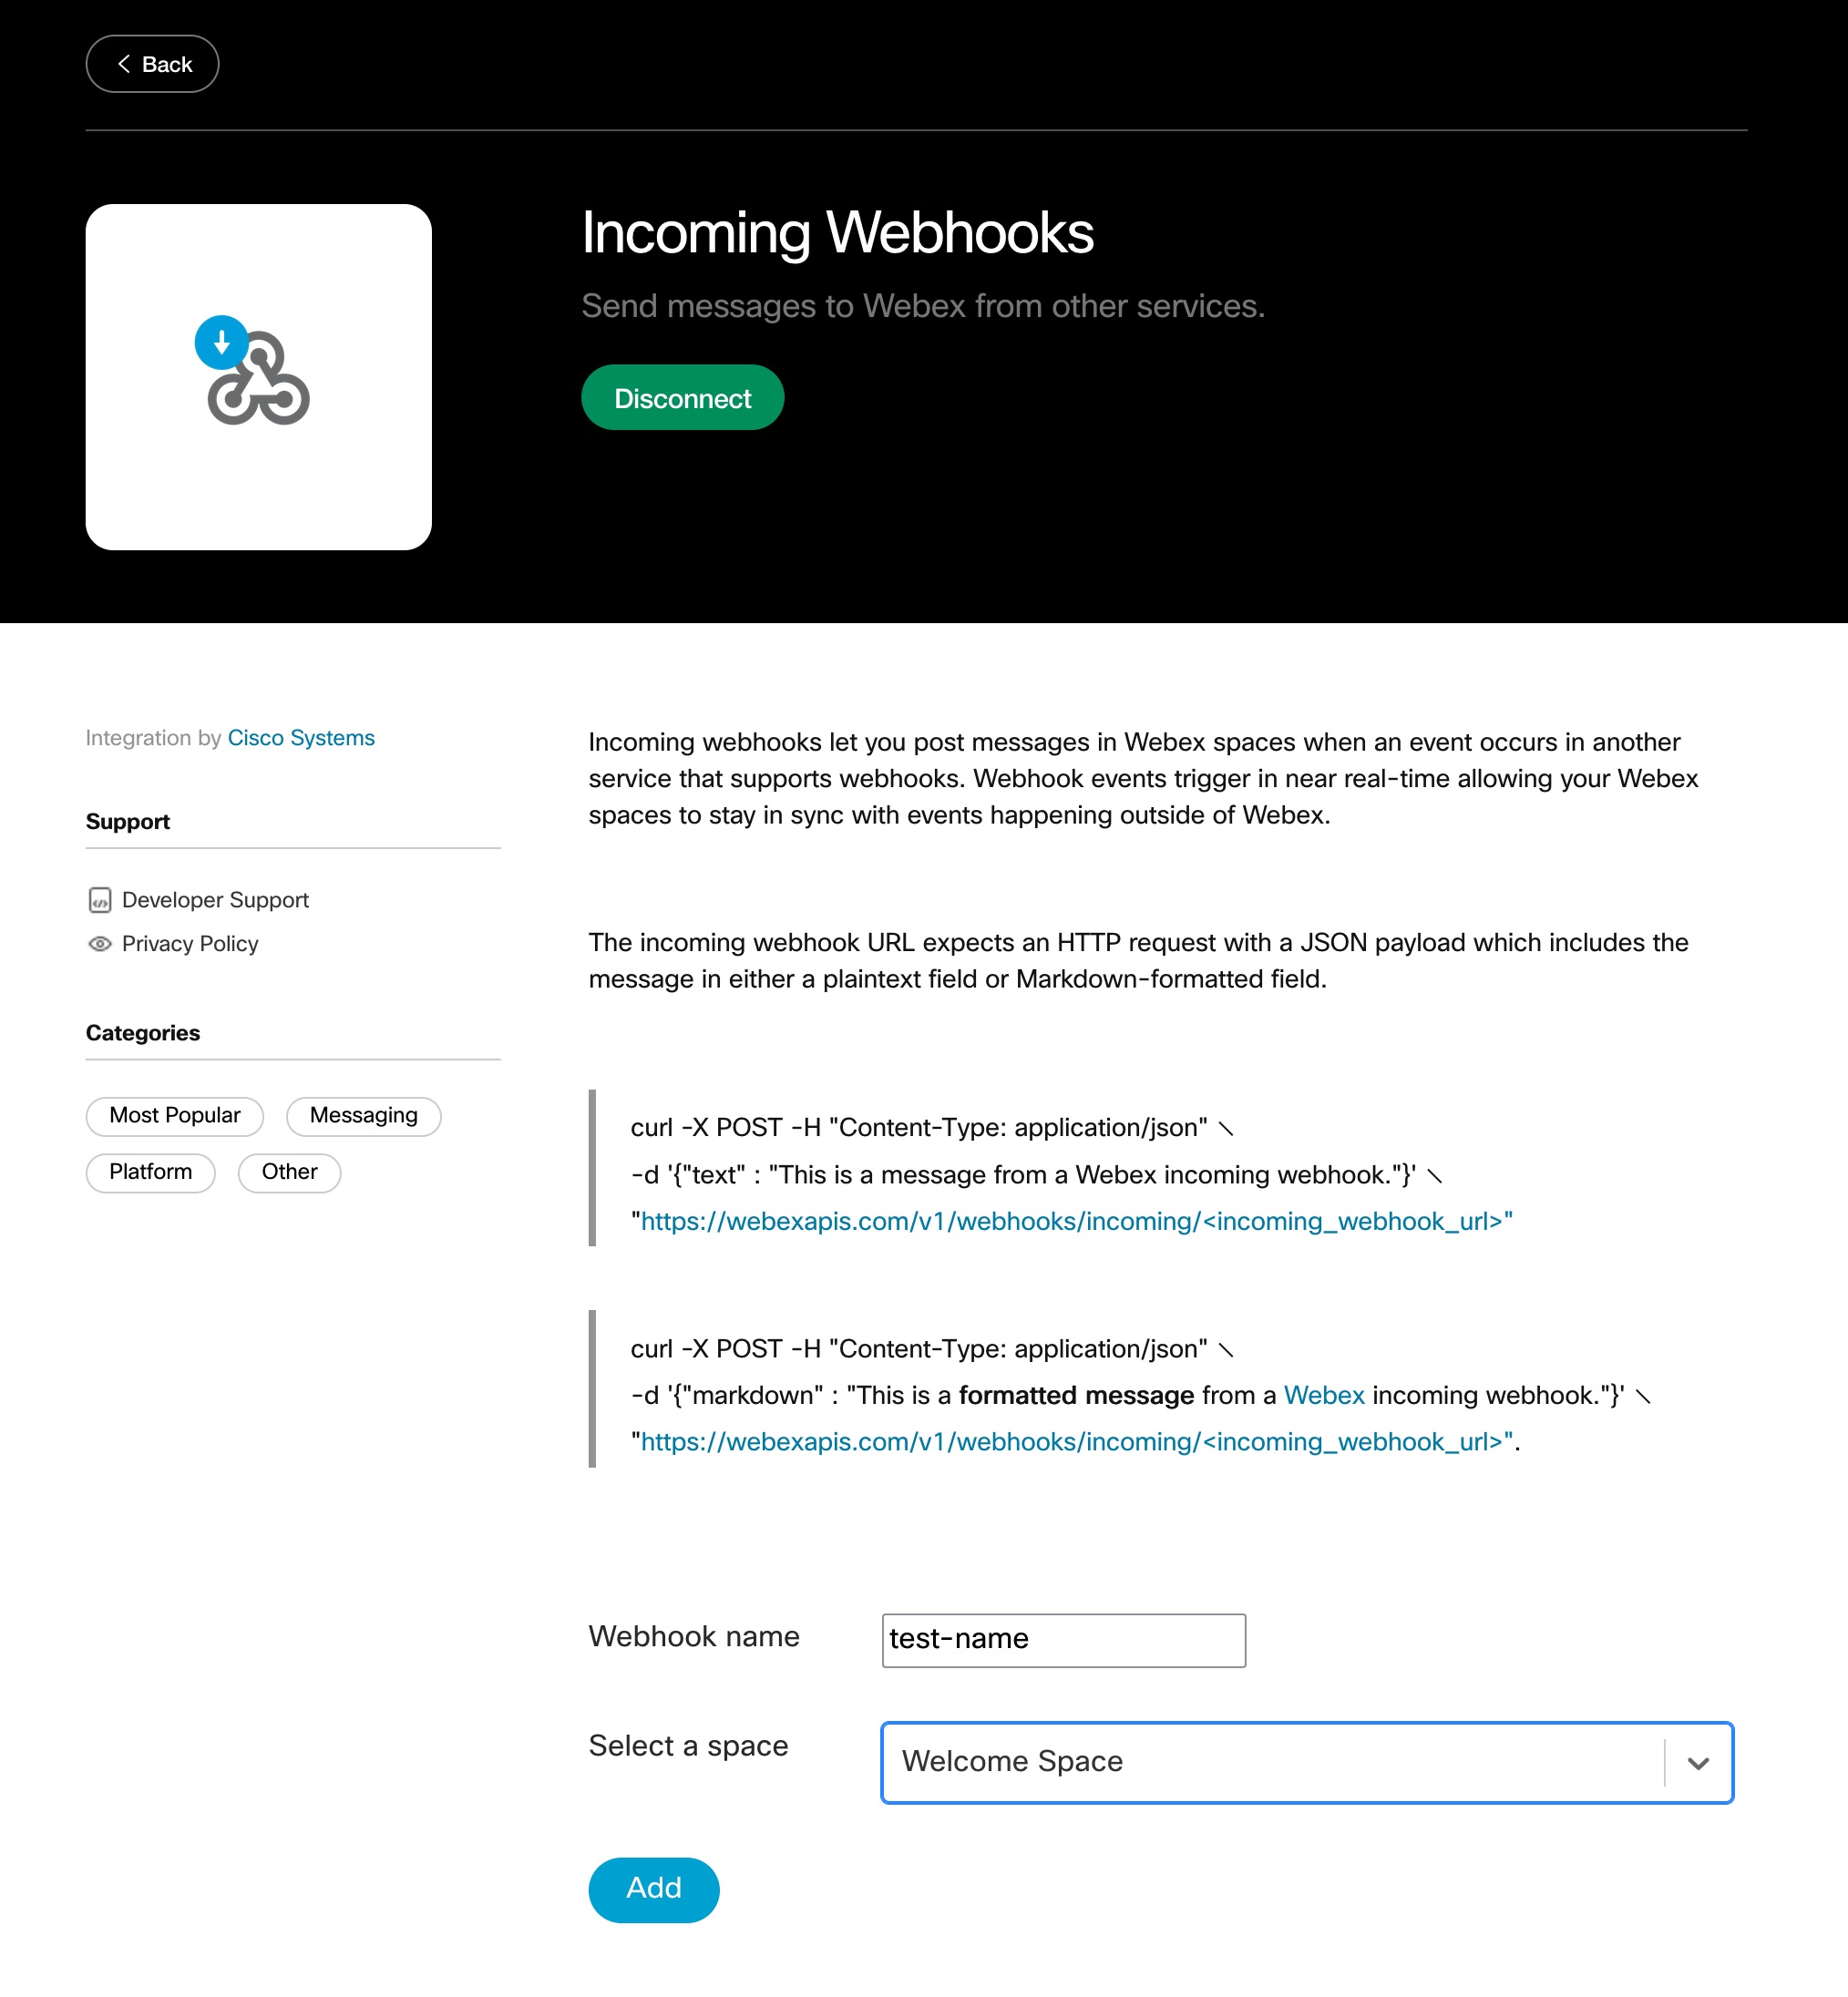
After providing these, click the Add button and copy the Webhook URL to your clipboard.
In Splunk On-Call
Navigate to Integrations >> Outgoing Webhooks and click the blue Add Webhook button to create a new one.
Below are our suggested values for the webhook:
Event: Incident-Triggered
Method: POST
Content Type: application/json
Custom Headers: none
To: <your Webhook URL copied from Webex>
Payload:
{
"markdown": "${{ALERT.entity_display_name}}<br>${{ALERT.state_message}}"
}
Lastly, click Save. An Outgoing Webhook will now be sent to your Webex Teams space when an incident is triggered in Splunk On-Call.
[Optional] Only send a notification to Webex for alerts directed to a specific routing key
With some configuration adjustments, it’s possible to reduce the scope of the Outgoing Webhook so that it only successfully posts a message in Webex Teams when your specified routing key is present in the Splunk On-Call incident.
To start, navigate back to the Outgoing Webhook you created under Integrations >> Outgoing Webhooks and edit the webhook. Navigate to the To field and highlight the portion following
https://webexapis.com/v1/webhooks/incoming/
It should be a random string looking something like Y2lzY29zcGFyazovL3VybjpURUFNOnVzLXdlc3QtMl9yL1dFQkhPT0svNTZhZDEzZmMtNWQyNi00YTA3LWI5OTgtNjJiNmQwZTc2NWNm.
Copy this random string to your clipboard and replace it with ${{ALERT.webexteams-field}}. The full URL should now look like
https://webexapis.com/v1/webhooks/incoming/${{ALERT.webexteams-field}}
Save your changes.
Next, navigate to the Alert Rules Engine under Settings >> Alert Rules Engine and click the blue Add Rule button.
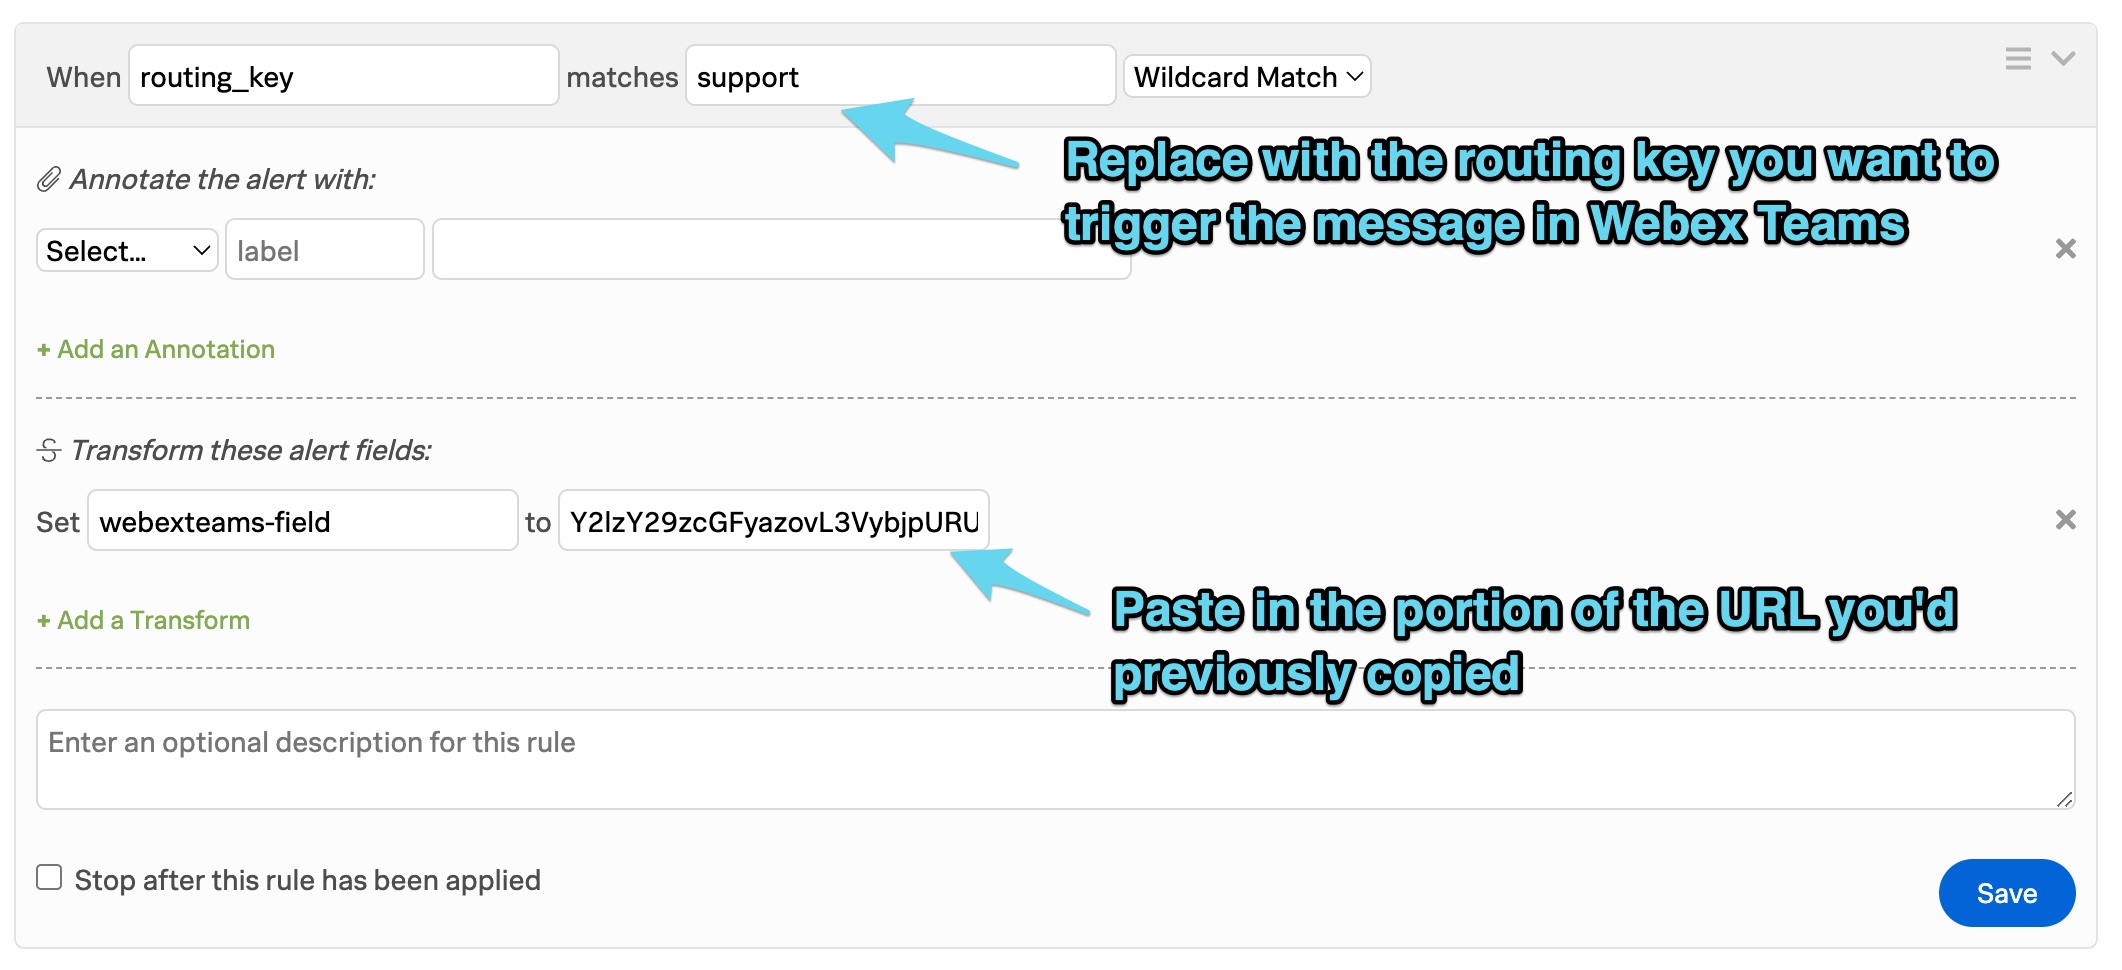
In the top line, specify the routing_key you’d like to have trigger the message in Webex Teams. Next, skip down to the Transform these alert fields section and set the webexteams-field to the portion of the URL you copied earlier. The resulting rule should look similar to the below screenshot.
Click the blue Save button to save the rule. This optional configuration is now complete.
When the routing key you’ve specified is present on an alert, this alert rule will apply and create a field called webexteams-field with a value of the URL portion you pasted in. This webexteams-field value is then dynamically pulled in on the Outgoing Webhook, completing the URL and giving it a valid destination to send to. For all alerts that don’t contain this routing key, the webhook will be attempted and will fail as it will be directed to a URL of literally https://webexapis.com/v1/webhooks/incoming/${{ALERT.webexteams-field}}.
[Optional] Segment notifications to different Webex Teams spaces based on the routing key of the alert
This largely builds off of the previous “[Optional] Only send a notification to Webex for alerts directed to a specific routing key” section. This takes it a step further and walks through the creation of multiple Incoming Webhooks in Webex Teams that direct to different spaces.
To start, navigate back to the Incoming Webhooks page on the Webex App Hub. Provide a new webhook name, specify the space you want this to sent to, and click Add. Copy the resulting Webhook URL to your clipboard.
You can now scroll back up to the In Splunk On-Call section and resume following the instructions from there. You will complete both that and the [Optional] Only send a notification to Webex for alerts directed to a specific routing key section again, specifying the different routing key you’d like to send your Webex Space. Repeat these steps as necessary for all of the routing keys and spaces you’d like to integrate with.