Versions Supported: On Premise and SaaS versions
VictorOps Version Required: Starter, Growth, or Enterprise
AppDynamics focuses on managing the performance and availability of applications across cloud computing environments as well as inside the data center.
The AppDynamics integration with Splunk On-Call allows AppDynamic users to utilize Splunk On-Call as an “Alerting Extension” within AppDynamics. The “Alerting Extension” enables AppDynamics to post events and custom alerts into the Splunk On-Call Timeline. The payload of the alert includes valuable information related to the alert including a link to AppDynamics for a thorough diagnosis of the event.
On Premise Version
In Splunk On-Call
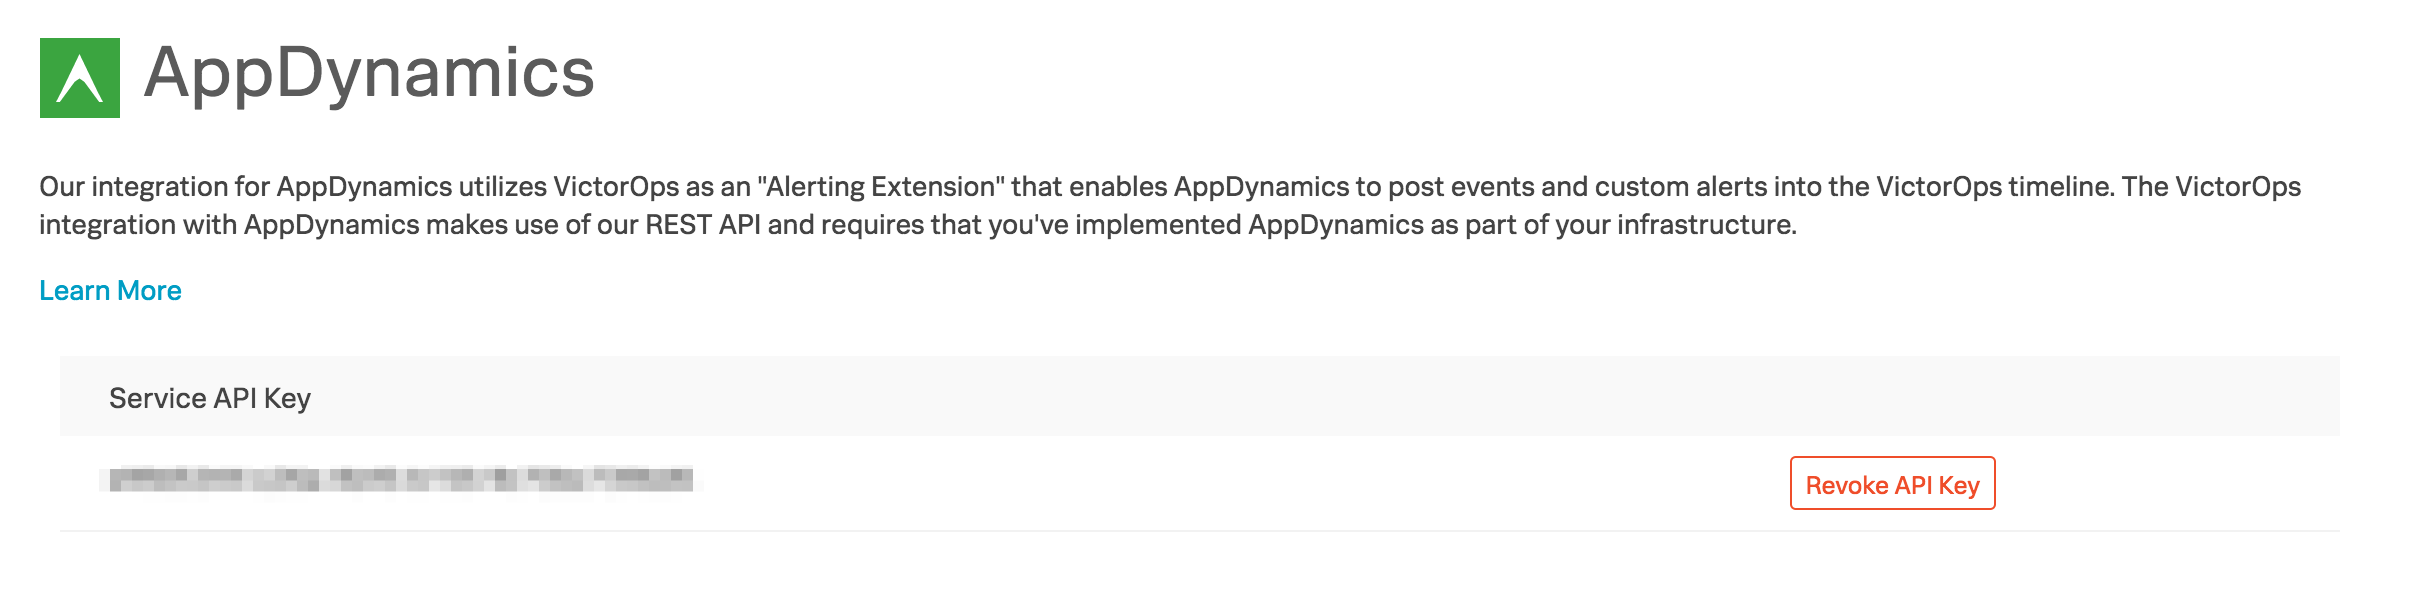
Navigate to the AppDynamics integration page by visiting Integrations >> AppDynamics.
If the integration has not yet been enabled, click the Enable Integration button. Copy the “Service API Key” to your clipboard.

In AppDynamics
- Download the VictorOps Alerting Extension zip from [AppDynamics Exchange]
- Unzip the victorops-alert.zip file into <CONTROLLER_HOME_DIR>/custom/actions/ . You should have <CONTROLLER_HOME_DIR>/custom/actions/victorops-alert created.
- Check if you have custom.xml file in <CONTROLLER_HOME_DIR>/custom/actions/ directory. If yes, add the following xml to the <custom-actions> element
1
2
3
4
5
victorops-alert <!-- For Linux/Unix *.sh --> victorops-alert.sh <!-- For windows *.bat --> <!--<executable>victorops-alert.bat</executable>-->If you don’t have custom.xml already, create one with the below xml content:
<custom-actions>1 2 3 4 5
victorops-alert <!-- For Linux/Unix *.sh --> victorops-alert.sh <!-- For windows *.bat --> <!-- victorops-alert.bat --> - Update the config.yaml file in <CONTROLLER_HOME_DIR>/custom/actions/victorops-alert
1 2 3 4 5 6 7 8 9 10 11 12 13 14 15 16 17 18 19 20 21
#VictorOps Org Key
voOrganizationKey: "YOUR_SERVICE_API_KEY_HERE"

#VictorOps Routing Key
voRoutingKey: "YOUR_ROUTING_KEY_HERE"

#scheme used (http/https)
protocol: "https"

#VictorOps host
voAlertHost: "alert.victorops.com"

#VictorOps url path
voAlertUrlPath: "/integrations/generic/20131114/alert"

#http timeouts
connectTimeout: 10000
socketTimeout: 10000

#control level of details in VO alert
showDetails: false
- Installing Custom Actions:
To create a Custom Action, first refer to the following topics in the AppDynamics docs:Now you are ready to use this extension as a custom action. In the AppDynamics UI, go to Alert & Respond ⇨ Actions. Click Create Action. Select Custom Action and click OK. In the drop-down menu, you can find the action called ‘victorops-alert’.
SaaS Version
AppDynamics gives you real-time insight from your apps using Application Performance Management–how they’re being used, how they’re performing, where they need help. The following guide will walk you through the Splunk On-Call integration with the AppDynamics SaaS-based model, if you are using the hosted solution please see the documentation here: AppDynamics Integration.
In Splunk On-Call
Navigate to the AppDynamics integration page by visiting Integrations >> AppDynamics.
If the integration has not yet been enabled, click the Enable Integration button. Copy the Service API Key to your clipboard.
In AppDynamics
From the main web portal select Alert & Respond then HTTP Request Templates and then New.
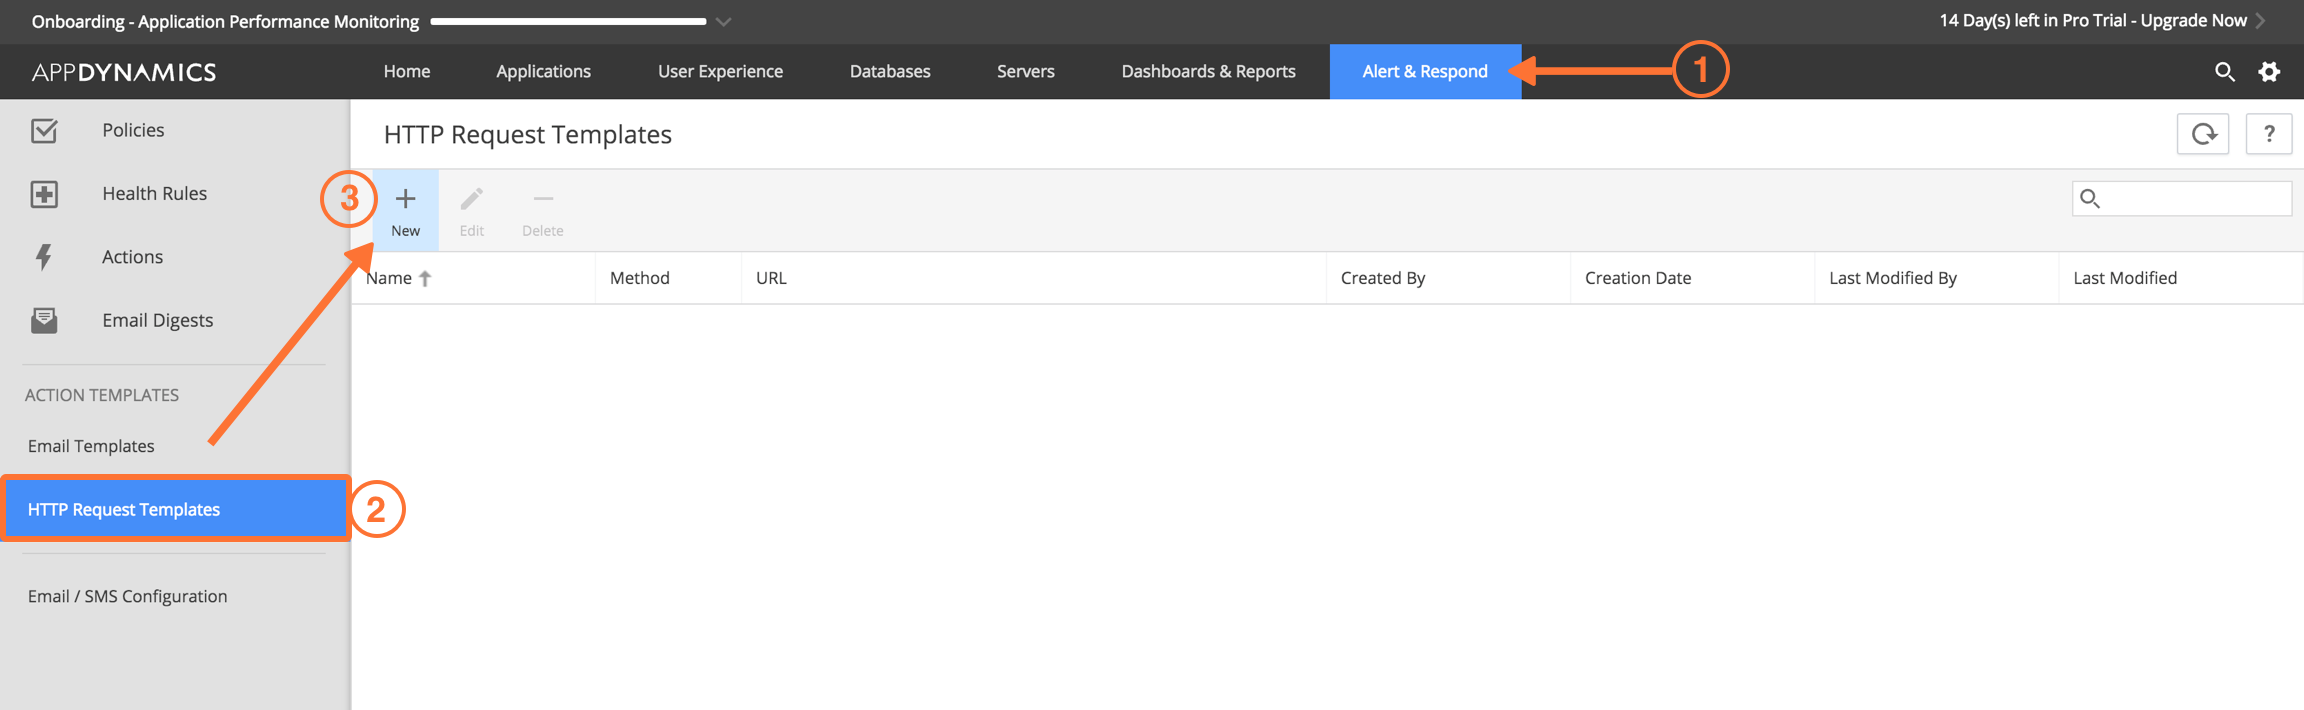
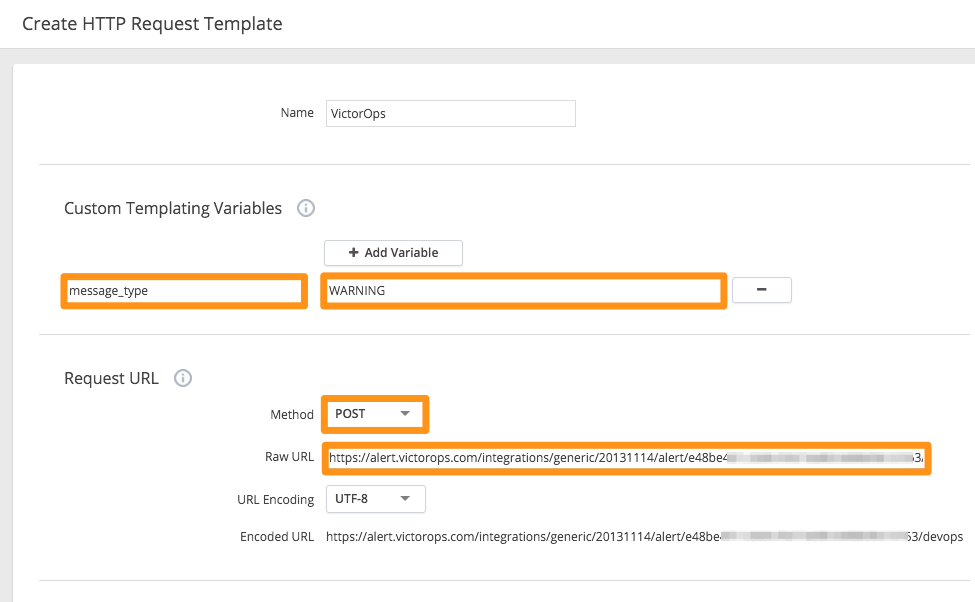
Give the Template a name (Splunk On-Call Test in below example).
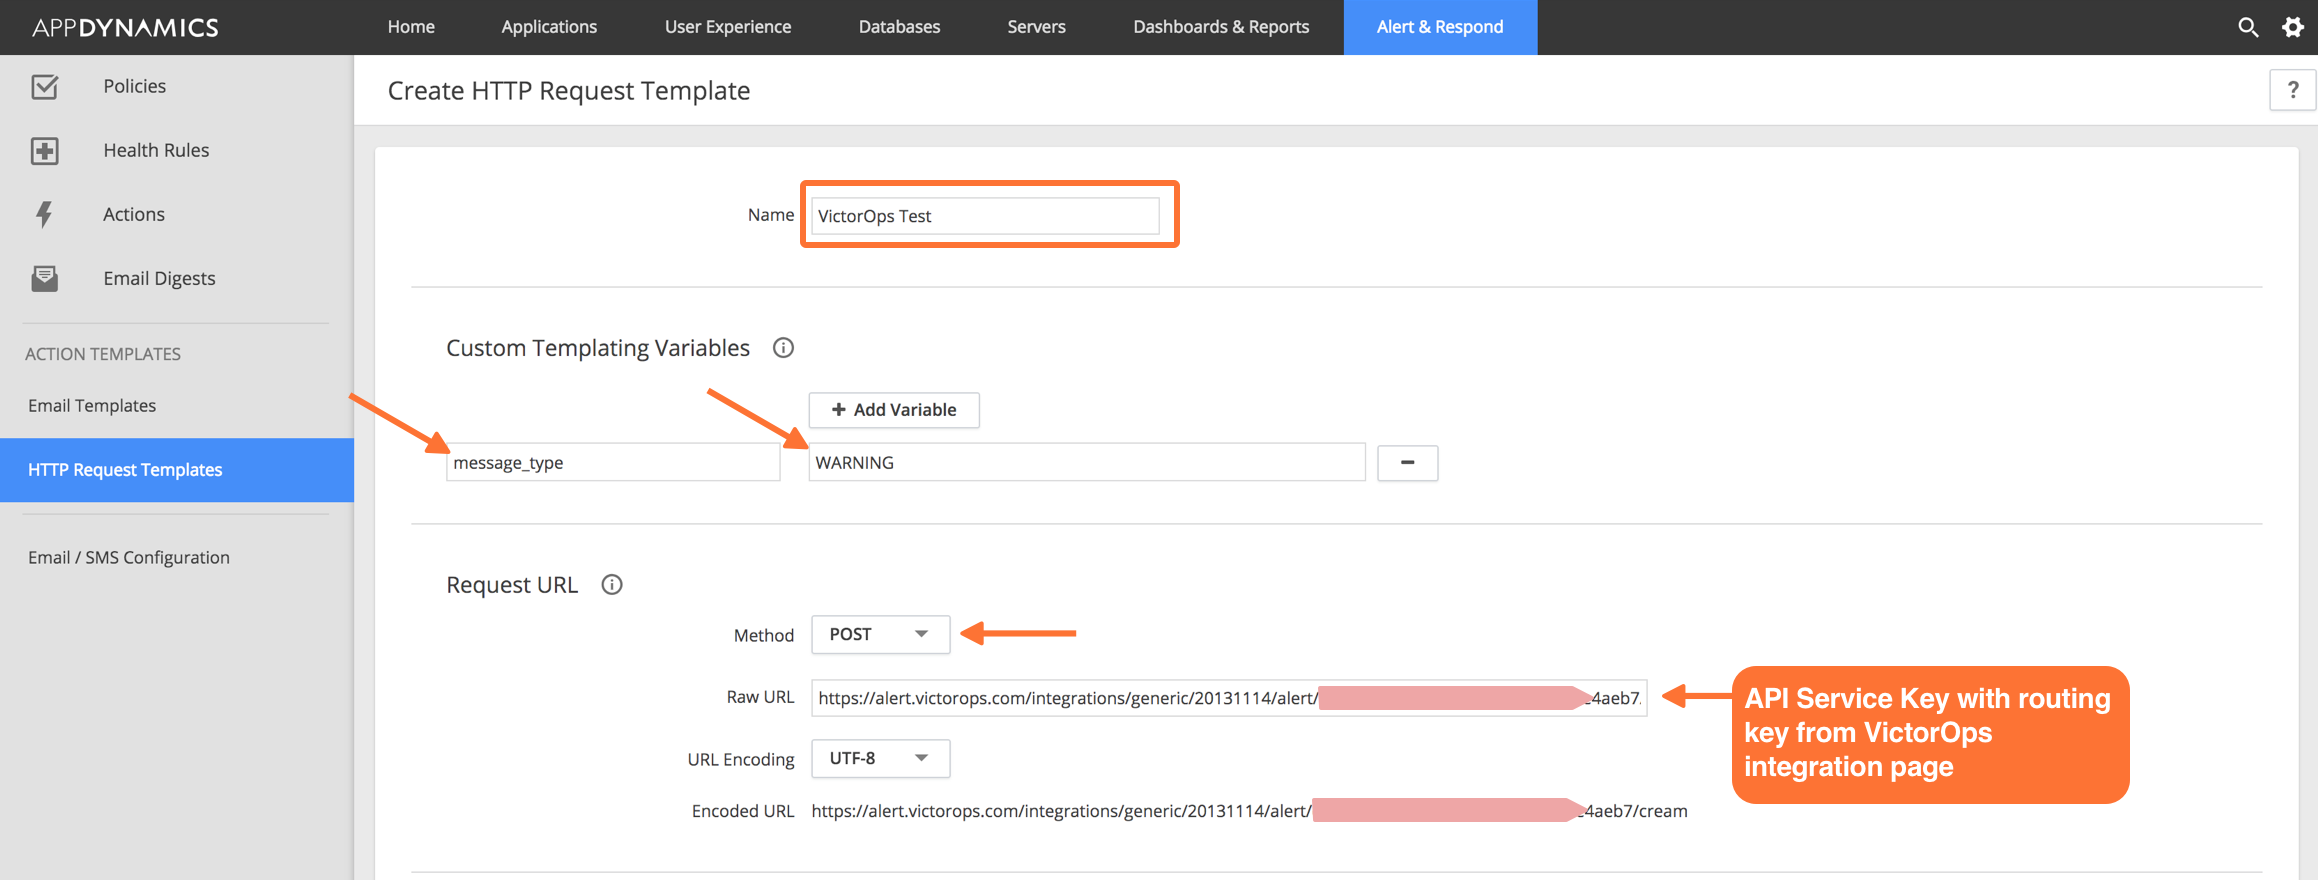
Set a Custom Templating Variable with a field name of message_type and a value of WARNING.
Under Request URL set the Method to POST.
Paste in your Splunk On-Call Service API Key into the box labeled Raw URL using the following format: https://alert.victorops.com/integrations/generic/20131114/alert/YOUR_SERVICE_API_KEY_HERE/YOUR_ROUTING_KEY_HERE
Example: (Assuming a routing_key value of “app-monitoring”) https://alert.victorops.com/integrations/generic/20131114/alert/<api-key-here>/app-monitoring
No custom headers are required.
Under Payload select the MIME Type of application/json.
Paste the following payload into the box in AppDynamics:
#foreach(${eventList} in ${fullEventsByTypeMap.values()})

  #foreach(${event} in ${eventList})

    #if ($event.eventType == "POLICY_OPEN_CRITICAL")

          #set ( $message_type = "CRITICAL" )

    #elseif ($event.eventType == "POLICY_UPGRADED")

          #set ( $message_type = "CRITICAL" )

    #elseif ($event.eventType == "ERROR")

          #set ( $message_type = "CRITICAL" )

    #elseif ($event.eventType == "APPLICATION_ERROR")

          #set ( $message_type = "CRITICAL" )

    #elseif ($event.eventType == "POLICY_CLOSE_WARNING")

          #set ( $message_type = "RECOVERY" )

    #elseif ($event.eventType == "POLICY_CLOSE_CRITICAL")

         #set ( $message_type = "RECOVERY" )

    #elseif ($event.eventType == "POLICY_CANCELED_CRITICAL")

         #set ( $message_type = "RECOVERY" )

    #else

          #set ( $message_type = "WARNING" )

    #end

{

    "message_type":"${message_type}",

    "entity_id":"${latestEvent.incident.id}",

    "state_message":"${event.eventMessage}",

    "alert_url":"${event.deepLink}",

    "ad_event_type":"${event.eventType}",

    "monitoring_tool":"AppDynamics"

}

  #end

#end
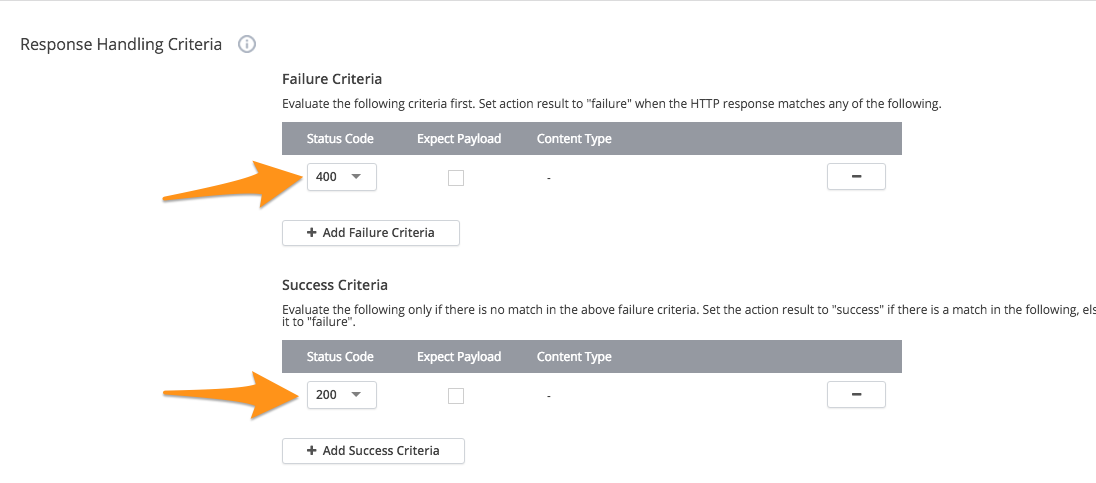
Under Response Handling Criteria set the Failure Criteria status code to 400 and the Success Criteria status code to 200.
Make sure to uncheck the box for Expected Payload for both items.
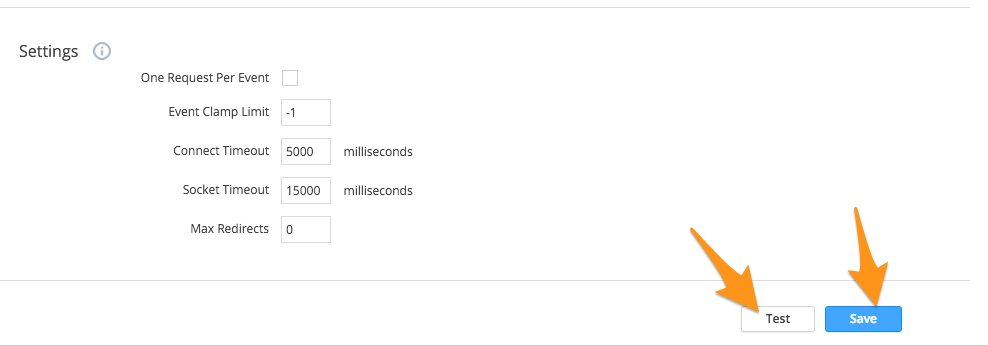
At the bottom of the page, make any changes to the settings you would like and then select Save and Test.
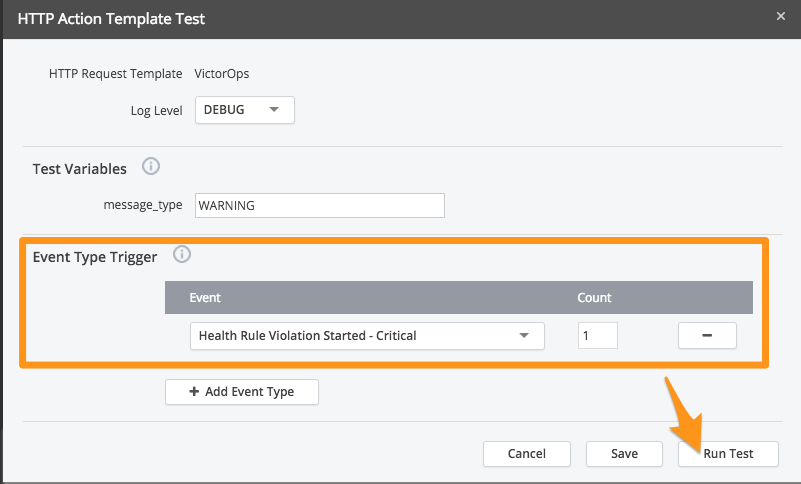
When testing, add an Event Type Trigger with a count of 1 and hit Run Test.
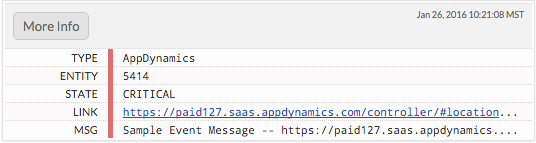
Check your VictorOps timeline to make sure you get the associated alert.
You can now use the VictorOps HTTP Request Template with any of your alerts in AppDynamics. If you have any questions please contact us at support.