Connect Splunk On-Call to the tool of your choice using our custom outgoing webhooks. Splunk On-Calls outbound webhooks can ‘subscribe’ to a number of different Splunk On-Call actions such as incidents or chats. The webhook URL, method, content type, and payload are all configurable. Splunk On-Calls ‘variables’ can be used as part of the payload so that the information being sent to third-party systems is dynamic. The following will walk you through setting up your first outbound webhook.
Please note: The Splunk On-Call Outgoing Webhooks are an Enterprise service level feature and require admin credentials to view and modify.
Getting Started
From the Splunk On-Call timeline go to Integrations >> Outgoing Webhooks. Select Add Webhook.
Event Types
The different event types are as follows:
| Subscription Name | Subscription Description |
|---|---|
| All-Chats | Webhook will fire anytime any chat is placed into the main timeline. This includes all incident chats and any chat entered from a third party chat integration. |
| Any-Incident | Webhook will fire anytime any incident is created, acknowledged and resolved. |
| Any-On-Call | Webhook will fire anytime there is any form of on-call change, both going on-call and going off-call. |
| Any-Paging | Webhook will fire anytime any user starts or stops being paged. |
| Incident-Acknowledged | Webhook will fire anytime any user or system acknowledges an incident. |
| Incident-Chats | Webhook will fire anytime any chat is entered into a specific incident. |
| Incident-Resolved | Webhook will fire anytime any user or system resolves an incident. |
| Incident-Triggered | Webhook will fire anytime any user or system triggers an incident. |
| Off-Call | Webhook will fire anytime any user goes off-call. |
| On-Call | Webhook will fire anytime any user goes on-call. |
| Paging-Start | Webhook will fire anytime any user starts being paged. |
| Paging-Stop | Webhook will fire anytime any user stops being paged. |
Suggested Variables
The example variables for each “Event” will populate on the right side of the screen. Please note: although the variables are listed as Available they are, in fact, only suggestions and may be customized to fit your needs.
Custom Headers
To add a Custom Header to your webhook select + Add Custom Header within the new webhook.
Then configure the rest of your webhook and save the webhook. (Note: This can take up to 10 minutes for the caching to “clear”).
Request Types
Next, select the appropriate method for your webhook. The available options are:
- GET
- POST
- PUT
- DELETE
- PATCH
Enter the appropriate ‘Content Type’ for your webhook, application/json for example.
Place your endpoint URL that you want to receive these notifications in the ‘To’ field.
Splunk On-Call parses all URL’s for basic authentication, so if your endpoint requires basic auth you can add it to the URL like so:
http://username:password@example.com/
or
http://username:api_key@example.com/
The last step is to construct your Payload. If you plan to use one of the available variables as part of your payload make sure to wrap them with ${{variable_name}}. For example, if you want to include the number of alerts in an incident you could add the following variable: ${{STATE.ALERT_COUNT}}. Other fields specific to the incident can also be used, for example, ${{ALERT.field_name}}.
Finally, hit Save and you are done.
Conditionally Fire Webhooks
By combining outgoing webhooks with the power of the Alert Rules Engine, you can set up rules to have them only fire when a desired condition is met.
To start, you’ll navigate to the Alert Rules Engine under Settings >> Alert Rules Engine.
From here, you’ll select “+ Add a Rule” and define your particular Matching Condition for the rule (the condition you want the webhook fired on). In this example, we’ll be doing when the state_message contains the phrase “escalate to dev” anywhere in it.
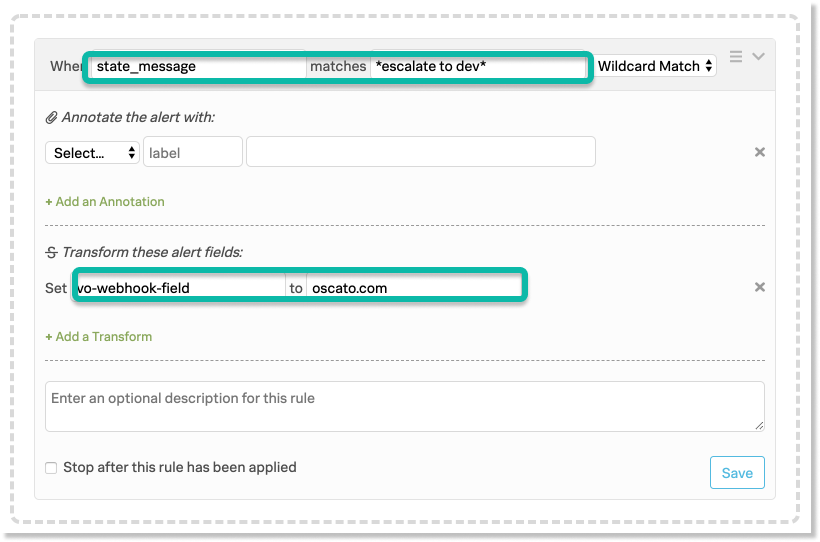
In the “Transform these alert fields” portion, we’ll create a new field called “vo-webhook-field” and populate it with part of the destination URL you’re sending the webhook to.
In this example, the full destination URL we’re hoping to send to is “https://dev.oscato.com/2tn6xfh” so we’ll put “oscato.com” as the vo-webhook-field value.
Next, you’ll navigate to Outgoing Webhooks under Integrations >> Outgoing Webhooks. Select Add Webhook.
Here, select the Event you want the webhook to fire on in addition to the Method and Content Type you want for it.
In the “To:” field, you’ll paste in your destination URL while replacing the part you’d pasted in the Rules Engine rule with ${{ALERT.vo-webhook-field}}.
In this example, the full destination URL we want the webhook to go to is “https://dev.oscato.com/2tn6xfh” and we’d put “oscato.com” in the Rules Engine rule, so the complete “To:” URL will be “https://dev.${{ALERT.vo-webhook-field}}/2tn6xfh”
This will make it so that the URL is only complete (thus allowing the webhook to successfully fire) when the “vo-webhook-field” is present, which will only be present when the Rules Engine matching condition is met.
Fill out the Payload information with the desired fields you want included in the webhook, add an optional description, and you’re all set with a conditionally firing webhook!