About Jira and Splunk On-Call
The Splunk On-Call and Jira integration helps with project and ticket tracking while centralizing incident information in Splunk On-Call. Depending on how your organization is using Jira, an issue could represent a software bug, a project task, a helpdesk ticket, a leave request form, etc. The Splunk On-Call and Jira integration works in two ways: 1) The Jira integration allows you to create a new Jira ticket for any incident that comes into Splunk On-Call. 2) You can create Splunk On-Call incidents whenever a new issue is created, or content is added to a Jira ticket.
Splunk On-Call and Jira: Flexible Project and Ticket Tracking for Software Teams
- Create new Jira tickets for incidents that comes into Splunk On-Call
- Integrate Jira issues with every Splunk On-Call incident by adding the Jira email address to the first step of that team’s escalation policy
- Create Splunk On-Call incidents whenever a new issue is added to your Jira project.
- The Splunk On-Call and Jira integration empowers continuous delivery and site reliability through detailed project tracking in both Jira and Splunk On-Call
This integration provides a wide range of customizable configuration options, so there is not just one way to set this up. This guide aims to provide you with all the tools you will need to setup this integration to fit your workflows.
Jira Webhook Integration Guide
Using Jira Webhooks allows you to set up webhooks for automatically sending
data from Jira to On-Call. According to your settings, this will create, update, and
resolve On-call incidents as the Jira state changes. Communication from On-
Call to Jira is not included here, and will need to be set up with a combination of Custom Outgoing Webhooks and Alert Rules in On-Call as described below.
Getting Started
From the Splunk On-Call web portal navigate to Integrations >> 3rd Party Integrations >> Jira (webhook) and click Enable Integration. Copy your Service API Endpoint to the clipboard to be used later in future steps. Replace the $routing_key with whichever routing key is desired (leaving it blank will route to the default routing key in Splunk On-Call).
In Jira (Webhook Integration)
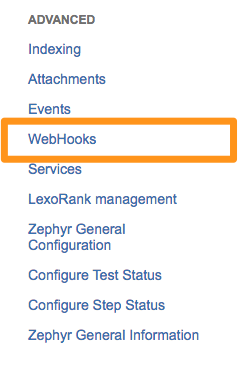
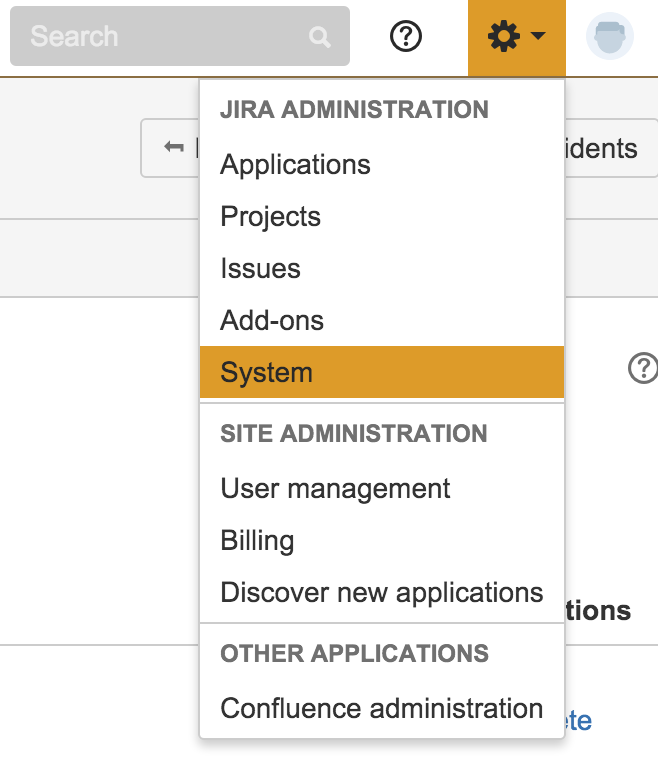
From the main web interface, select the cog in the upper right hand corner and then System.

In the left side bar under “Advanced” select WebHooks.
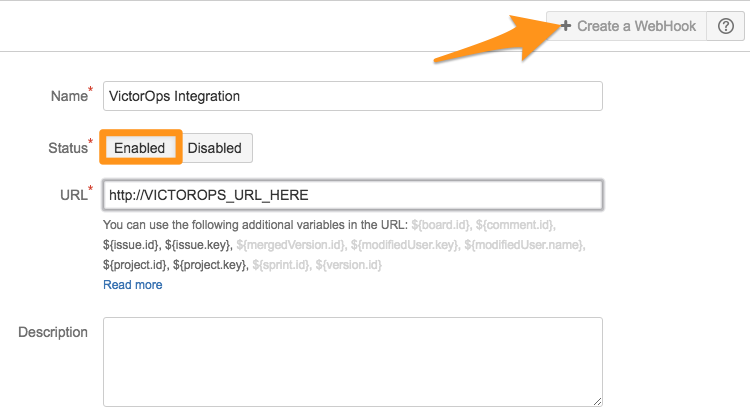
Select + Create a Webhook. Give the WebHook a name, set the status to Enabled, and paste in the VictorOps JIRA URL.
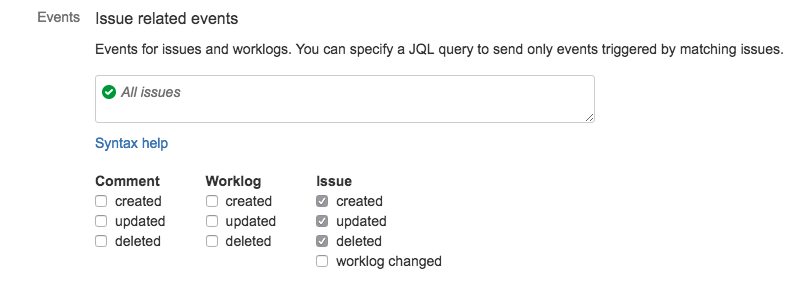
You will then have the options to use specific JQL queries to send only certain issues.
Next select the events you would like to send to Splunk On-Call for. In our example we have chosen to send a webhook whenever an “Issue” is created, updated or deleted.
Finally un-check the “Exclude body” check box so that JIRA sends JSON, and click Create.
Now when an issue is created in JIRA, a CRITICAL incident will be created in Splunk On-Call and any updates will be sent to the timeline as an alert associated to that incident (including info messages when a comment is added). When the issue is resolved or deleted in JIRA, the incident will be resolved in Splunk On-Call. That is the out of the box functionality. Any additional functionality you desire can be accomplished through the use of custom fields and the Rules Engine.
In Splunk On-Call (Webhook Integration)
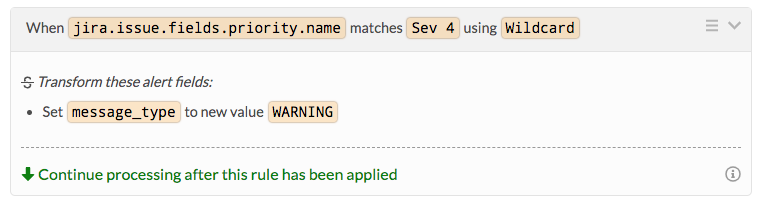
Now that webhooks are being sent from JIRA, we have a number of options on how we can manipulate those into different types of alerts and update JIRA issues based on actions in Splunk On-Call. We will start with using the Rules Engine to create a simple rule. For example you may want to adjust the severity level of an alert based on the priority that was set in JIRA or the jira.issue.fields.priority.name. Let’s say for all JIRA issues with a priority of Sev 4 you want to make those WARNING alerts in Splunk On-Call. The rule would look something like:
Sending Splunk On-Call Information to Jira
This is not a built-in integration, but rather a way to send communication to Jira from On-Call with Custom Outgoing Webhooks. This method can be used without Jira Webhooks to create new Jira issues, or while using Jira Webhooks to add assignees to an existing Jira issue and add comments to a Jira ticket based on incident chat activity.
Please note that actions like creating Jira issues from On-Call while Jira Webhooks are enabled, and updating an existing Jira ticket status based on the corresponding On-Call incident actions are part of a larger bidirectional configuration that will require a degree of initial customer set-up using Jira Webhooks, Custom Outgoing Webhooks, and the Alert Rules Engine. For assistance on setting up a bidirectional integration with Jira and Splunk On-Call, contact Splunk On-Call Support.
Important Notes
- In order to authenticate your On-Call Outgoing webhooks, we suggest creating/using a service user account in Jira to avoid any authentication breaking in the event that the user who set things up is removed from your Jira instance. In addition, this allows us to match on the service user’s name with the Rules Engine, indicating that an alert has been created via On-Call. The service user will need any applicable permissions to generate API keys, as well as create/update/resolve Jira tickets.
- If you are transitioning issue statuses with Outgoing Webhooks, you will need to know your Jira instance’s transition IDs for those statuses to use in each respective webhook. This can be found by navigating to Settings -> Issues -> Workflows -> Edit (for relevant project workflow) -> Text. Please be advised that doing this without implementing a bidirectional configuration will result in duplicate alerts in the Timeline for updated incidents.
Authentication
We suggest using a Bearer token for your service user through OAuth, but you can choose any of the options listed here. It may also be possible to use a Base64 encoded “username:API token” to authenticate (“Authorization” in the first box, “Basic <BASE64_ENCODED_JIRA_USERNAME:JIRA_API_TOKEN>” in the second box), but please note that due to the increasing length of new Jira API tokens, the encoding might be longer than our max character limit – if this is the case, please use another option.
Webhooks
Payloads, Trigger Events, and ‘To’ URL will vary depending on the action you’d like to take with a webhook. Please refer to the Jira API documentation for more information regarding endpoint and payload requirements for each relevant action.
Some important fields to use in the Rules Engine and Outgoing Webhooks are:
jira.issue.fields.status.id
jira.issue.fields.status.name
jira.issue.fields.priority.id
jira.issue.fields.priority.name
jira.issue.id
jira.issue.key
The following example will show the basic format of this type of webhook:
Event: <Incident-Triggered, Incident-Chats, Incident-Resolved, etc.>Method: POSTContent-Type: application/jsonCustom Headers:<Authorization>: <Your choice>To: <Relevant URL>{<Relevant payload>}
For webhooks that interact with existing Jira tickets, the issue key will need to be referenced in the URL. You can pull this value into the URL with the dynamic variable, “${{ALERT.jira.issue.key}}”
Please note that without a bidirectional configuration, creating Jira issues from On-Call while Jira Webhooks are enabled may result in an incident creation loop. Please reach out to Splunk On-Call Support for assistance with this option, as well as any configuration and troubleshooting assistance!
Jira Service Desk Integration
JIRA Software offers flexible issue and project tracking for software teams. Splunk On-Call has two integrations with JIRA, one for each direction. The first will allow you to create a new JIRA ticket for any incident that comes into Splunk On-Call. The second one below allows you to create Splunk On-Call incidents whenever a new issue is added to your JIRA project.
- Splunk On-Call =>JIRA (Email Endpoint)
- Splunk On-Call =>JIRA (Custom URL)
Splunk On-Call =>JIRA (Email Endpoint)
This integration requires that you setup a JIRA email that creates and updates Issues. This is only available with JIRA Service Desk. For more information see the documentation HERE.
In Jira (Service Desk Integration)
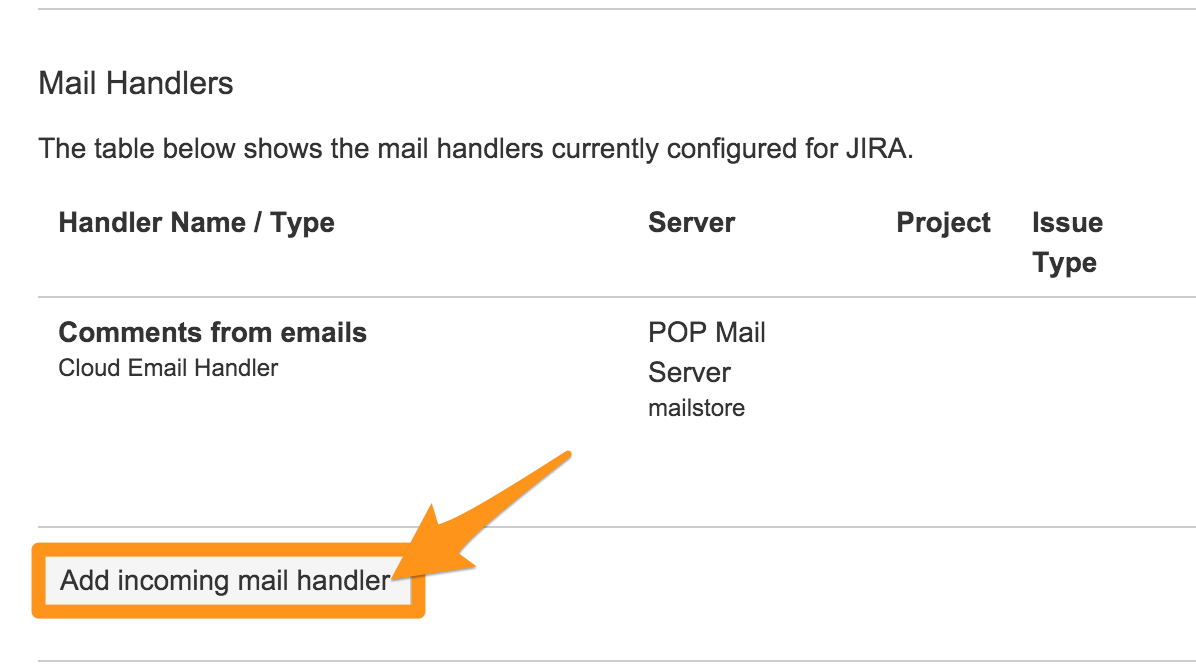
The first step is to set up an “Incoming mail handler” for the project you want to receive issues from Splunk On-Call. To do so, select Settings (gear icon) and then System.
In the left sidebar under “Mail” select Incoming Mail.

Under “Mail Handlers” select Add Incoming mail handler.
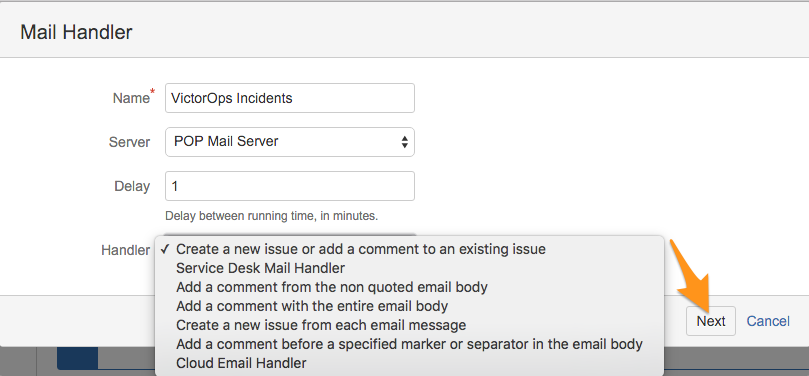
Give it a name and select the appropriate handler you want to use for this integration (We suggest the “Create a new issue or add a comment to an existing issue” option), then hit Next.
Select the Project you want to associate this integration with, then select Add. In this example we selected the “Splunk On-Call Critical Incidents”.
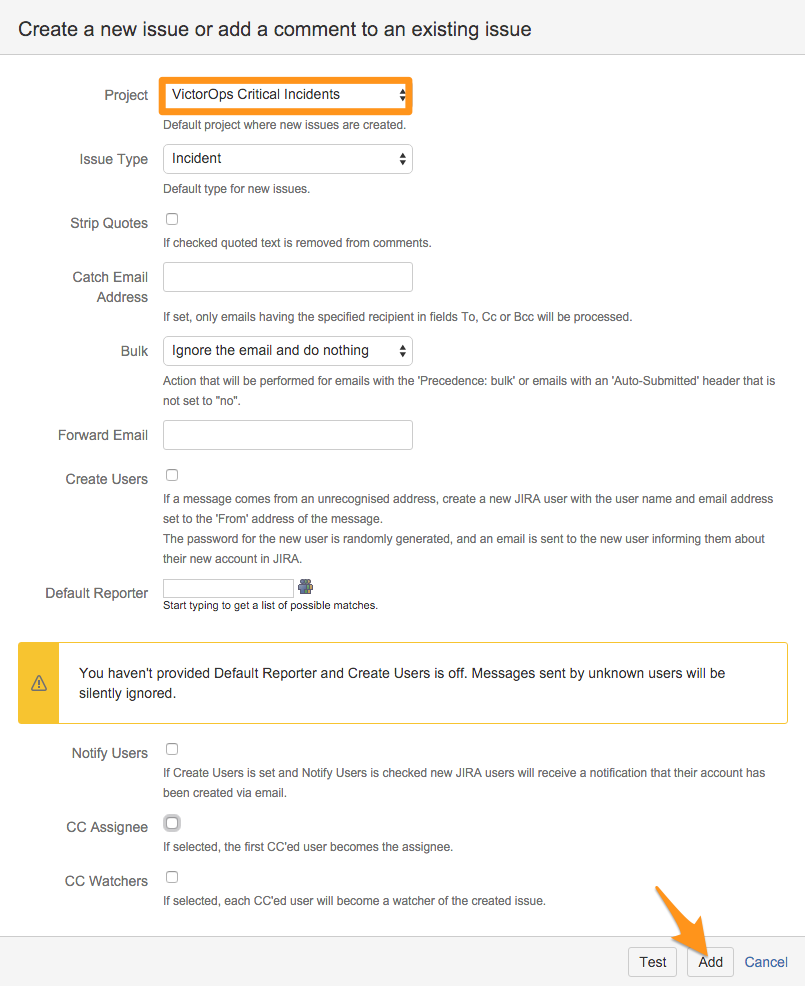
Next, retrieve the email address associated to the project. To do this go into your projects administration page and select Email requests. Copy the email you want to use to your clipboard.

In Splunk On-Call (Service Desk Integration)
We will use the JIRA email address as part of a team’s escalation policy so that when an alert is routed to that team, a ticket is created. This gives you two options:
1) Create JIRA issues from specific Splunk On-Call incidents by re-routing incidents to a “New JIRA Ticket” team that has a single escalation step to send an email to the JIRA email address.
2) Create JIRA issues from every Splunk On-Call incident that goes to a team by adding the JIRA email address to the first step of that teams escalation policy.
The following will walk you through the first option.
In the Splunk On-Call web portal navigate to Teams then click Add Team. Add your JIRA Email address to the first step of this team’s Escalation Policy.
When you want to create a JIRA issue from any Splunk On-Call incident, re-route that incident to the “New JIRA Ticket” team.
For any questions or feedback, please contact Splunk On-Call Support.
Splunk On-Call to Jira (Custom URL)
This integration method utilizes a custom URL and the Splunk On-Call Rules Engine to generate a JIRA ticket with information from the alert automatically added.
In Splunk On-Call (Custom URL)
From the web portal select Settings >> Alert Rules Engine and click Add a Rule.
Set the rule to match on the alerts you would want to create JIRA tickets from. Next, add an Annotation and select the URL type. Give it a name and then build a custom create JIRA ticket using documentation from Atlassian here:
You can use Variable Expansion within the Rules Engine to build the URL in a way that pulls in information for the ticket dynamically. The exact format of the necessary URL is highly variable based on your specific Jira environment. Below are some examples where we set the Description, Summary and Label fields.
https://YOUR_DOMAIN_HERE.atlassian.net/secure/CreateIssueDetails!init.jspa?pid=10506&issuetype=1&description=${{state_message}}&summary=${{entity_id}}&labels=${{labels}}
https://YOUR_DOMAIN_HERE.atlassian.net/secure/CreateIssueDetails!init.jspa?pid=10000&issuetype=10000&description=${{state_message}}&summary=${{entity_id}}&labels=${{labels}}
Within the Splunk On-Call incident, this rule will create a clickable annotation. Now whenever the rule matches on an alert, you will have a one-touch option to create a JIRA ticket that already has information pulled directly from the Splunk On-Call alert.
For any questions or feedback, please contact Splunk On-Call Support.