The Splunk Add-on for On-Call (VictorOps) is a downloadable add-on (similar to an app) that will ingest Splunk On-Call data into Splunk using the Splunk On-Call public API. The add-on includes pre-built dashboards to help you quick-start visualizing your Splunk On-Call data.
The add-on is installed on a heavy forwarder and will play nicely with any other add-ons also installed. The add-on will create an input data source for users, teams, on-call, and incidents. The polling interval can be defined for each data source and data sources can be selected or deselected depending on the data desired.
For each type of data, the script will check to see if the API response contains duplicate data, and if so, then the data is not indexed. For example, all users will be polled on the interval, however, if for some user A data looks the same, then it won’t be indexed; if the user updated their paging policy then the data will be indexed. This is important because it will ensure that the Splunk On-Call data is a very low amount.
These reports can provide real-time visibility across multiple Splunk On-Call instances and offer highly granular and customizable reporting.
Splunk Versions Supported:
-
Splunk Enterprise, Splunk CloudPlatform Version: 9.0*, 8.2*, 8.1*, 8.0*, 7.3
- Python version 2 or 3 is supported
* there is presently an outstanding issue affecting the calendar display on certain Splunk versions
General Requirement:
- You will need an active Splunk On-Call instance before you begin. Click here to start a free 14-day trial.
- On-Prem
- customers will need to open port 443 for outgoing https communication with Splunk On-Call.
- Proxy is supported (available with 1.0.5 version and above) from the Splunk base HERE or contact support for the most recent version.
Important Notes:
- As there are both dashboards and data inputs for the add-on, both
will need to be configured in all Search Heads and heavy forwarders
-
We recommend using one index per input, but it is possible to have multiple inputs write into a single index.
- The add-on requires macros. It is always good idea to double-check your macros and make sure they are pointed toward the correct indexes.
- The add-on supports proxy configurations

Set-Up Instructions
After downloading the add-on from the Splunk base here, it needs to be installed. Navigate to Apps > Manage Apps >> Install App From File and import the .tar.gz file downloaded previously.
The Splunk add-on for On-Call should now be visible as an app in Splunk, navigate to the app. Under Inputs, select Create New Input and choose a type of data you would like Splunk to ingest from Splunk On-Call. For all data types the input configuration options will look like below:
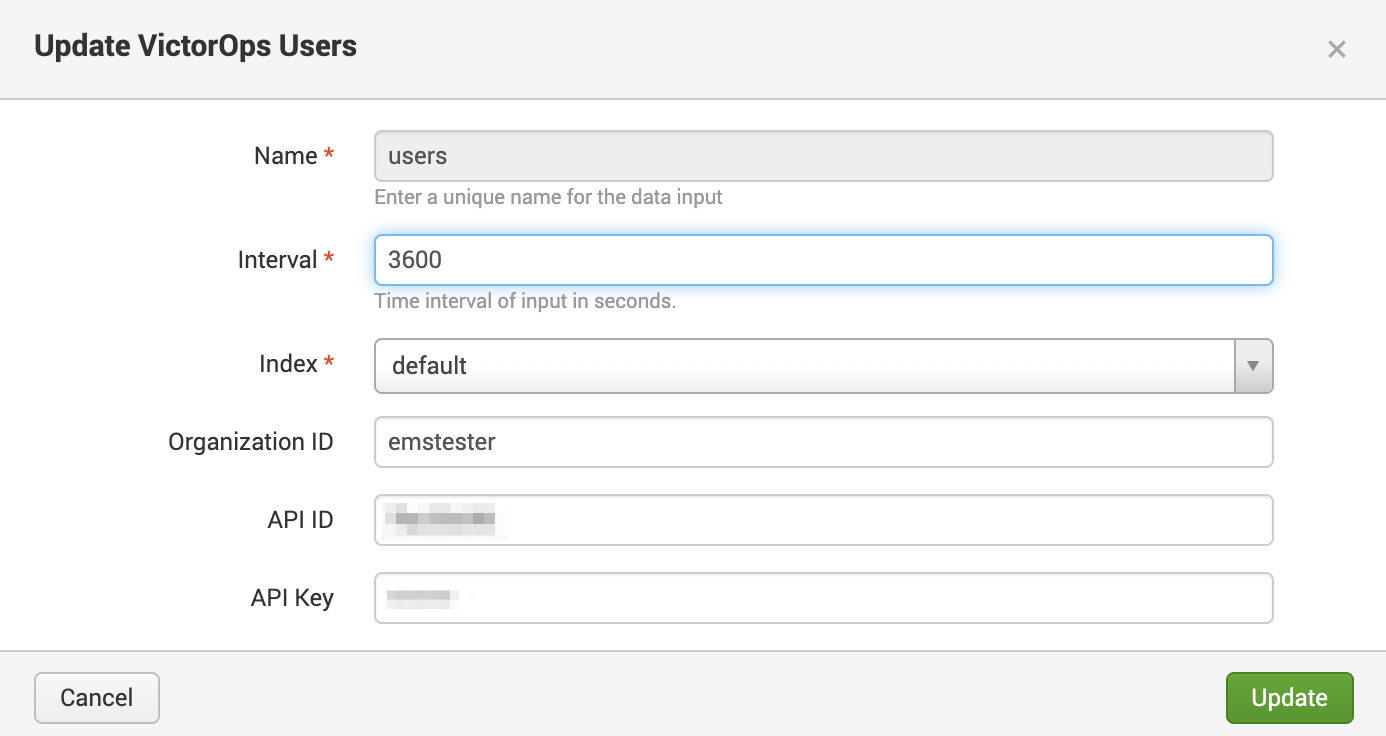
- Name — this is a unique name for the data input. As a best practice, choose a name that accurately represents the input. For example, use something like vo_users_<org_name>.
- Interval — this is the polling interval, in seconds, at which the Splunk On-Call API will be polled. Keep in mind the time scale that is desired to see changes reflected in Splunk, the rate at which updates happen in Splunk On-Call, and the resource consumption of running the polling scripts when selecting this number.
- We recommend the polling interval for incidents and on call to be around 300 seconds. While the polling interval for teams and users to be closer to 3600 seconds but adjust these values for your needs and use cases.
- Index — select any Splunk index where the data should be available. We recommend one index per input. You will need to update the dashboard search macros to use the index name you decide on in order for data to populate on the dashboards.
- Organization ID — Note which Splunk On-Call organization this data is coming from. This of even more importance if collecting data from multiple organizations in Splunk On-Call
- API ID — This value can be found in Splunk On-Call under Integrations >> API (admin or alert admin required).
- API Key — This value can be found in Splunk On-Call under INtegrations >> API (admin or alert admin required).
Input Details
There are four types of inputs collected: users, oncall, teams (which includes routing keys) and incidents. Each input can be selected individually and independently of other inputs. In other words, users have the option to decide what exactly would be indexed per organization. Below are the inputs and their respective attributes in a sample JSON format.
Users (type=user)
- Info
- Names (first, last, username)
- Created date
- Date created
- Date password updated
- Verified
- Contact Methods – Name, verification status (phone only) and value of all contact methods.
- Paging Policy
- Organization
On-Call (type=oncall, events are split per team)
- Organization
- Team name, slug
- Escalation Policy
- Oncall user(s) at time of index
Teams (type=team)
- Info
- Number of members, verified members
- Team name, slug
- Members
- Username, first name, last name
- Verified
- Organization
- Policies
- Name, slug
Routing Keys (type=routingkey)
- Default routing key status (true/false)
- Organization
- Name
- Target escalation policies
- Escalation policy name, slug
- Team name, slug
Incidents (source=victorops_incidents)
- Paged Users, Teams
- State changes (ack, resolve)
- All Metadata
- Index timestamp is set to the startTime field
- Alert Count
Troubleshooting
Things to verify, generally in order, if encountering problems
- Check that the API credentials are correct. Note, this is not the ‘Splunk API key’ this is the public API key and id found under Integrations >> API.
- Is the environment permitted to access the outside web? Ensure that from the host you can reach the Splunk On-Call API. Try running ‘ping api.victorops.com’ to confirm the connection.
- You can investigate further by inspecting the logs in $SPLUNK_HOME/var/log/splunk/ta_splunk_add_on_for_victorops_victorops_<INSERT_INPUT_TYPE_HERE>.log.
- If polling incidents in an organization with more than 60 incidents in the past seven days, the incident poll can take some time to run due to Splunk On-Call API rate limits. If the input has been configured correctly and incident data is still not appearing, check the above log path for the incidents log (i.e. tail -f ta_splunk_add_on_for_victorops_victorops_incidents.log), if the last log entry is similar to “Waiting 59.985822999999996 seconds”, the script is waiting on rate limits to finish collecting and indexing the data. If this issue persists, consider reducing the polling interval.
- If dashboard items are not appearing, check the dashboard macros by navigating to Settings>>Advanced Search>>Search macros and ensure the index name you created for the inputs is being used in the macros.
Important Notes:
- While the webhook configuration is available if needed, we highly recommend the native add-on instead of the webhook configuration.
Webhooks
Ingesting Data
Splunk On-Call will send data to Splunk using an HTTP Endpoint Collector (HEC) depending upon your deployment a heavy forwarder may also be needed. To ensure communication from Splunk On-Call to Splunk, Splunk On-Call‘s range of IP addresses should be allowed.
Tip: When setting up the HEC in Splunk, create a new Source Type for the type of data that you’re sending in. This allows you to send in and keep track of multiple different types of OnCall data like chats, incident action logs, different team incidents, etc.
Creating the Webhooks
Four outgoing webhooks can be created, one for each event type. See below for each configuration. While the url will be the same for each webhook, keep in mind that the url will vary with different deployments of Splunk.
| Splunk Version | Url |
| On-Prem Instance | https://<host>:8088/services/collector |
| Self-Service Splunk Cloud Instance | https://input-<host>:8088/services/collector |
| All Other Splunk Cloud Instances | https://http-inputs-<host>:8088/services/collector |
Note: Although rare, some Splunk instances use port 443 instead of 8088 for event ingestion.
The header will be the same for all webhooks and Splunk deployments. Be sure to replace <token> with the appropriate value for the HEC.
| Key | Value |
| Authorization | Splunk <token> |
The Content Type field should be set to application/json
The body of each webhook will vary according to the event-type. Be sure to replace your org slug (organization id found in the url of victorops, e.g. https://portal.victorops.com/dash/<org_slug>/outgoing-webhooks) in all instance of <org_slug>.
Event Type: Any Incidents
Body:
{
 "sourcetype": "_json",
 "event":
 {
 "slug": "<org_slug>",
 "link": "https://portal.victorops.com/client/<org_slug>/popoutIncident?incidentName=${{STATE.INCIDENT_NAME}}",
 "type": "incident",
 "alertService": "${{ALERT.service}}",
 "hostName": "${{ALERT.host_name}}",
 "service": "${{ALERT.service}}",
 "ENTITY_TYPE": "${{INCIDENT.ENTITY_TYPE}}",
 "SERVICESTATE": "${{ALERT.SERVICESTATE}}",
 "VO_ALERT_RCV_TIME": "${{ALERT.VO_ALERT_RCV_TIME}}",
 "alert_url": "${{ALERT.alert_url}}",
 "entity_display_name": "${{ALERT.entity_display_name}}",
 "entity_state": "${{ALERT.entity_state}}",
 "message_type": "${{ALERT.message_type}}",
 "monitor_name": "${{ALERT.monitor_name}}",
 "monitoring_tool": "${{ALERT.monitoring_tool}}",
 "routing_key": "${{ALERT.routing_key}}",
 "alert_timestamp": "${{ALERT.timestamp}}",
 "ACK_MSG": "${{STATE.ACK_MSG}}",
 "ACK_USER": "${{STATE.ACK_USER}}",
 "ACK_TIMESTAMP": "${{STATE.ACK_TIMESTAMP}}",
 "ALERT_COUNT": "${{STATE.ALERT_COUNT}}",
 "CURRENT_ALERT_PHASE": "${{STATE.CURRENT_ALERT_PHASE}}",
 "CURRENT_STATE": "${{STATE.CURRENT_STATE}}",
 "ENTITY_ID": "${{STATE.ENTITY_ID}}",
 "IncidentNum": "${{STATE.INCIDENT_NAME}}",
 "INCIDENT_TIMESTAMP": "${{STATE.INCIDENT_TIMESTAMP}}",
 "LAST_TIMESTAMP": "${{STATE.LAST_TIMESTAMP}}",
 "MONITOR_TYPE": "${{STATE.MONITOR_TYPE}}",
 "stateService": "${{STATE.SERVICE}}",
 "alert_uuid": "${{ALERT.VO_UUID}}"
 }
}
Event Type: Any-Paging
Body:
{
 "sourcetype": "_json",
 "event":{
 "slug":"<org_slug>",
 "type":"paging",
 "user": "${{PAGE.USER_ID}}",
 "started":"${{PAGE.STARTED}}",
 "page_id": "${{PAGE.ID}}",
 "attempt_num": "${{PAGE.ATTEMPT_NUMBER}}",
 "method_type": "${{PAGE.METHODS.0.TYPE}}",
 "method_label": "${{PAGE.METHODS.0.LABEL}}",
 "cancellation": "${{PAGE.CANCELLATION}}"
 }
}
Event-type: Any-On-Call
Body:
{
 "sourcetype": "_json",
 "event":{
 "slug":"<org_slug>",
 "type":"oncall",
 "user":"${{ONCALL.USER_ID}}",
 "state":"${{ONCALL.STATE}}",
 "team":"${{ONCALL.TEAM_NAME}}",
 "group":"${{ONCALL.GROUP_ID}}",
 }
}
Event-type: All-Chats
Body:
{
 "sourcetype": "_json",
 "event":{
 "slug":"<org_slug>",
 "type":"chat",
 "user": "${{CHAT.USER_ID}}",
 "text": "${{CHAT.TEXT}}",
 "is_robot": "${{CHAT.IS_ROBOT}}"
 }
}