Versions Supported for Plugin: Zabbix 4.2 and below, PHP version >= 5.3.0, CURL
Zabbix 4.4 and above can be integrated via Zabbix Webhooks
VictorOps Version Required: Starter, Growth, or Enterprise
Zabbix is an enterprise-class open source distributed monitoring solution for networks and applications.
Configuration in VictorOps
In VictorOps, navigate to Integrations >> Zabbix.
Once selected, click Enable Integration and copy the Service API Key for later use.
Zabbix 5.0 – 6.X – Webhooks
Although our plugin only supports versions up to 4.2, we can integrate with Zabbix 5.0 and above via webhooks. The behavior and layout is similar to the plugin.
The basic components we need are a VictorOps Users group with a user called “VictorOps Alert” assigned to it, an action called “Notify VictorOps”, and a media type called “VictorOps Webhook”.
Zabbix Media Type
To get started, we’ll need to download the VictorOps Media Type from our Github located here:
Zabbix Version 5.4 – 6.x:
Zabbix Version 5.3 and below:
Once that’s downloaded, go into Zabbix and navigate to your Media Types (Administration >> Media types). In the upper right corner you’ll want to click on Import which will bring you to this page:
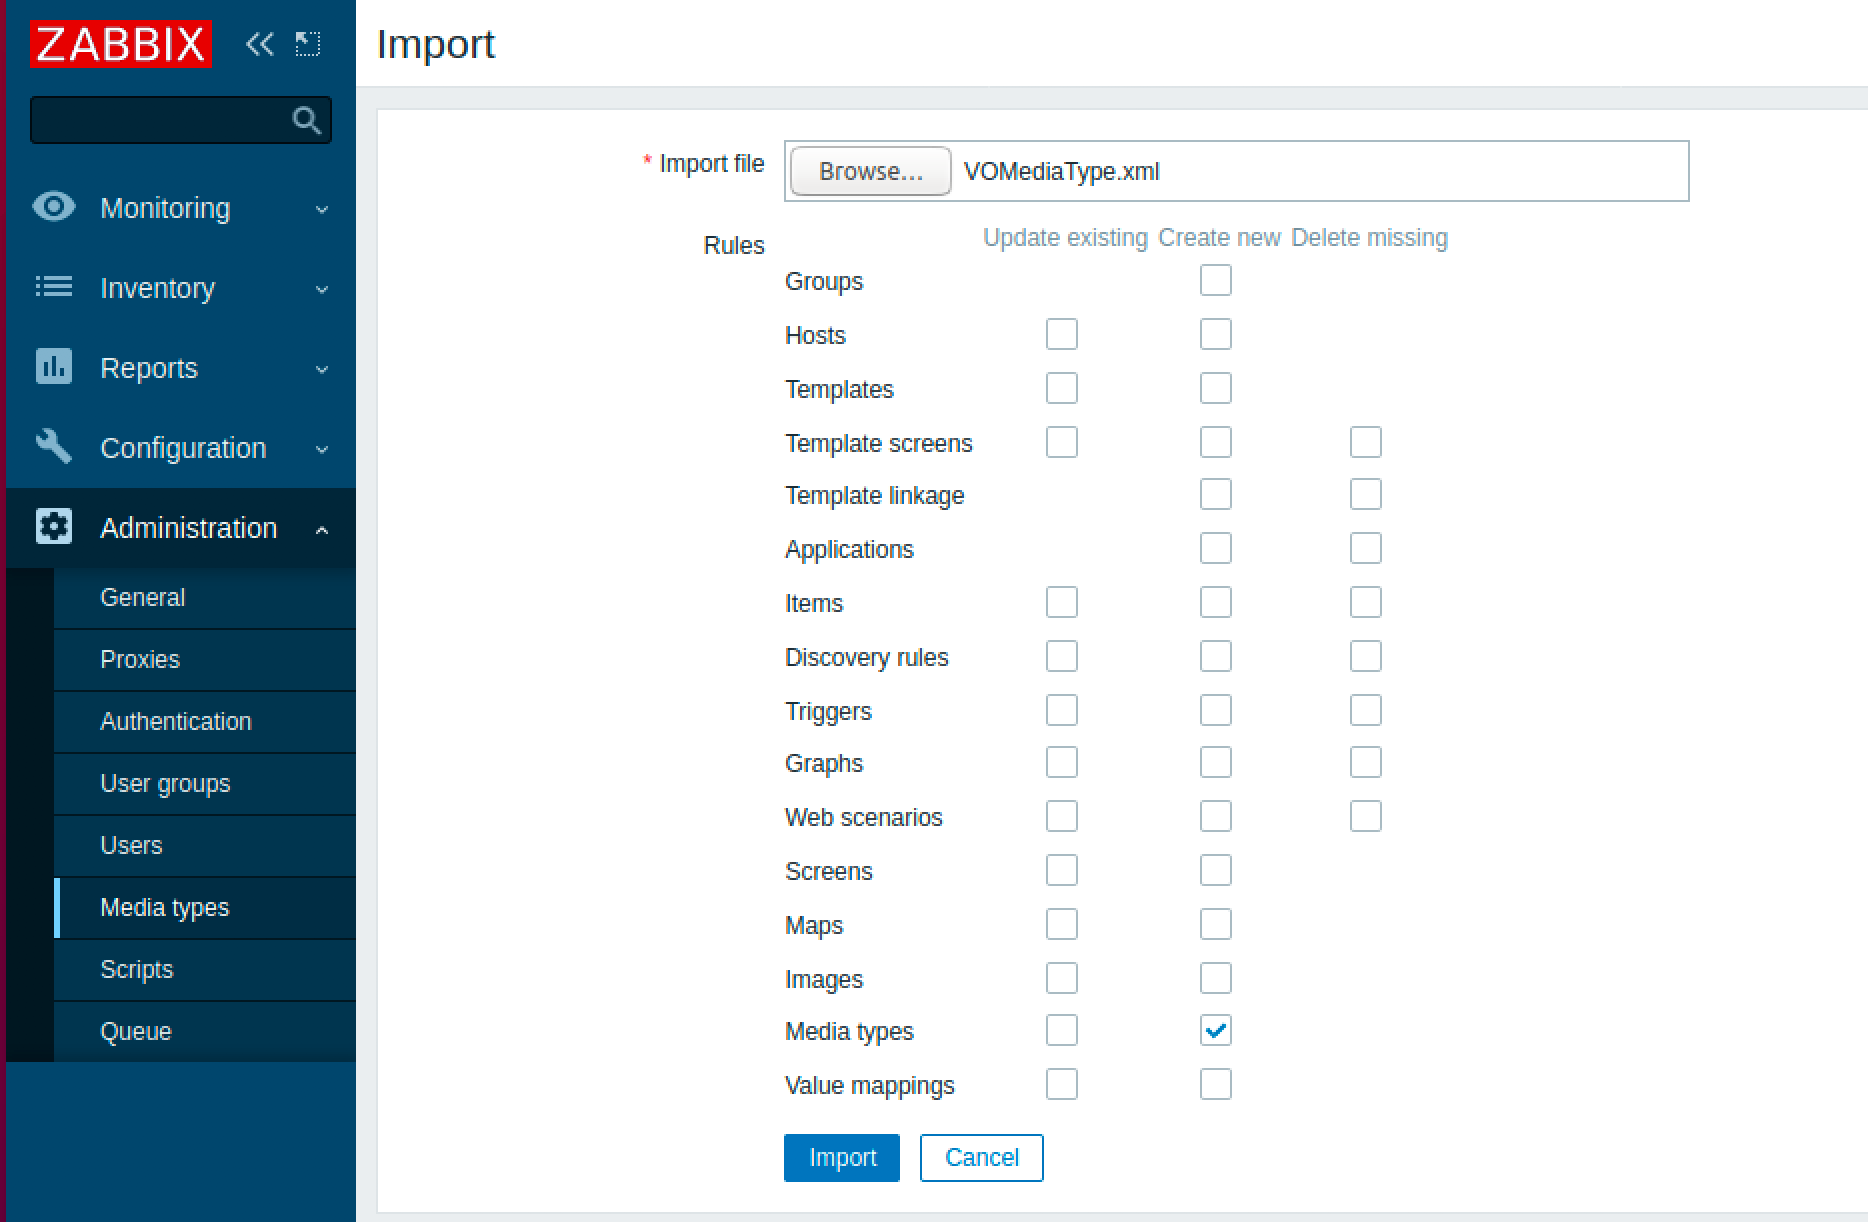
You will then want select the .xml file you downloaded earlier and select Import at the bottom of the screen. You’ll want to keep the default values for importing media types as it’s shown above.
After the import is successful you’ll want to go back to your media types. You should now see a Media Type labeled “VictorOps”. Click on the media type and scroll down to the values “VO_ORGANIZATION_ID” and “VO_ORGANIZATION_KEY” and fill them in with your VictorOps org slug and Zabbix Api key respectively. Your orgslug can be found in the url of your VictorOps instance (https://portal.victorops.com/client/<your-org-slug-here>) and the Zabbix API key is located in your VictorOps org under Integrations >> Zabbix.
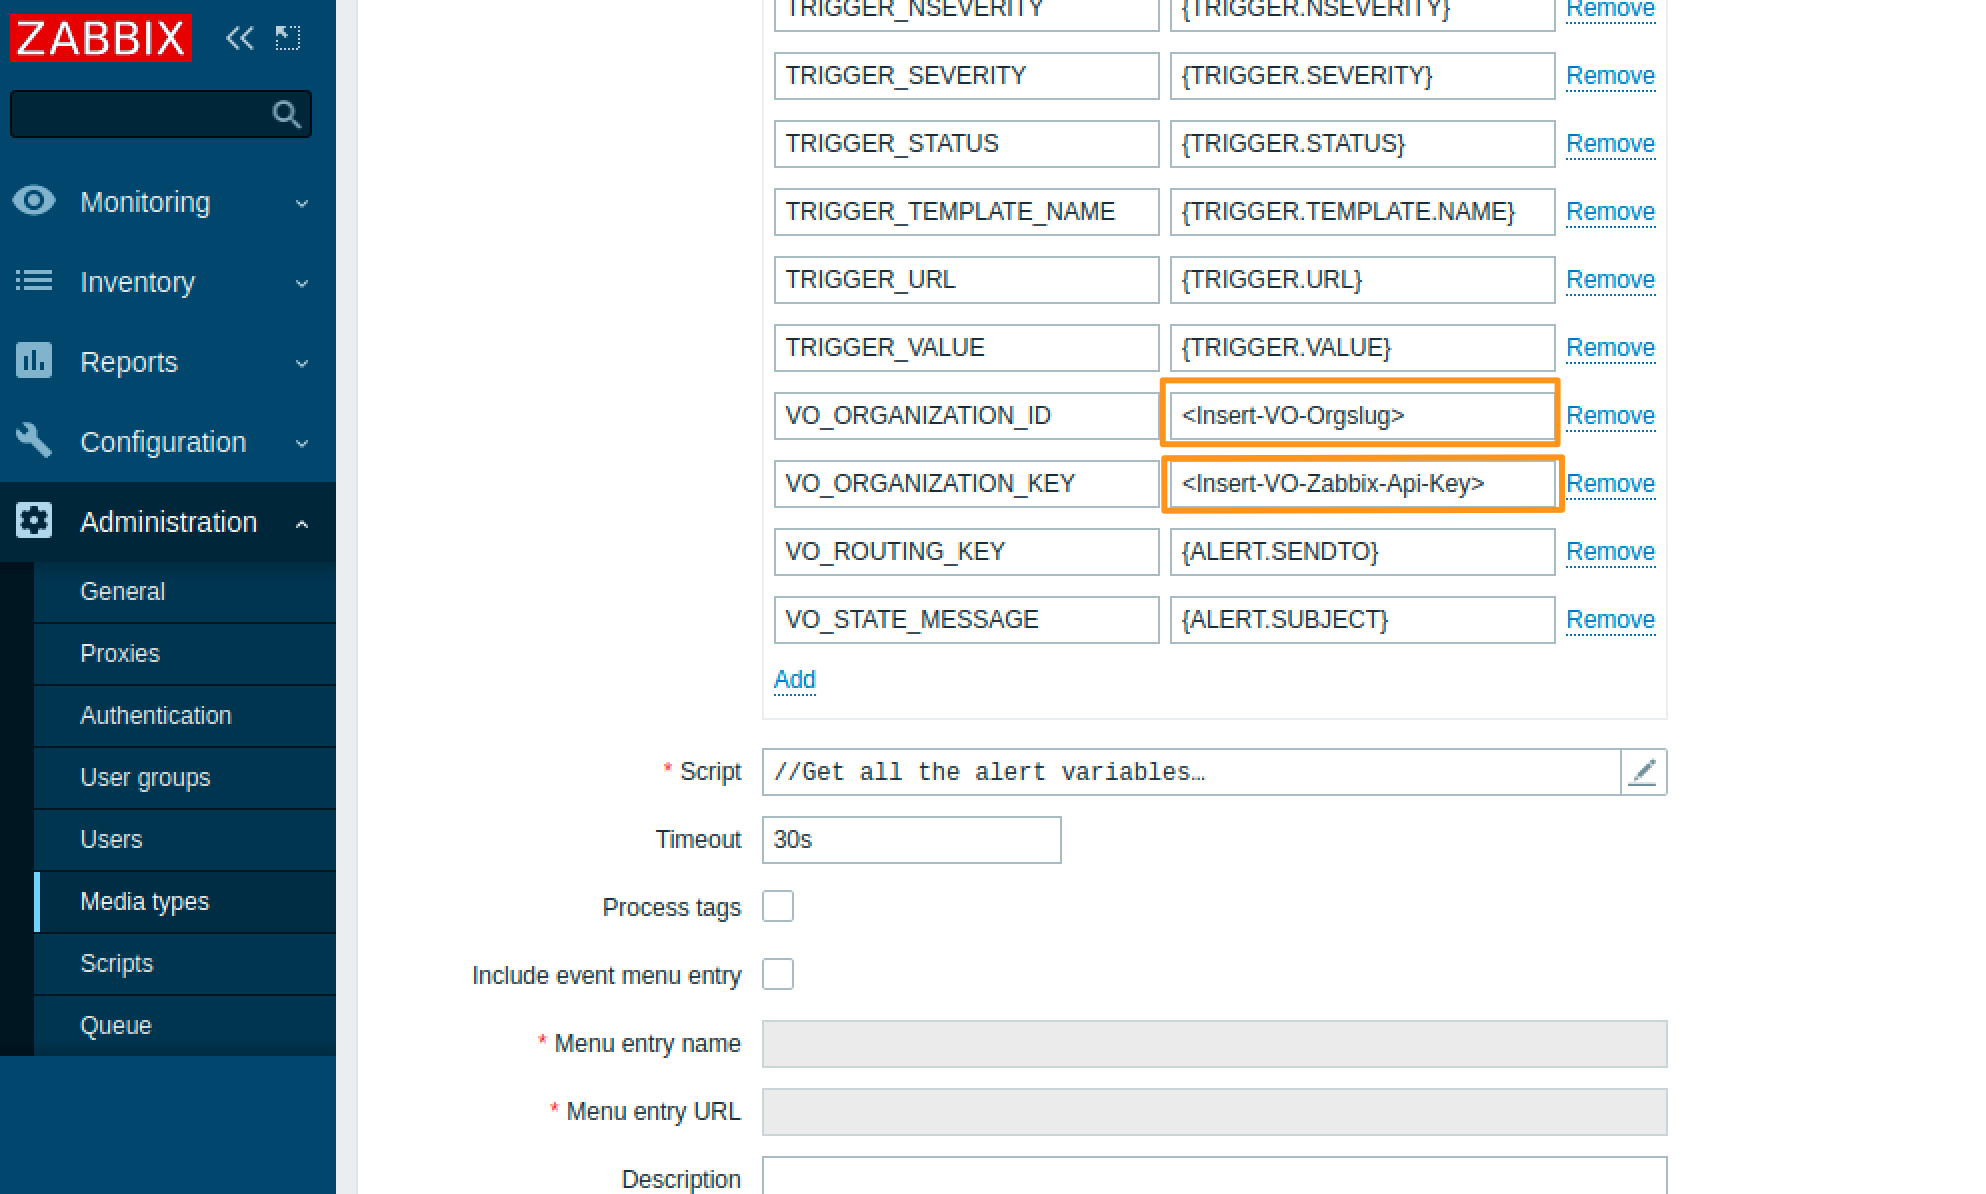
Lastly, be sure to Update the Media Type by clicking the blue Update button at the bottom of the Media Type configuration screen.
Testing the Media Type itself will fail. This is because the VictorOps Media Type dynamically pulls in information from the alert that is being sent to it. We recommend testing this after the Webhook is fully setup (including the following setups) with a real Zabbix alert.
Zabbix User
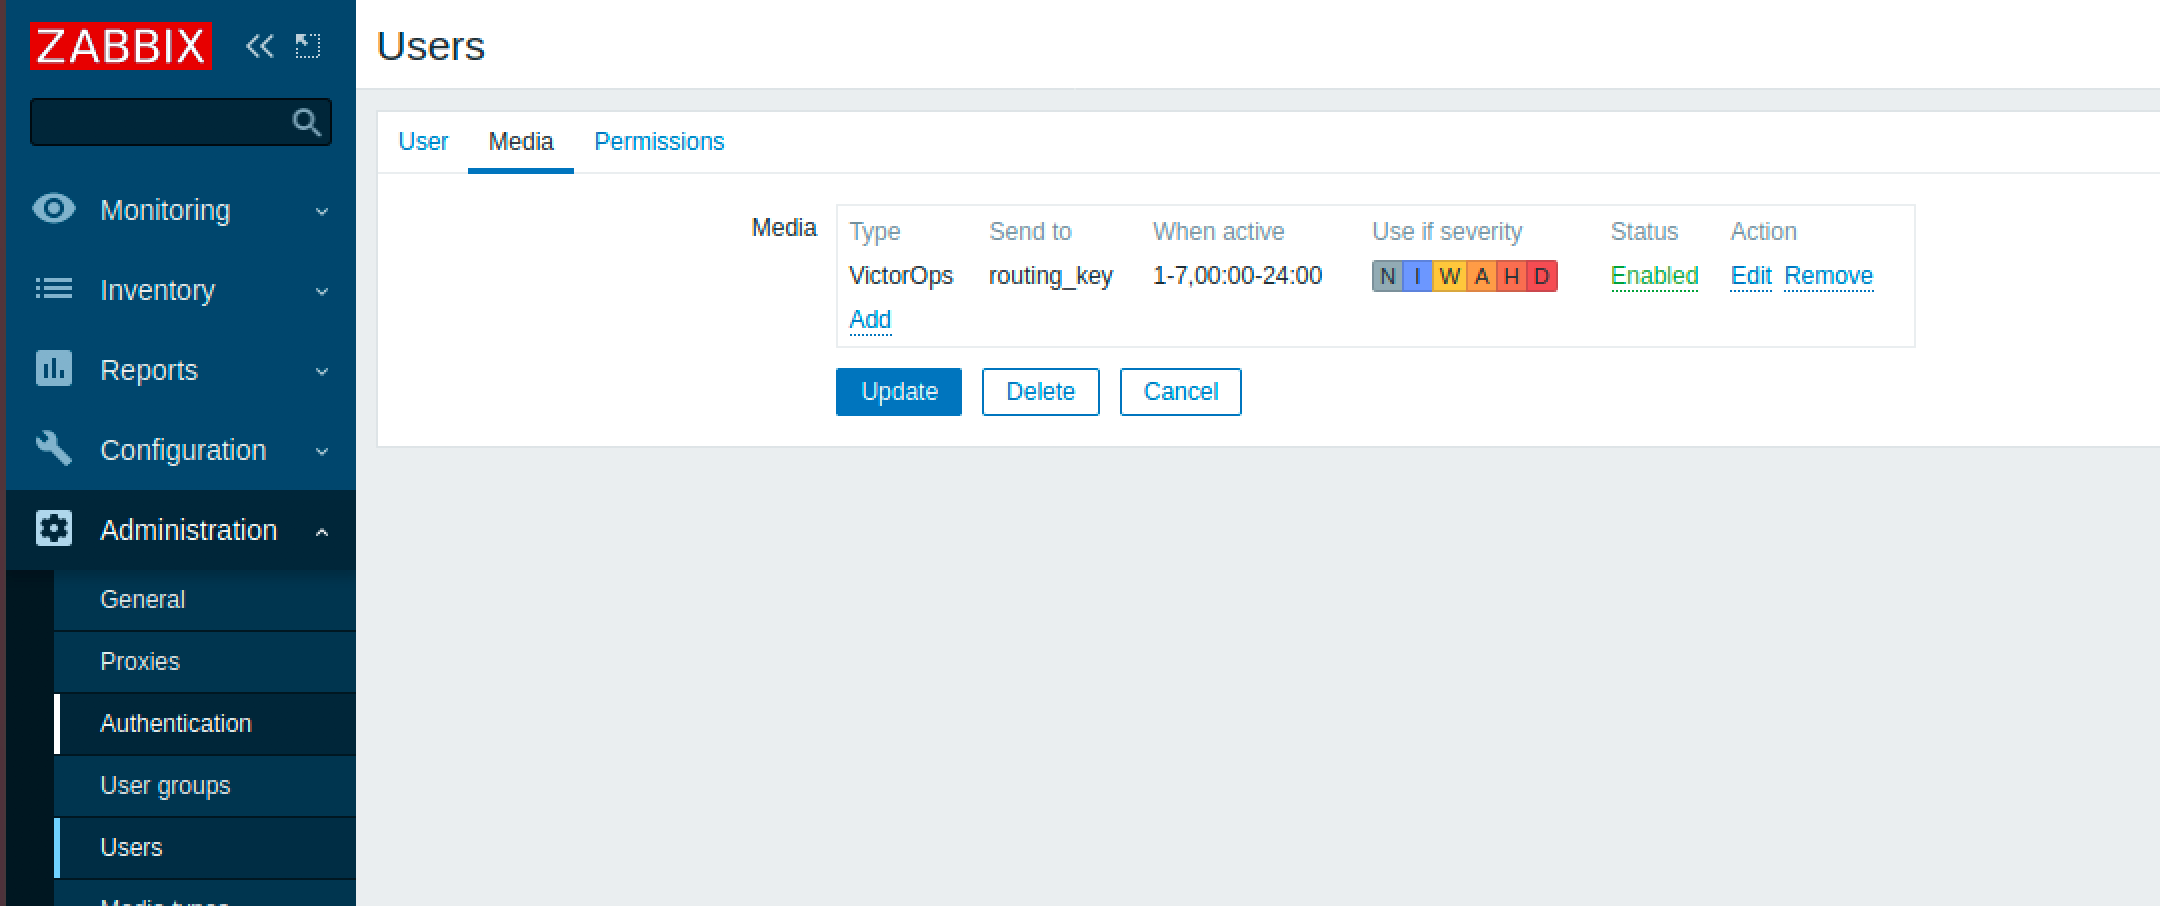
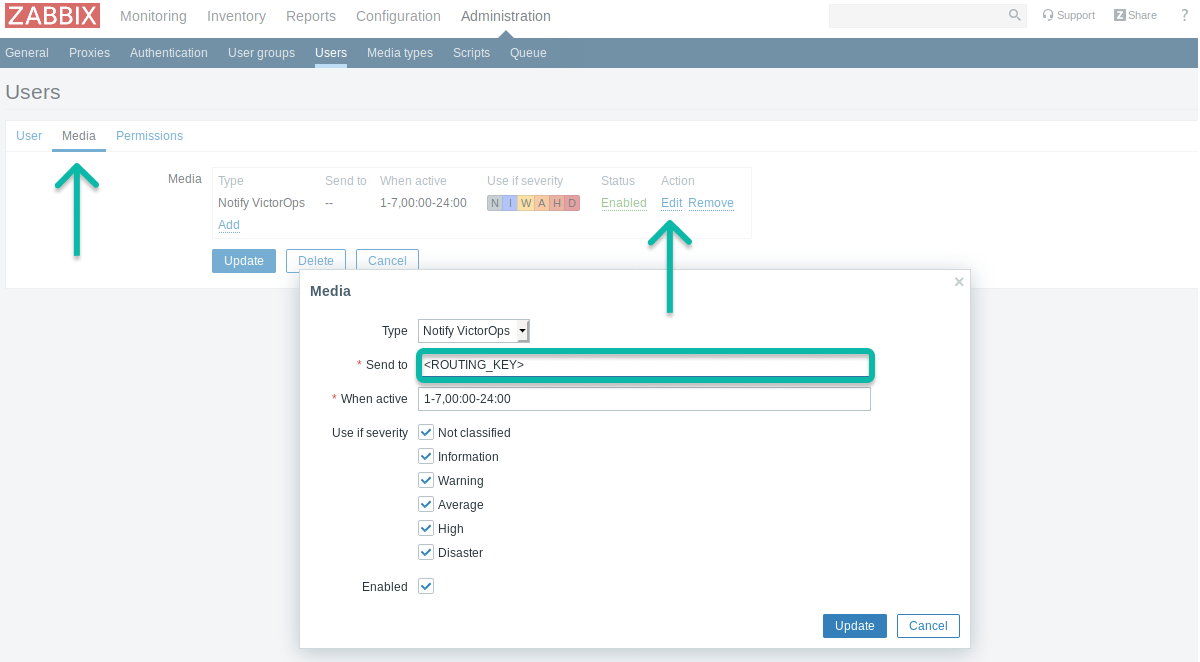
Create a new User and assign it to any desired group. Then associate the user, in this case, “VictorOps Alert” with the media type. Fill in the “send to” section in the Media tab with an appropriate VictorOps Routing Key. You can also specify which severity of alerts will be sent to VictorOps here. The user needs read-write permissions so assign whatever permission level necessary.
Zabbix Action
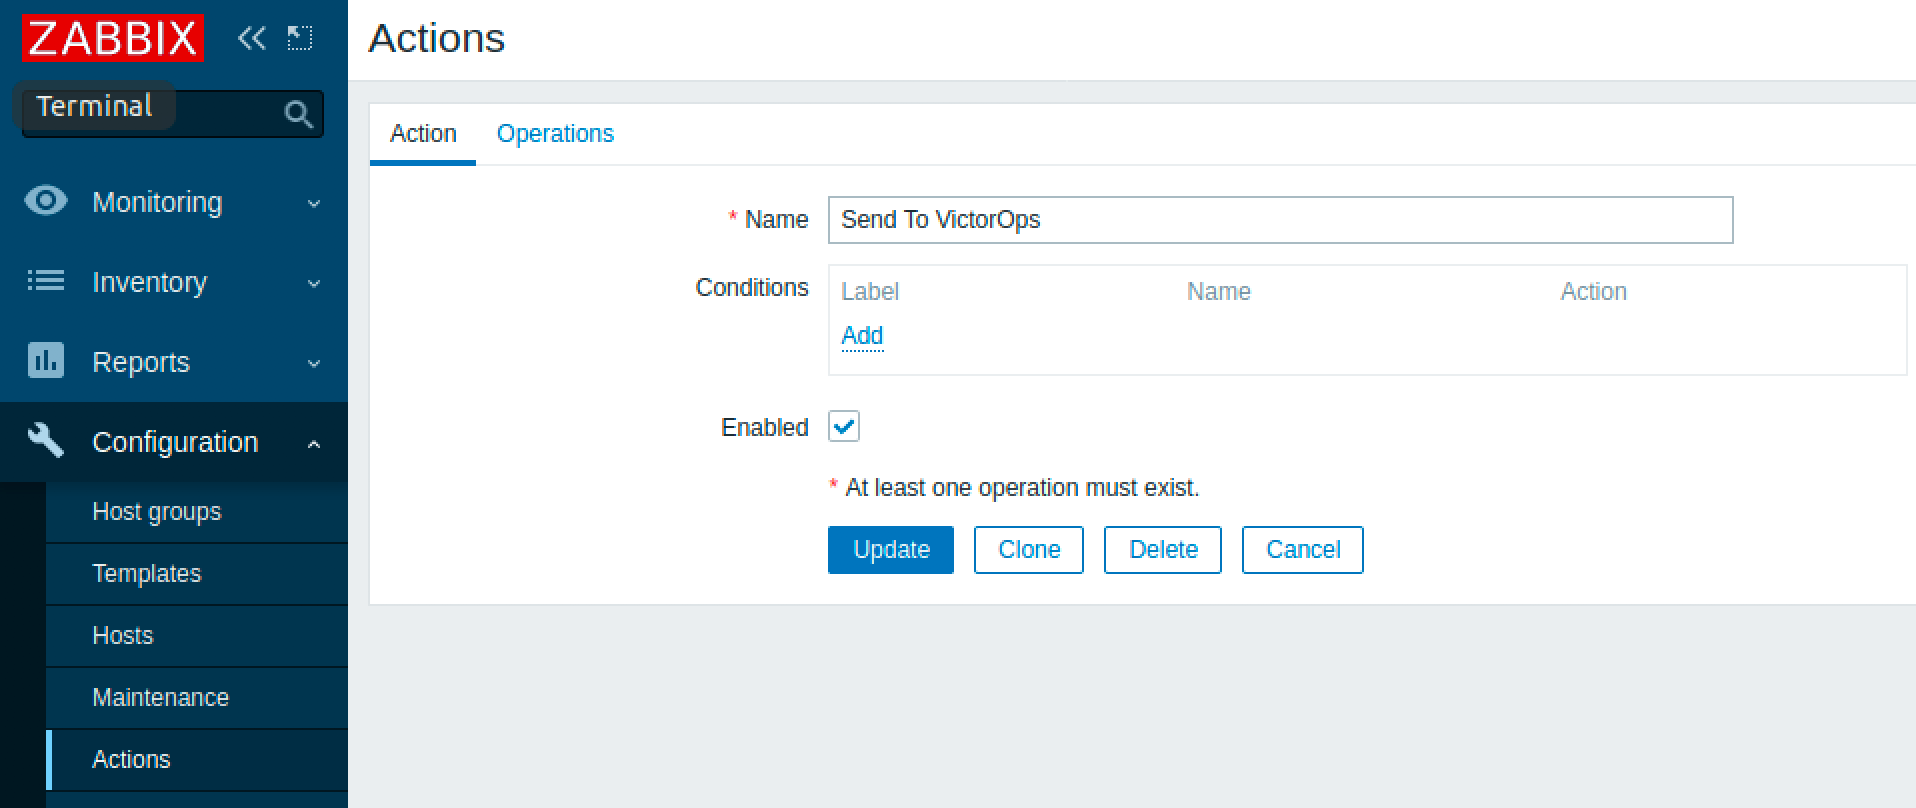
The next step is to create the action. You may customize alerting behavior by setting the action conditions.
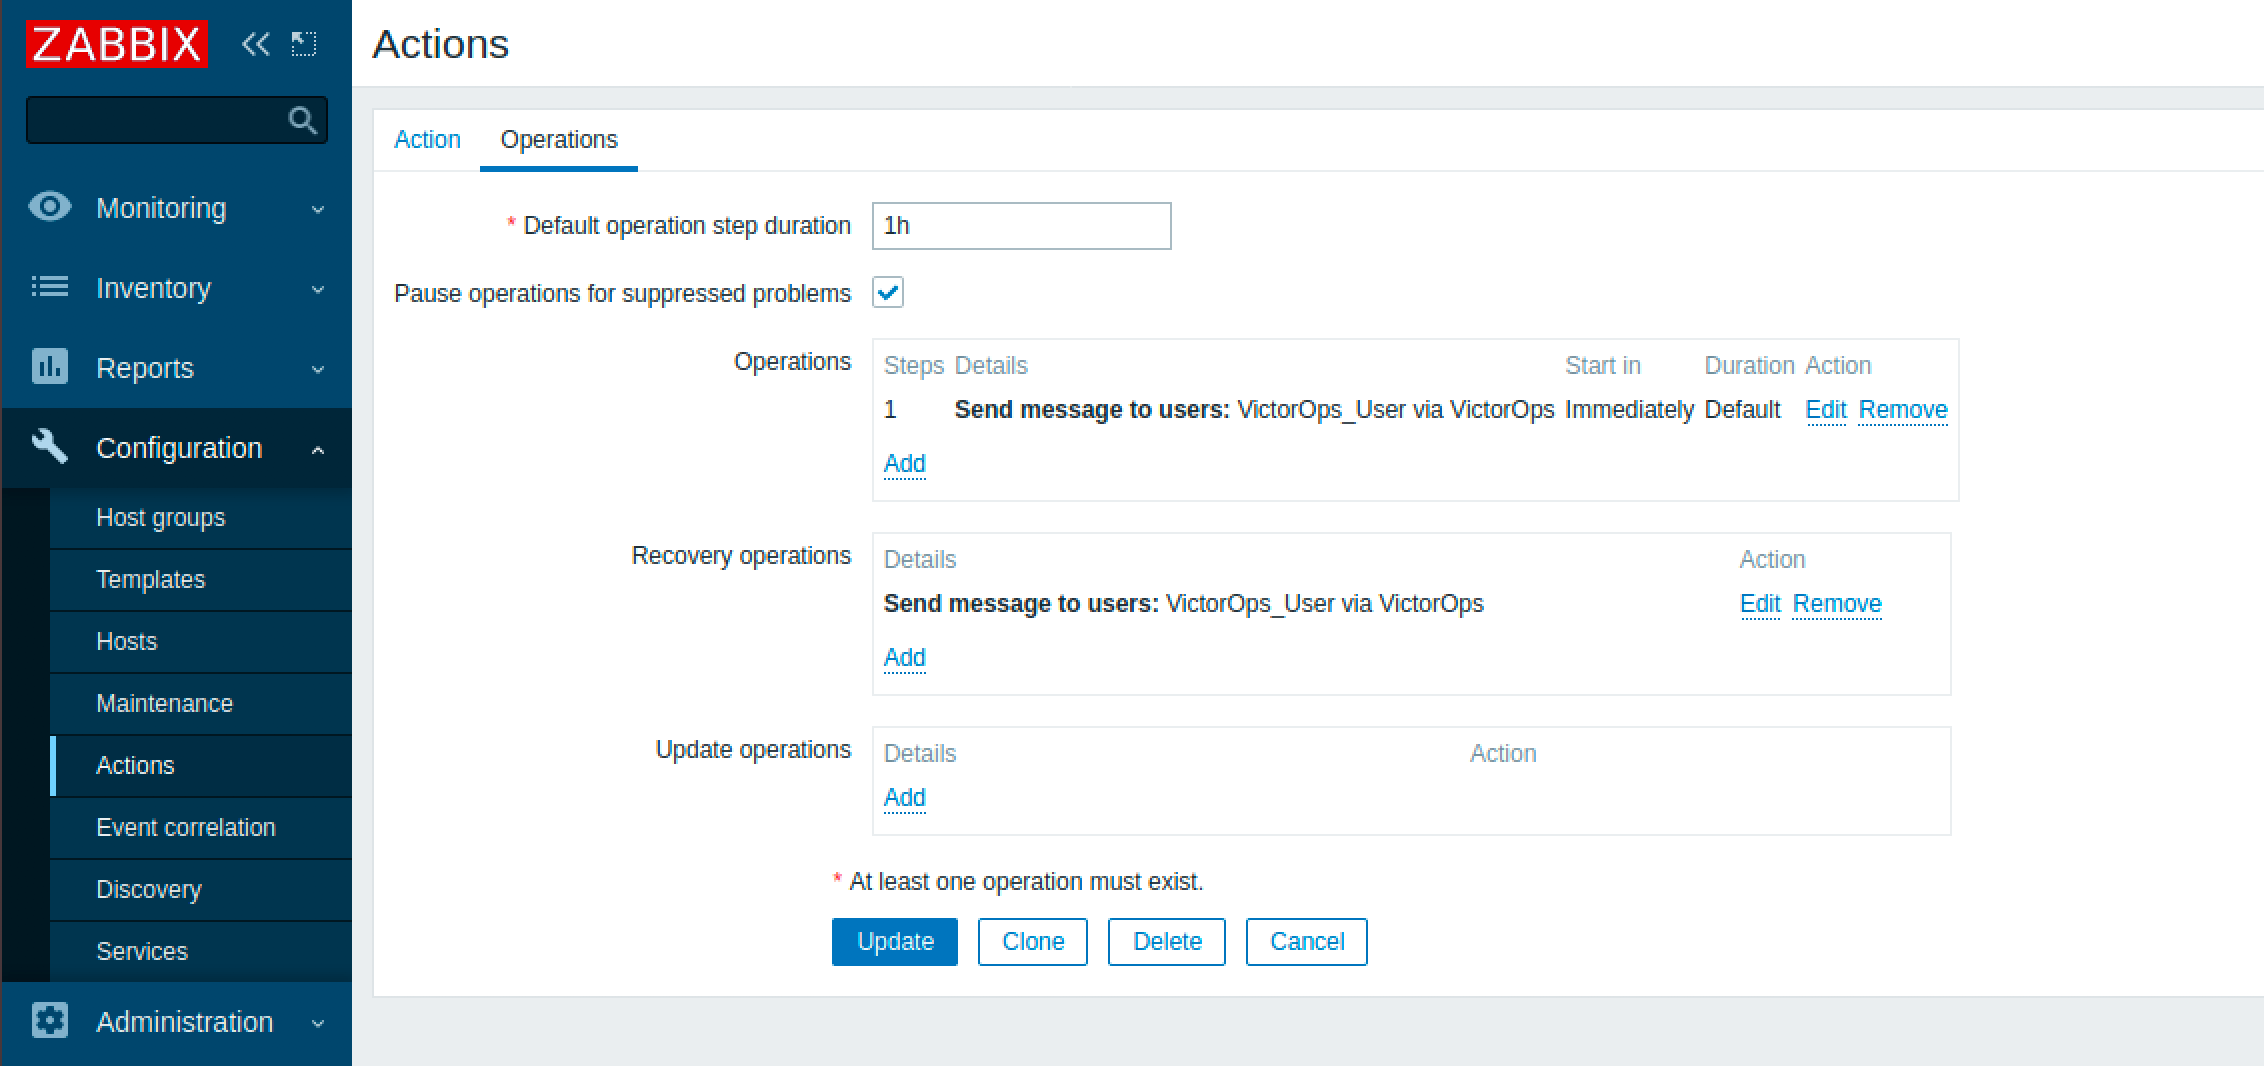
Then head over to the operations tab and set up the ‘Operations’ and ‘Recovery Operations’ to send a message to the VictorOps user using the VictorOps Media Type that you just created.
With that, your Zabbix integration should now be all set up! To test it, create a new alert in Zabbix and check the actions section on the dashboard to see if it was successful.
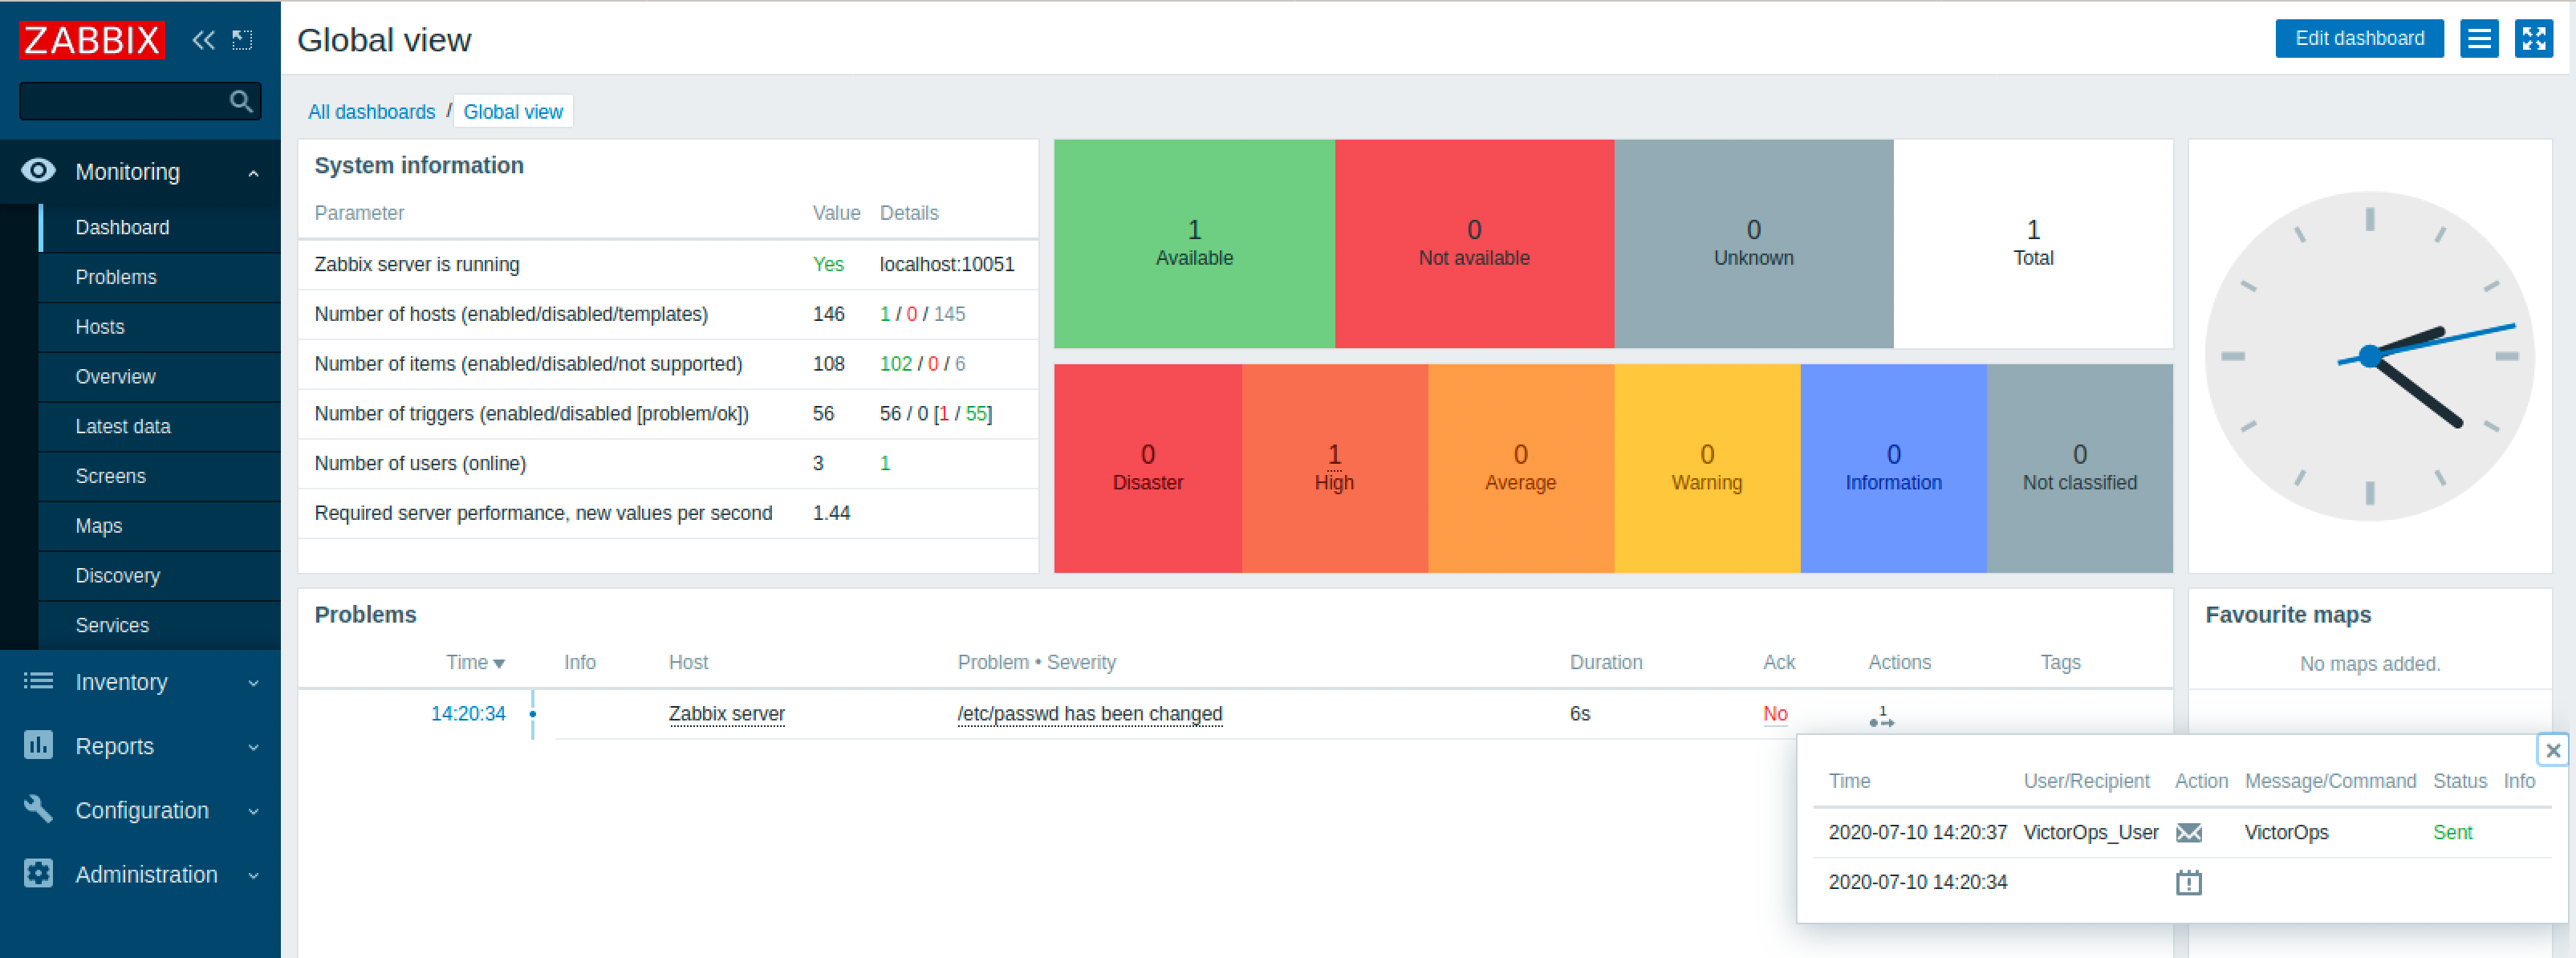
If it wasn’t, please refer to the troubleshooting section of this article for solutions to common issues or submit a ticket with us!
Zabbix 4.4 – Webhooks
Although our plugin only supports versions up to 4.2, we can integrate with Zabbix 4.4 via webhooks. The behavior and layout is similar to the plugin.
The basic components we need are a VictorOps Users group with a user called “VictorOps Alert” assigned to it, an action called “Notify VictorOps”, and a media type called “VictorOps Webhook”.
Zabbix Media Type 4.4
To get started, create a new media type from Administration>>Media Types. Under Type, select ‘Webhook’ and configure the parameters to match this screenshot, you will have to fill in the correct values for VO_ORGANIZATION_KEY (from VictorOps Integrations>>Zabbix page), and VO_ORGANIZATION_ID(VictorOps account name as it appears in the url). No special syntax is needed for those fields, just the value. 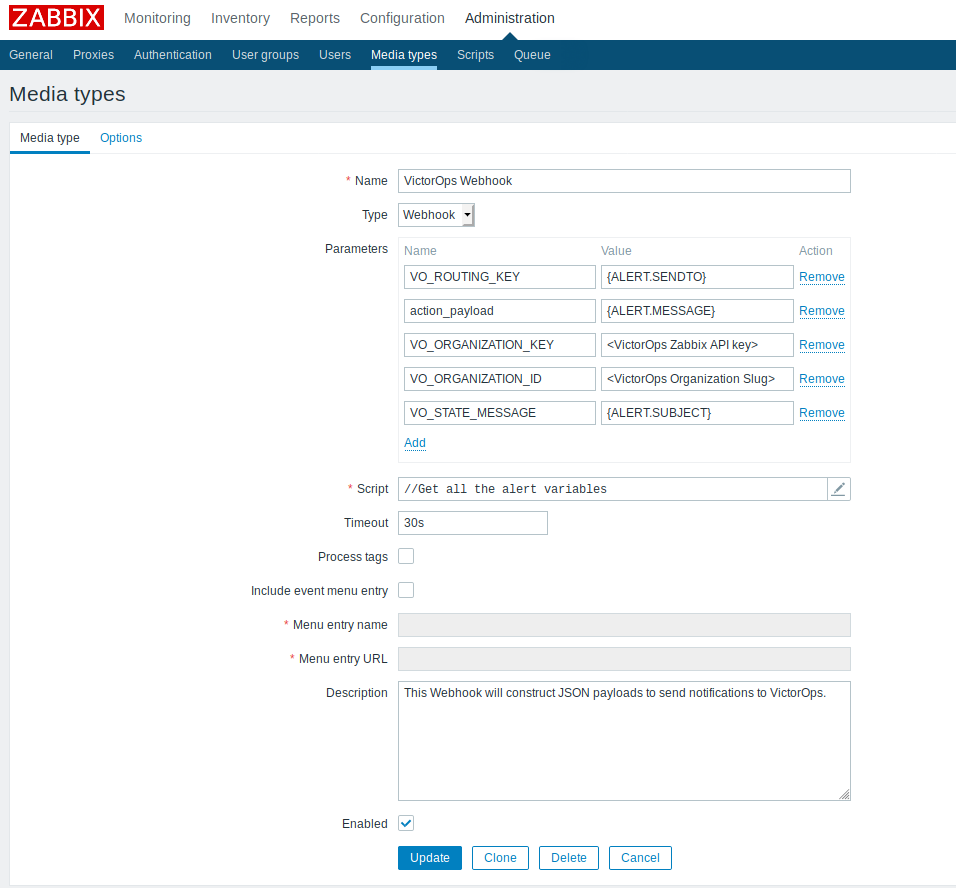
Next, we fill in the script section with the javascript needed to construct the alert to VictorOps.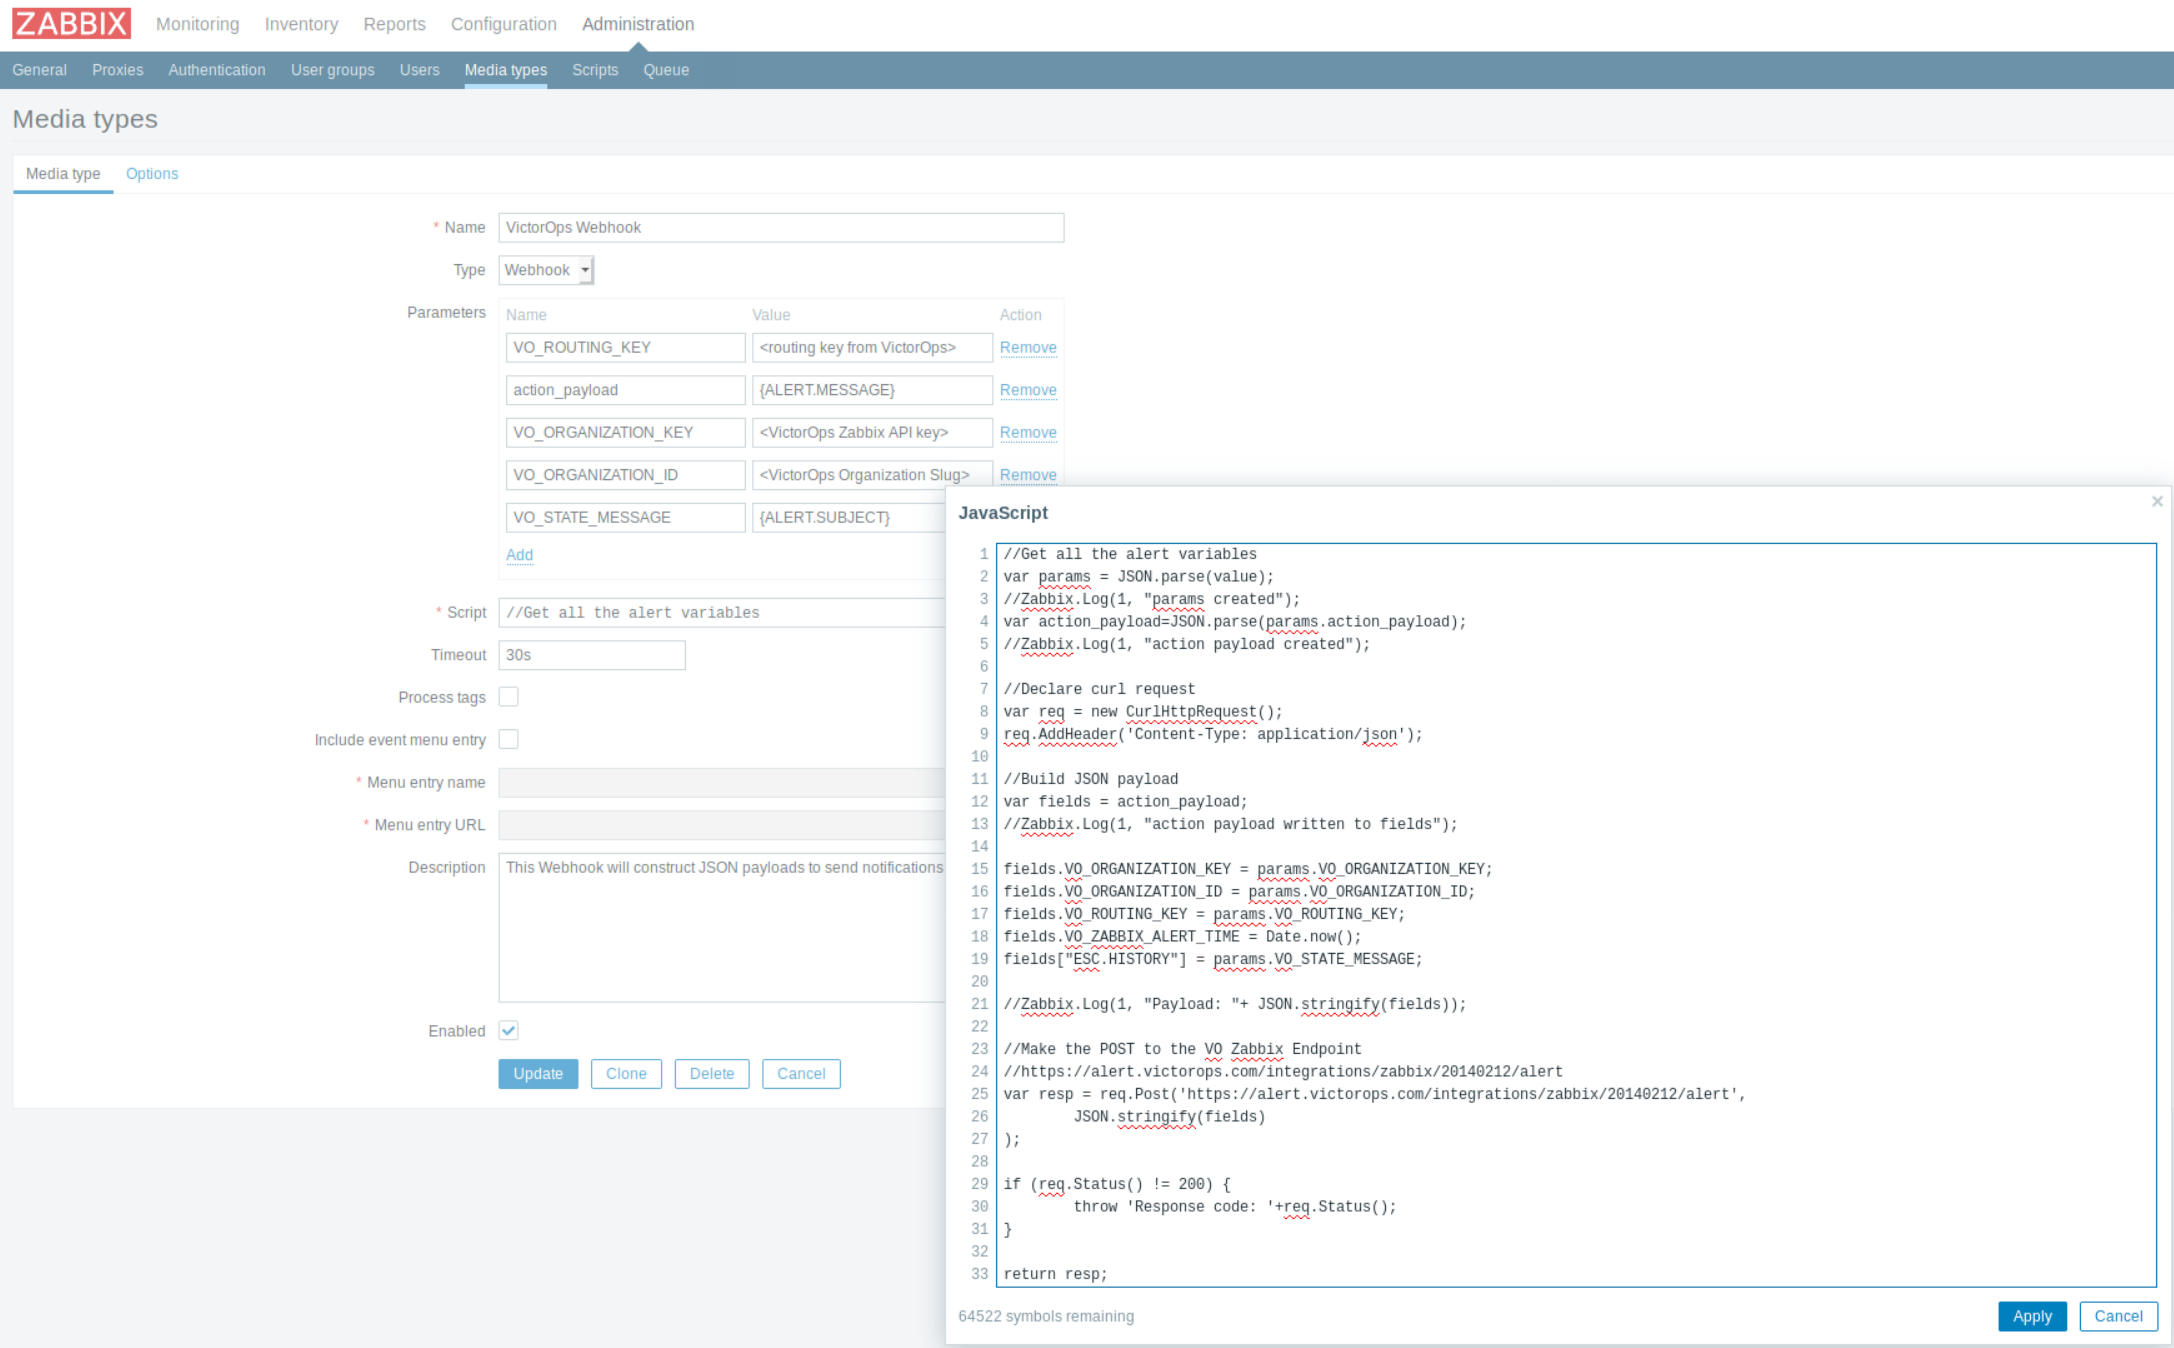
You can find the javascript hosted here. Or copy from this code block:
//Get all the alert variables
var params = JSON.parse(value);
//Zabbix.Log(1, "params created");
var action_payload=params.action_payload;
//Zabbix.Log(1, "action payload created: " + action_payload);

//Use regex to check for invalid quotes and newline chars in the action field values
//For 2 erroneous quotes
//action_payload=action_payload.replace(/([ :])(\")([^"^,]*)(\")([^"^,]*)(\")([^"^,]*)(\")/g, "$1$2$3$5$7$8");
//For 1 erroneous quote
//action_payload=action_payload.replace(/([ :])(\")([^"^,]*)(\")([^"^,]*)([\"][,|\w,])/g, "$1$2$3$5$6");
//Zabbix.Log(1, "action payload regex 1: " + action_payload);
//For newline/carriage returns
//action_payload=action_payload.replace(/[\n\r]/g, " ");
//Zabbix.Log(1, "action payload regex 2: " + action_payload);
// For \
//action_payload=action_payload.replace(/\\/g, String.fromCharCode(92,92));

//Build JSON payload
var fields = JSON.parse(action_payload);
//Zabbix.Log(1, "FIELDS after PARSE: "+fields);

//set fields for use in VictorOps endpoint mapping
if (fields.MONITOR_NAME) {
fields.monitor_name = fields.MONITOR_NAME;
fields.VO_ZABBIX_HOST = fields.MONITOR_NAME;
delete fields.MONITOR_NAME;
}
fields.VO_ORGANIZATION_KEY = params.VO_ORGANIZATION_KEY;
fields.VO_ORGANIZATION_ID = params.VO_ORGANIZATION_ID;
fields.VO_ROUTING_KEY = params.VO_ROUTING_KEY;
fields.VO_ZABBIX_ALERT_TIME = Date.now();
fields["ESC.HISTORY"] = params.VO_STATE_MESSAGE;

//Declare curl request
var req = new CurlHttpRequest();
req.AddHeader('Content-Type: application/json');
//req.setProxy();
//Make the POST to the VO Zabbix Endpoint
//https://alert.victorops.com/integrations/zabbix/20140212/alert
var resp = req.Post('https://alert.victorops.com/integrations/zabbix/20140212/alert',
JSON.stringify(fields)
);

if (req.Status() != 200) {
throw 'Response code: '+req.Status();
}

return resp;
Zabbix User 4.4
Create a new User and assign it to any desired group. Then associate the user, in this case, “VictorOps Alert” with the media type. Fill in the “send to” section with an appropriate VictorOps Routing Key. The user needs read-write permissions so assign whatever permission level necessary. 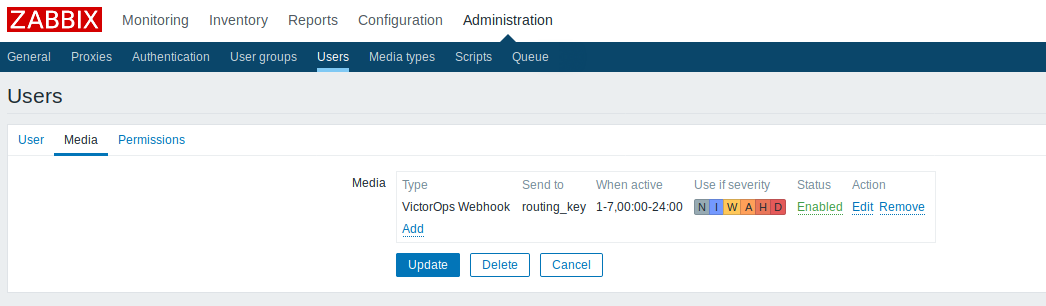
Zabbix Action 4.4
The next step is to create the action. You may customize alerting behavior by setting the action conditions.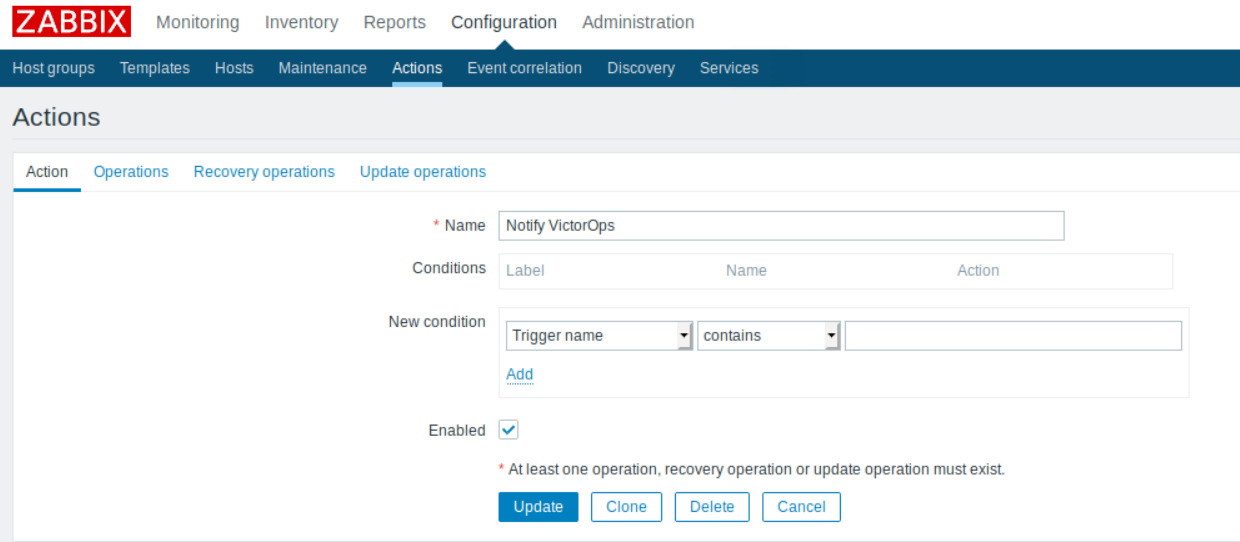
Then, update the Operations and Recovery Operations tabs with the appropriate JSON payload.
Place the following payloads in the “Default Message” section of both tabs. Then update the “Default Subject” to “Incident: {ESC.HISTORY}” on the Operations tab and “Resolved: {ESC.HISTORY}” on the Recovery Operations tab.
1 2 3 4 5 6 7 8 9 10 11 12 13 14 15 16 17 18 19 20 21 22 23 24 25 26 27 28 29 30 31 32 33 34 35 36 37 38 39 40 | {
"TRIGGER.KEY":"{ITEM.KEY}",
"TRIGGER.DESCRIPTION":"{TRIGGER.DESCRIPTION}",
"TRIGGER.HOSTGROUP.NAME":"{TRIGGER.HOSTGROUP.NAME}",
"TRIGGER.EXPRESSION":"{TRIGGER.EXPRESSION}",
"TRIGGER.ID":"{TRIGGER.ID}",
"TRIGGER.NAME":"{TRIGGER.NAME}",
"TRIGGER.NAME.ORIG":"{TRIGGER.NAME.ORIG}",
"TRIGGER.NSEVERITY":"{TRIGGER.NSEVERITY}",
"TRIGGER.SEVERITY":"{TRIGGER.SEVERITY}",
"TRIGGER.STATUS":"{TRIGGER.STATUS}",
"TRIGGER.TEMPLATE.NAME":"{TRIGGER.TEMPLATE.NAME}",
"TRIGGER.URL":"{TRIGGER.URL}",
"TRIGGER.VALUE":"{TRIGGER.VALUE}",
"DATE":"{DATE}",
"EVENT.AGE":"{EVENT.AGE}",
"EVENT.DATE":"{EVENT.DATE}",
"EVENT.ID":"{EVENT.ID}",
"EVENT.STATUS":"{EVENT.STATUS}",
"EVENT.TIME":"{EVENT.TIME}",
"EVENT.VALUE":"{EVENT.VALUE}",
"HOST.CONN1":"{HOST.CONN1}",
"HOST.DNS1":"{HOST.DNS1}",
"HOST.HOST1":"{HOST.HOST1}",
"HOST.IP1":"{HOST.IP1}",
"HOST.NAME":"{HOST.NAME}",
"HOST.NAME1":"{HOST.NAME1}",
"HOST.PORT1":"{HOST.PORT1}",
"TIME":"{TIME}",
"ACTION.ID":"{ACTION.ID}",
"ACTION.NAME":"{ACTION.NAME}",
"ITEM.DESCRIPTION1":"{ITEM.DESCRIPTION1}",
"ITEM.ID1":"{ITEM.ID1}",
"ITEM.KEY1":"{ITEM.KEY1}",
"ITEM.KEY.ORIG1":"{ITEM.KEY.ORIG1}",
"ITEM.LASTVALUE1":"{ITEM.LASTVALUE1}",
"ITEM.NAME1":"{ITEM.NAME1}",
"ITEM.NAME.ORIG1":"{ITEM.NAME.ORIG1}",
"ITEM.VALUE1":"{ITEM.VALUE1}"
} |
1 2 3 4 5 6 7 8 9 10 11 12 13 14 15 16 17 18 19 20 21 22 23 24 25 26 27 28 29 30 31 32 33 34 35 36 37 38 39 40 41 42 43 44 45 | {
"TRIGGER.KEY":"{ITEM.KEY}",
"TRIGGER.DESCRIPTION":"{TRIGGER.DESCRIPTION}",
"TRIGGER.HOSTGROUP.NAME":"{TRIGGER.HOSTGROUP.NAME}",
"TRIGGER.EXPRESSION":"{TRIGGER.EXPRESSION}",
"TRIGGER.ID":"{TRIGGER.ID}",
"TRIGGER.NAME":"{TRIGGER.NAME}",
"TRIGGER.NAME.ORIG":"{TRIGGER.NAME.ORIG}",
"TRIGGER.NSEVERITY":"{TRIGGER.NSEVERITY}",
"TRIGGER.SEVERITY":"{TRIGGER.SEVERITY}",
"TRIGGER.STATUS":"{TRIGGER.STATUS}",
"TRIGGER.TEMPLATE.NAME":"{TRIGGER.TEMPLATE.NAME}",
"TRIGGER.URL":"{TRIGGER.URL}",
"TRIGGER.VALUE":"{TRIGGER.VALUE}",
"DATE":"{DATE}",
"EVENT.AGE":"{EVENT.AGE}",
"EVENT.DATE":"{EVENT.DATE}",
"EVENT.ID":"{EVENT.ID}",
"EVENT.RECOVERY.DATE":"{EVENT.RECOVERY.DATE}",
"EVENT.RECOVERY.ID":"{EVENT.RECOVERY.ID}",
"EVENT.RECOVERY.STATUS":"{EVENT.RECOVERY.STATUS}",
"EVENT.RECOVERY.TIME":"{EVENT.RECOVERY.TIME}",
"EVENT.RECOVERY.VALUE":"{EVENT.RECOVERY.VALUE}",
"EVENT.STATUS":"{EVENT.STATUS}",
"EVENT.TIME":"{EVENT.TIME}",
"EVENT.VALUE":"{EVENT.VALUE}",
"HOST.CONN1":"{HOST.CONN1}",
"HOST.DNS1":"{HOST.DNS1}",
"HOST.HOST1":"{HOST.HOST1}",
"HOST.IP1":"{HOST.IP1}",
"HOST.NAME":"{HOST.NAME}",
"HOST.NAME1":"{HOST.NAME1}",
"HOST.PORT1":"{HOST.PORT1}",
"TIME":"{TIME}",
"ACTION.ID":"{ACTION.ID}",
"ACTION.NAME":"{ACTION.NAME}",
"ITEM.DESCRIPTION1":"{ITEM.DESCRIPTION1}",
"ITEM.ID1":"{ITEM.ID1}",
"ITEM.KEY1":"{ITEM.KEY1}",
"ITEM.KEY.ORIG1":"{ITEM.KEY.ORIG1}",
"ITEM.LASTVALUE1":"{ITEM.LASTVALUE1}",
"ITEM.NAME1":"{ITEM.NAME1}",
"ITEM.NAME.ORIG1":"{ITEM.NAME.ORIG1}",
"ITEM.VALUE1":"{ITEM.VALUE1}"
} |
Lastly update the bottom operations section ON BOTH TABS to send the notification to VictorOps users via the VictorOps Webhook media type. When all is said and done, both tabs should be similar to this: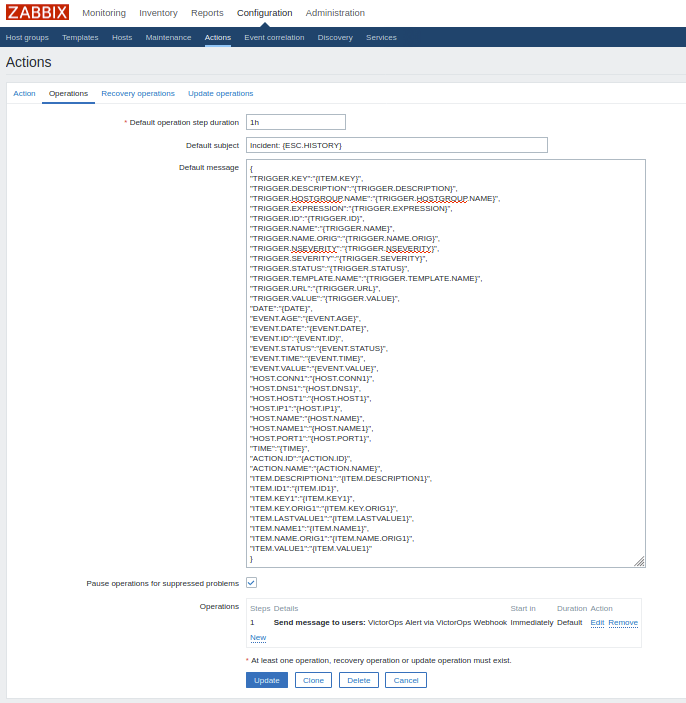
Ack-Back Setup 4.4-5.x
The ack-back functionality is installed via a plugin to create the item “VictorOps Command Poll”. This will allow acknowledgements in VictorOps to update a problem in Zabbix to an “Acknowledged” state.
deb package (For Linux Users)
Execute:
wget https://github.com/victorops/monitoring_tool_releases/releases/download/victorops-zabbix-0.18.3/victorops-zabbix_0.18.3-2_all.deb
sudo dpkg -i victorops-zabbix_0.18.3-2_all.deb
From /opt/victorops/zabbix_plugin/bin execute:
sudo ./install
rpm package
Execute:
wget https://github.com/victorops/monitoring_tool_releases/releases/download/victorops-zabbix-0.18.3/victorops-zabbix-0.18.3-2.noarch.rpm
sudo rpm -i victorops-zabbix-0.18.3-2.noarch.rpm
From /opt/victorops/zabbix_plugin/bin execute:
sudo ./install
Configuration
Rename the file ‘/opt/victorops/zabbix_plugin/conf/local.zabbix.conf.example’ to ‘/opt/victorops/zabbix_plugin/conf/local.zabbix.conf’.
mv /opt/victorops/zabbix_plugin/conf/local.zabbix.conf.example /opt/victorops/zabbix_plugin/conf/local.zabbix.conf
Then edit the file to provide an admin username and password, as well as the Zabbix Server URL for the plugin to be able to update Zabbix problems.
sudo nano local.zabbix.conf
Once installed, the package will need configuration by running the script:
sudo /opt/victorops/zabbix_plugin/bin/configure_ackback.sh
The configure script will connect to the Zabbix server, so to use it you will need to provide a Zabbix admin user ID and password. The script will prompt you for these.
Additionally, you will need to provide your organization “slug” and Zabbix alert key to the configure_ackback.sh script. These are found on your Zabbix integration page in VictorOps. (Settings>>Alert Behavior>>Integrations>>Zabbix). The organization id is the slug version your VictorOps account name and is visible in the url of your browser when inside the web portal. For example, “My Company” would be displayed as “my-company” in the url.
The final script to run is:
sudo /opt/victorops/zabbix_plugin/bin/create_links.sh
After the scripts have been run, there will be a new item on the Zabbix-Server called VictorOps Command Poll. Enable this item for Zabbix to get acknowledgement statuses from VictorOps.
Once this item is enabled your configuration is complete.
If you have any trouble getting these webhooks or ack-back configured please reach out to support.
NOTE: If you are installing your Zabbix integration on Ubuntu, you may need to install Curl; to do so, run this command:
sudo apt install curl
Zabbix 4.2 and Below – Plugin
The Plugin
VictorOps’ Zabbix plugin is a set of scripts that queue up trigger notifications and forward them to VictorOps servers for processing. The queuing up of notifications is done in-band as Zabbix runs the notification script, and forwarding is done out-of-band by a long-running process.
The forwarding process can retry sending the notification, and if the send fails for any reason, for an extended period of time (1 minute by default), it will fall back to sending an email to a configured address.
Layout
The main package files are installed to /opt/victorops/zabbix_plugin
Notifications are queued in /var/victorops/zabbix-alerts
Logging is written in /var/log/victorops
Symbolic links are created in the Zabbix alert scripts and external scripts directories (probably /usr/lib/zabbix/alertscripts/ and /usr/lib/zabbix/externalscripts/) for some of the files in /opt/victorops/zabbix_plugin/bin.
Installation
The package is available as an RPM, DEB or tarball from our github: https://github.com/victorops/monitoring_tool_releases/releases/tag/victorops-zabbix-0.17.3
If you cannot access the above repository, please contact Support.
deb package
Execute:
wget https://github.com/victorops/monitoring_tool_releases/releases/download/victorops-zabbix-0.17.3/victorops-zabbix_0.17.3-2_all.deb
sudo dpkg -i victorops-zabbix_0.17.3-2_all.deb
From /opt/victorops/zabbix_plugin/bin execute:
sudo ./install
rpm package
Execute:
wget https://github.com/victorops/monitoring_tool_releases/releases/download/victorops-zabbix-0.17.3/victorops-zabbix-0.17.3-2.noarch.rpm
sudo rpm -i victorops-zabbix-0.17.3-2.noarch.rpm
From /opt/victorops/zabbix_plugin/bin execute:
sudo ./install
Configuration
If you install from the DEB or RPM packages, the installer will put the plugin files in their location in /opt/victorops/zabbix_plugin. Additionally, two directories will be created,/var/victorops/zabbix-alerts and /var/log/victorops, for notification queuing and logging, respectively.
Once installed, the package will need configuration by running the script:
/opt/victorops/zabbix_plugin/bin/configure.sh
The configure script will connect to the Zabbix server, so to use it you will need to provide a Zabbix admin user ID and password. The script will prompt you for these.
Additionally, you will need to provide your organization “slug” and Zabbix alert key to the configure.sh script. These are found on your Zabbix integration page in VictorOps. (Settings>>Alert Behavior>>Integrations>>Zabbix). The organization id is the slug version your VictorOps account name and is visible in the url of your browser when inside the web portal. For example, “My Company” would be displayed as “my-company” in the url.
You may also provide an email address as the fallback contact in the unlikely event that sending a notification to VictorOps fails.
The final script to run is
/opt/victorops/zabbix_plugin/bin/create_links.sh
and your configuration is complete.
Configuration Elements
The configure script connects to the Zabbix server and, using the Zabbix API, adds several elements required to forward notifications to VictorOps. These are:
- A Zabbix user “VictorOps Alert“
- A Zabbix user group “VictorOps Users“
- A Zabbix media type “Notify VictorOps“
- A Zabbix action “Notify VictorOps“. The action includes the specific message content required for processing and is invoked by Zabbix for any trigger in problem status, including recovery notifications.
- A Zabbix item “VictorOps forwarder” to the host “Zabbix Server” for the VictorOps forwarder process. This item is an “external check” type. When Zabbix runs a check of this item, it will start the forwarder process if necessary.
Configure Ack-Back to Zabbix
To enable the ack-back feature for Zabbix, do the following:
Copy /opt/victorops/zabbix_plugin/conf/local.zabbix.conf.example to /opt/victorops/zabbix_plugin/conf/local.zabbix.conf
Open /opt/victorops/zabbix_plugin/conf/local.zabbix.conf in an editor and set a user and password allowed to log-in to the Zabbix console with “acknowledge” permissions
ZABBIX_USER=admin
ZABBIX_PASSWD=fooblyboo
You may wish to change the owner of the file to the Zabbix user, and set permissions to 600.
On the Zabbix console, navigate to the “Items” list for your Zabbix server (Configuration >> Hosts >> Zabbix Server >> VictorOps) and enable the VictorOps Command Poll item.
Configure Multiple Zabbix Servers
If you will be using the VictorOps integration on multiple Zabbix servers, you will need to update the Zabbix Action so that it includes the MONITOR_NAME field. You must add this to both the Default and Recovery message bodies.
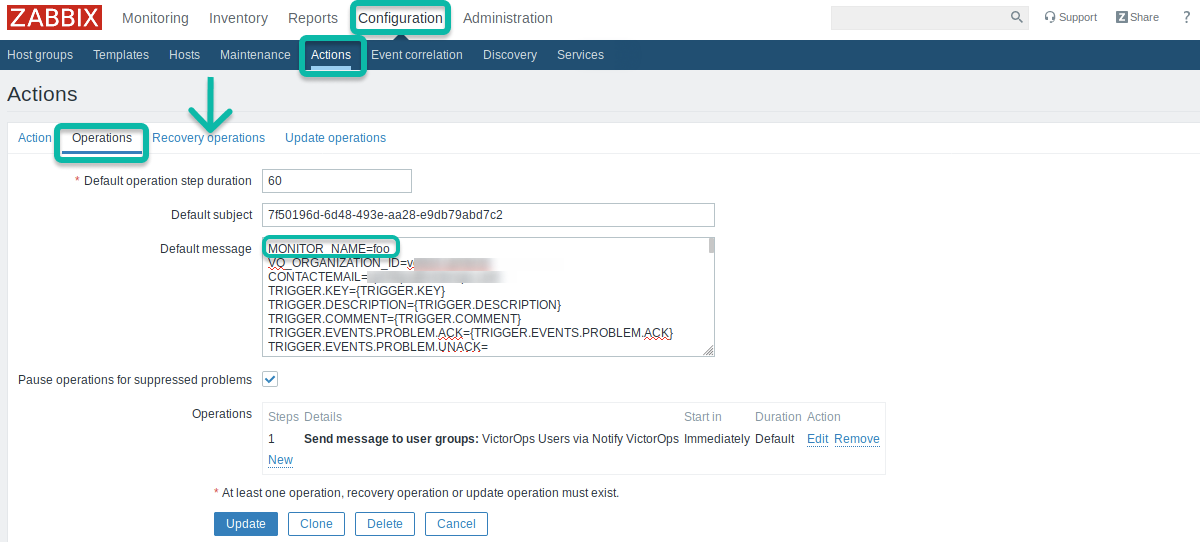
The MONITOR_NAME field should be unique for each Zabbix server that has the plugin installed.
The matching MONITOR_NAME value needs to be added to the configuration file found at /opt/victorops/zabbix_plugin/conf/local.zabbix.conf
The syntax of the .conf file is important. We recommend no spaces and no quotes when setting the MONITOR_NAME value.
These changes will, unfortunately, also have the effect of disconnecting the items on the Zabbix side from the VictorOps side, meaning that if there are any currently open incidents in VictorOps they will have to be manually resolved in VictorOps.
Finally, you will need to enable the VictorOps Command Poll item, just like in the previous section Configure Ack-Back to Zabbix.
Routing Incidents in VictorOps
Any incidents created by notifications sent to VictorOps will be processed on the default routing rule (Settings>>Alert Behavior>>Routing). If you prefer to use another routing key in VictorOps, you can modify the media for the VictorOps Alert user and put your VictorOps routing key in the Send to field.
Access the VictorOps Alert user:

Change the Send To to the routing key you wish to use.
To create multiple or complex routing schemes, you may need to create new Zabbix actions, users and or media types for the routing keys involved.
Troubleshooting
Syntax Error: Invalid json (at offset…)

If you are seeing errors on the Webhook action like this, it usually means there is some invalidating JSON characters in the item or trigger names and descriptions.
Lines 9, 11, 14, and 17 in the VictorOps media type script can be un-commented to parse out quotes and new line characters. If this fails to resolve your issue, you can augment the regular expression (for other invalidating characters) or reach out to our support team at victorops-support@splunk.com.
Proxy (5.0+ ONLY)
Line 38 can be un-commented to add a proxy to your Zabbix Webhook. NOTE: This feature was introduced in Zabbix 5.0 so it will only work with 5.0+ versions of Zabbix.
Notification Handling
The action to notify VictorOps saves the notification details to a file on disk. Within a couple seconds, the forwarder process will send the details to VictorOps, where the normal alert processing will be performed.
If forwarding the details is unsuccessful, the timestamp of the details is checked, and if the details are old (1 minute by default), the details are instead sent to the backup email address you provided at configuration time.
NOTE: If you want to shorten the payload (Default Message) sent from Zabbix to VictorOps, you must leave the following minimum required fields:
VO_ORGANIZATION_ID= YOUR_ORG_SLUG_HERE
CONTACTEMAIL= YOUR_EMAIL_HERE
ESC.HISTORY={ESC.HISTORY}
EVENT.ACK.HISTORY={EVENT.ACK.HISTORY}
EVENT.ACK.STATUS={EVENT.ACK.STATUS}
EVENT.DATE={EVENT.DATE}
EVENT.TIME={EVENT.TIME}
HOSTNAME={HOSTNAME}
HOST.NAME={HOST.NAME}
HOST.NAME1={HOST.NAME1}
TRIGGER.KEY={TRIGGER.KEY}
TIME={TIME}
TRIGGER.ID={TRIGGER.ID}
TRIGGER.NAME={TRIGGER.NAME}
TRIGGER.NSEVERITY={TRIGGER.NSEVERITY}
TRIGGER.SEVERITY={TRIGGER.SEVERITY}
TRIGGER.STATUS={TRIGGER.STATUS}