Splunk On-Call Version Required: Full-Stack
What you need to know: To enable SSO for your organization, you will need to provide an updated metadata file and your IDP. If you are interested in setting up SSO, please contact Splunk On-Call Support.
This article provides instructions for configuring Single Sign On between your Identity Provider (IDP) and Splunk On-Call. It also provides information for your end users when logging into Splunk On-Call for the first time using SSO.
Our standard SSO setup uses SAML 2.0 protocol. As long as your IDP can use SAML 2.0 protocol, it can be integrated with Splunk On-Call with fairly minimal effort. The exact steps differ depending on which IDP you use, but the process typically involves exporting a .XML metadata file and sending it to our support team. Once you have sent the .xml file, a Splunk On-Call support specialist will complete the setup on the back-end respond with confirmation.
If your IDP does not have SAML capability, please contact Splunk On-Call Support to explore what alternative options may be available.
Instructions for Users
Organization Slug
Throughout this article, the phrase Organization Slug refers to the slugified version of your organization’s name in Splunk On-Call (This process changes your organization name to a lowercase URL friendly version with no spaces or punctuation, though it may contain dashes). Your Organization Slug can be found at the end of the URL when you are logged into the Splunk On-Call portal via a web browser.
Contact your Splunk On-Call administrator or reach out to Splunk On-Call Support if you are having trouble finding your Organization Slug.
A user’s login experience on the Splunk On-Call platform will be slightly different after enabling Single Sign-On for your organization. If your organization has not explicitly disabled traditional authentication, users will be able to login as normal with their Splunk On-Call credentials or login via SSO. If traditional authentication has been disabled, users will encounter an error message directing them to login via SSO if they attempt to login with their Splunk On-Call credentials.
Web Client UI
The SSO login form can be found here: https://portal.victorops.com/auth/sso
Alternatively, you can create a link or bookmark to skip the typing and bypass the form by appending your company ID to the SSO URL, like this: https://portal.victorops.com/auth/sso/org-slug-here
Either of these routes will direct the user’s browser to your identity provider, where they will be required to authenticate and sent back to the Splunk On-Call timeline.
Mobile Applications
The Splunk On-Call client for your mobile device will also present a link on the login screen, offering the option to use your SSO credentials.
iOS/Android SSO Login
On the login screen, select “Sign in with Enterprise SSO”. This link will take you to a form prompting for your Organization Slug. After you enter your Company’s Organization Slug, you will be redirected to your IDP login page in a mobile browser. Once you sign in through the IDP you will be automatically logged into Splunk On-Call.
First-Time SSO Login
If your organization is using SSO you will need to do a one-time linking process between your SSO provider and your Splunk On-Call account. This will create a link between your external user ID and your Splunk On-Call user ID. If you have not received a “Your invitation to Splunk On-Call” email, please contact your Splunk On-Call administrator and ask them to send you an invitation.
- Receive an email to activate your Splunk On-Call account, create your username and password and complete the account set up process.
- You will be directed into the Splunk On-Call platform. From here, you need to sign out and select “sign in via SSO” on the login page to perform the one-time link. Please verify that you have logged out of Splunk On-Call in every browser you are using, and your IDP.
- Next, you will be prompted to enter your Org Slug
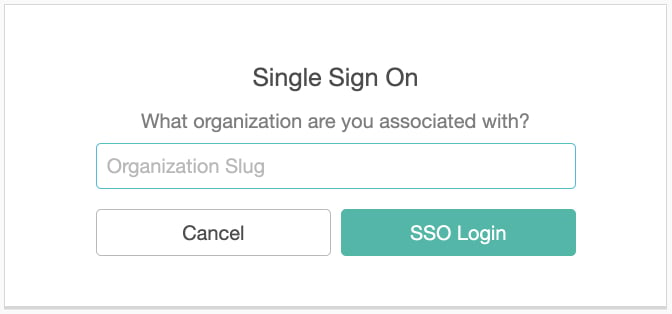
- From this page you will be redirected to your IDP page, where you will sign in using your SSO credentials.
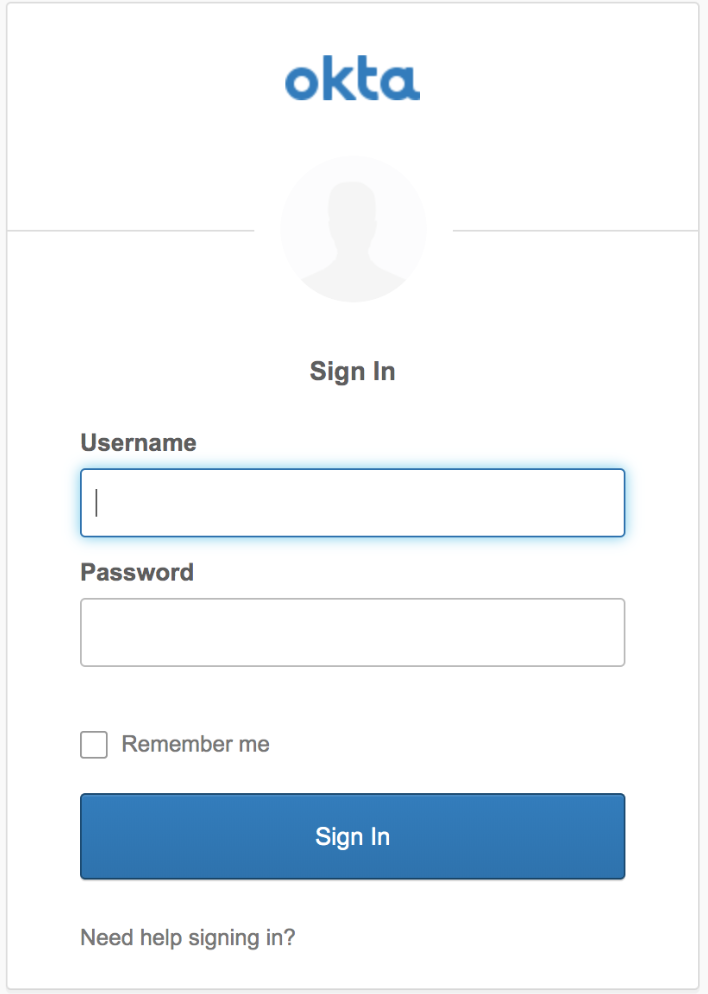
- After entering IDP credentials, you will be asked to enter the Splunk On-Call username/password. You will only need to enter your Splunk On-Call username and password once, and then we will not ask for it again.
- From here the user will be taken into the Splunk On-Call platform and they have finished the one-time SSO linking process!
How to break your SSO Linkage
If you are receiving an error when trying to sign into Splunk On-Call through SSO (such as “Uh oh – The Splunk On-Call user you have linked to your external SSO ID is not part of <Your-Company>. Please contact your administrator”), you may need to break the linkage between your Splunk On-Call username/password and your SSO provider.
To break the linkage, ensure you are signed in to your IDP and then paste the following link into the address bar of your browser: https://portal.victorops.com/do-defederation . Once the link between your Splunk On-Call credentials and your SSO provider is successfully broken, you will see the error, shown below. While a bit counterintuitive, we want to see this error message in this circumstance.
Note: You may have to paste the defederation link into your browser multiple times before the below error message will appear.

To re-associate your Splunk On-Call username/password with your SSO provider, you will need to walk through the “one-time” linking process again (please see steps in the “First-Time SSO Login” section).
If you have any questions or experience any issues, please contact Splunk On-Call Support.
Administrator Setup
Please see below for corresponding steps needed to complete, or begin, the SSO configuration with Splunk On-Call, and your IDP (Identity Provider).
Okta
From the Okta User Homepage, select Admin.

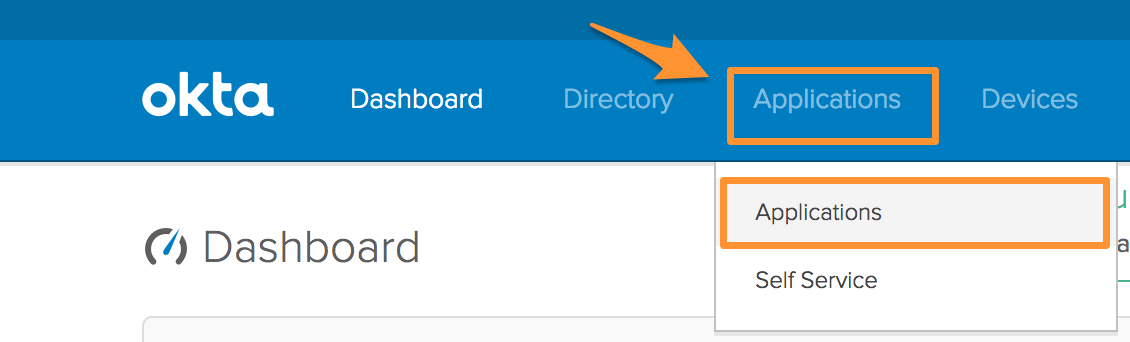
Selecting Admin will bring you to the Okta Dashboard. From the Okta Admin Dashboard, click Applications, and select Applications from the drop down.
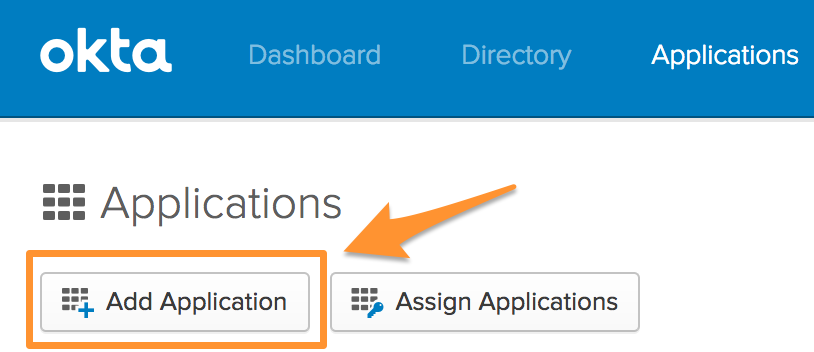
Within Applications, select Add Application.
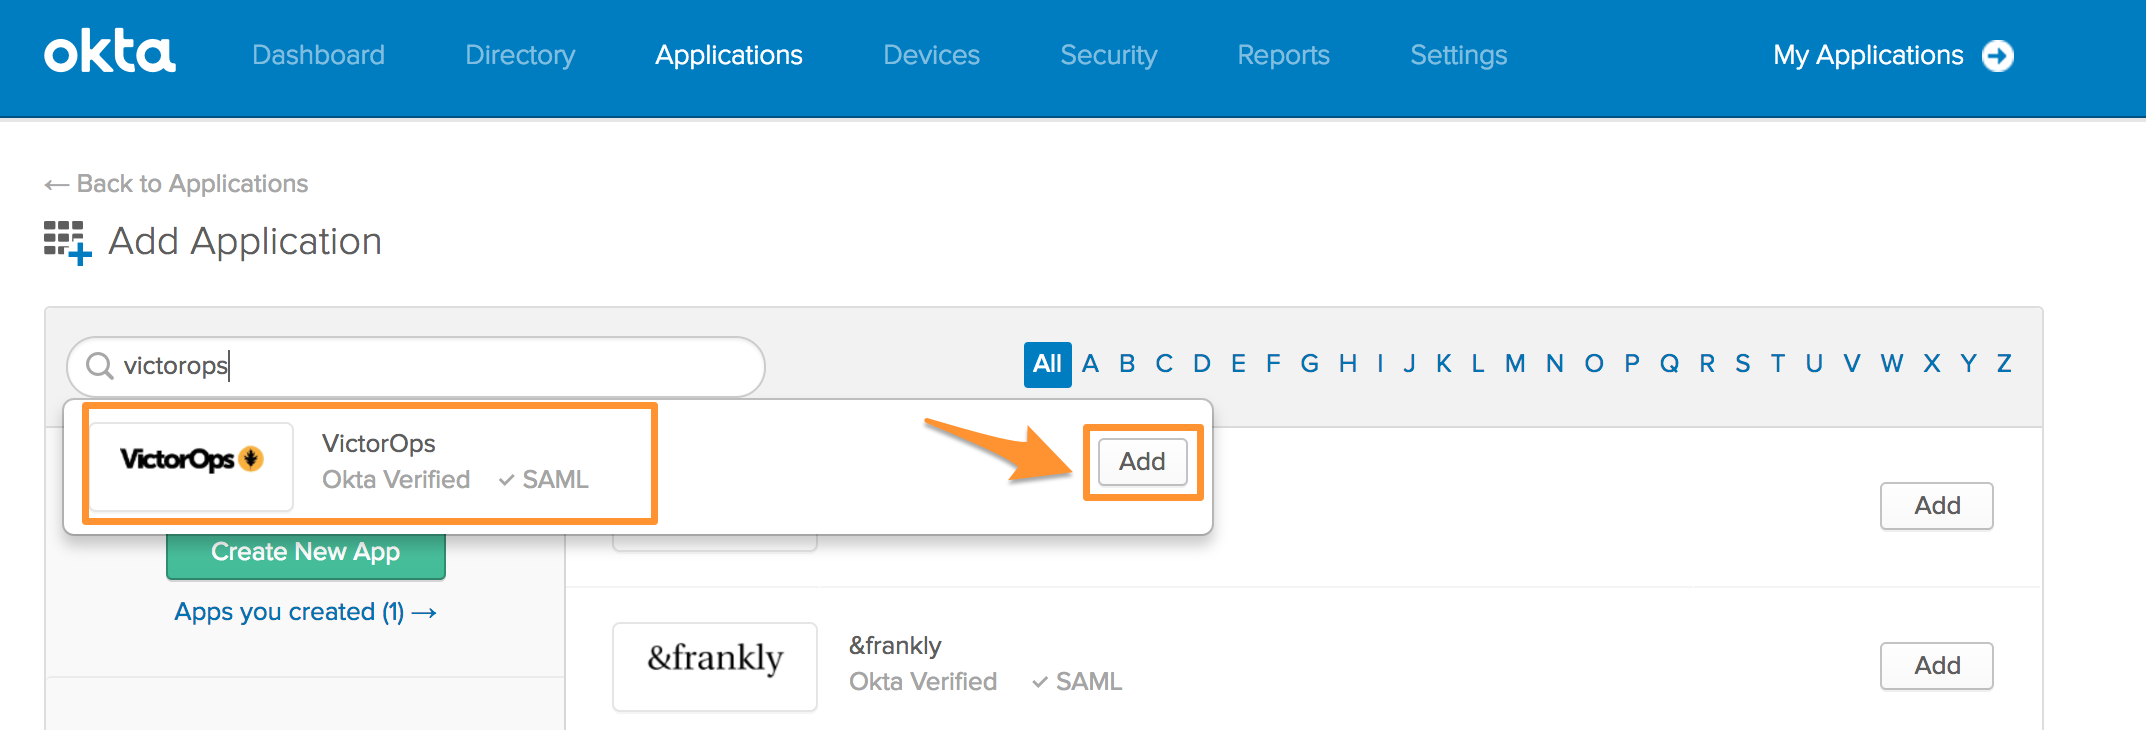
After clicking Add Application, begin typing Splunk On-Call in the search bar. When Splunk On-Call appears, select Add.
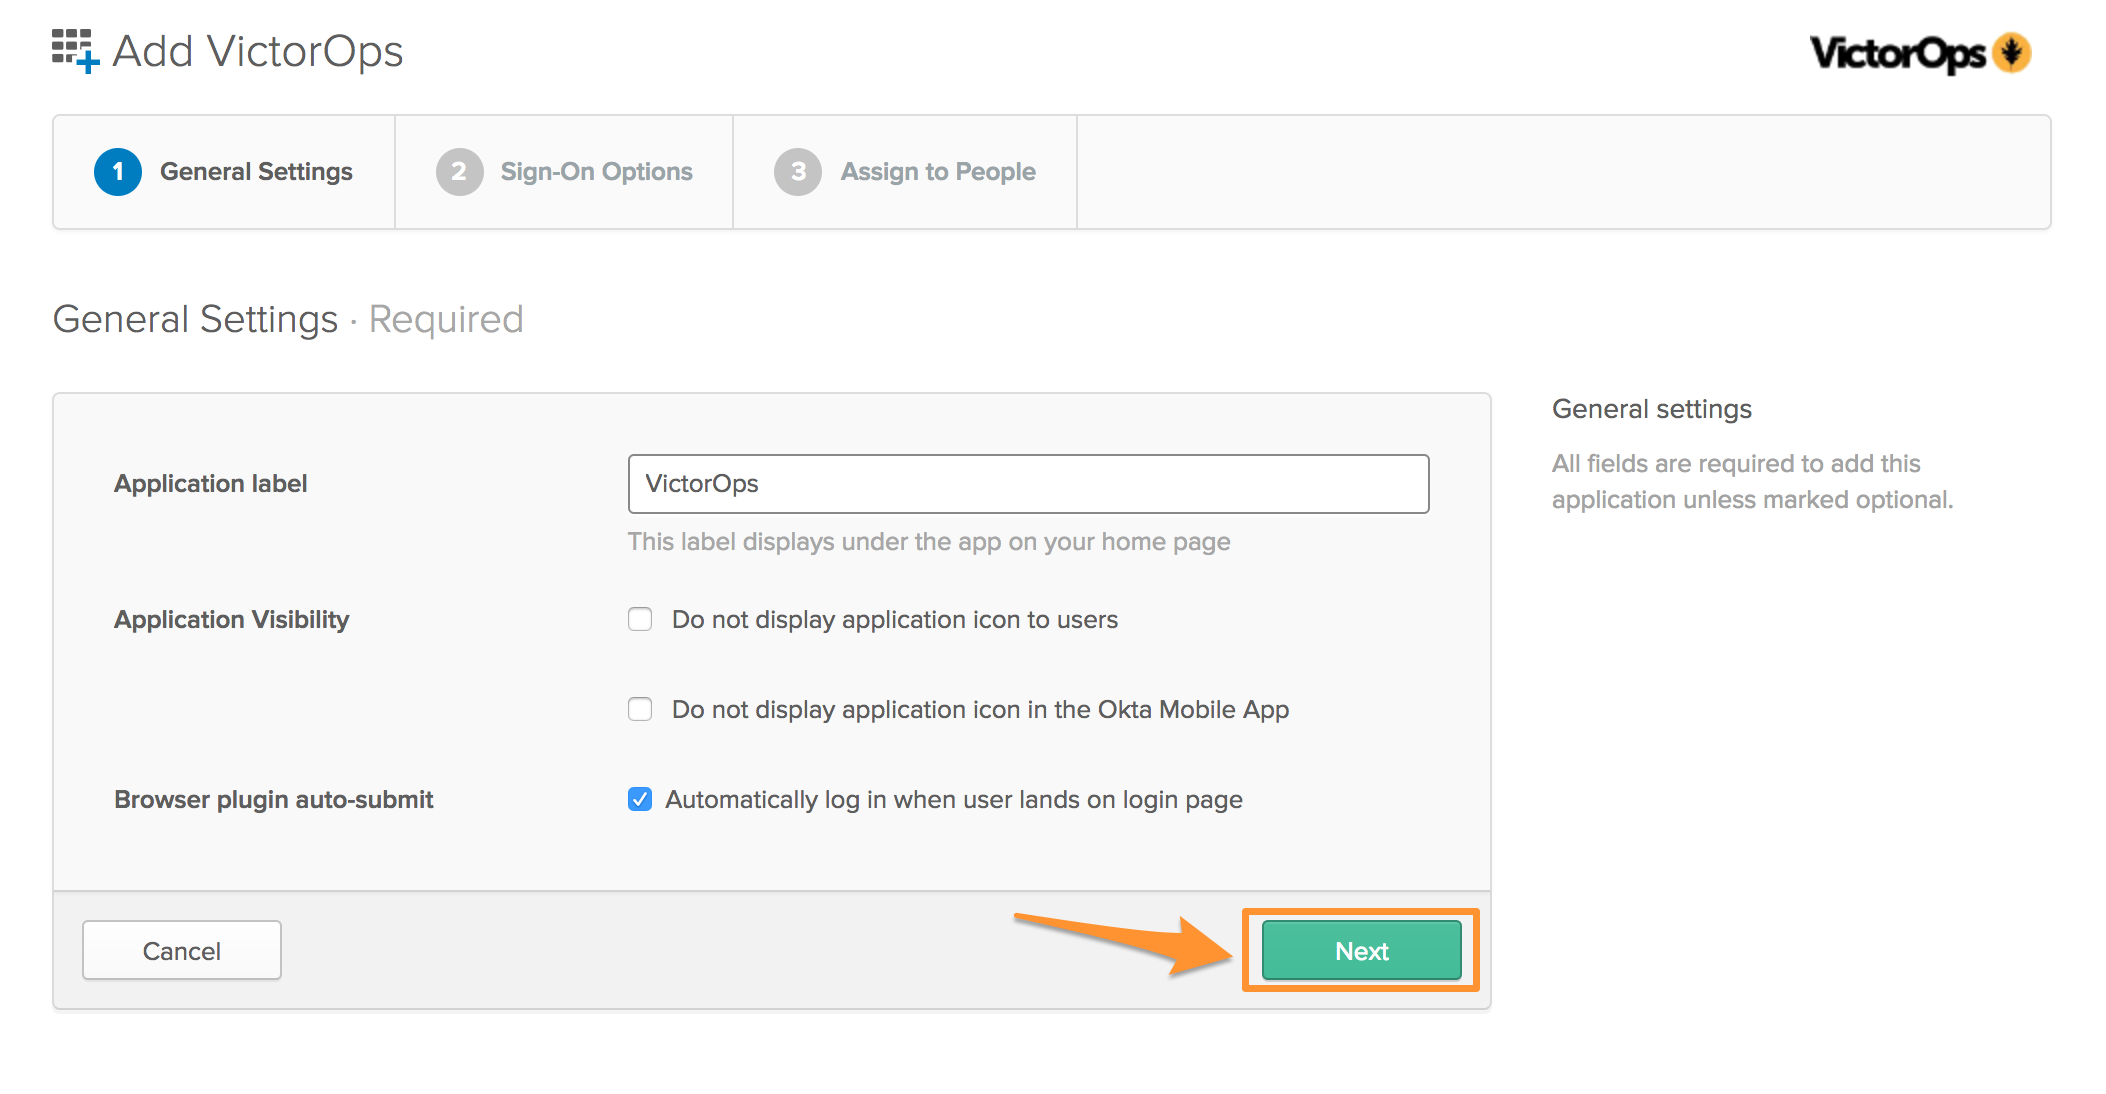
The Application label, or name, should auto-populate with the name Splunk On-Call, but please feel free to re-name this label, if desired. The Browser plugin auto-submit should be auto-populated as well. Verify that this setting is checked, and click Next.
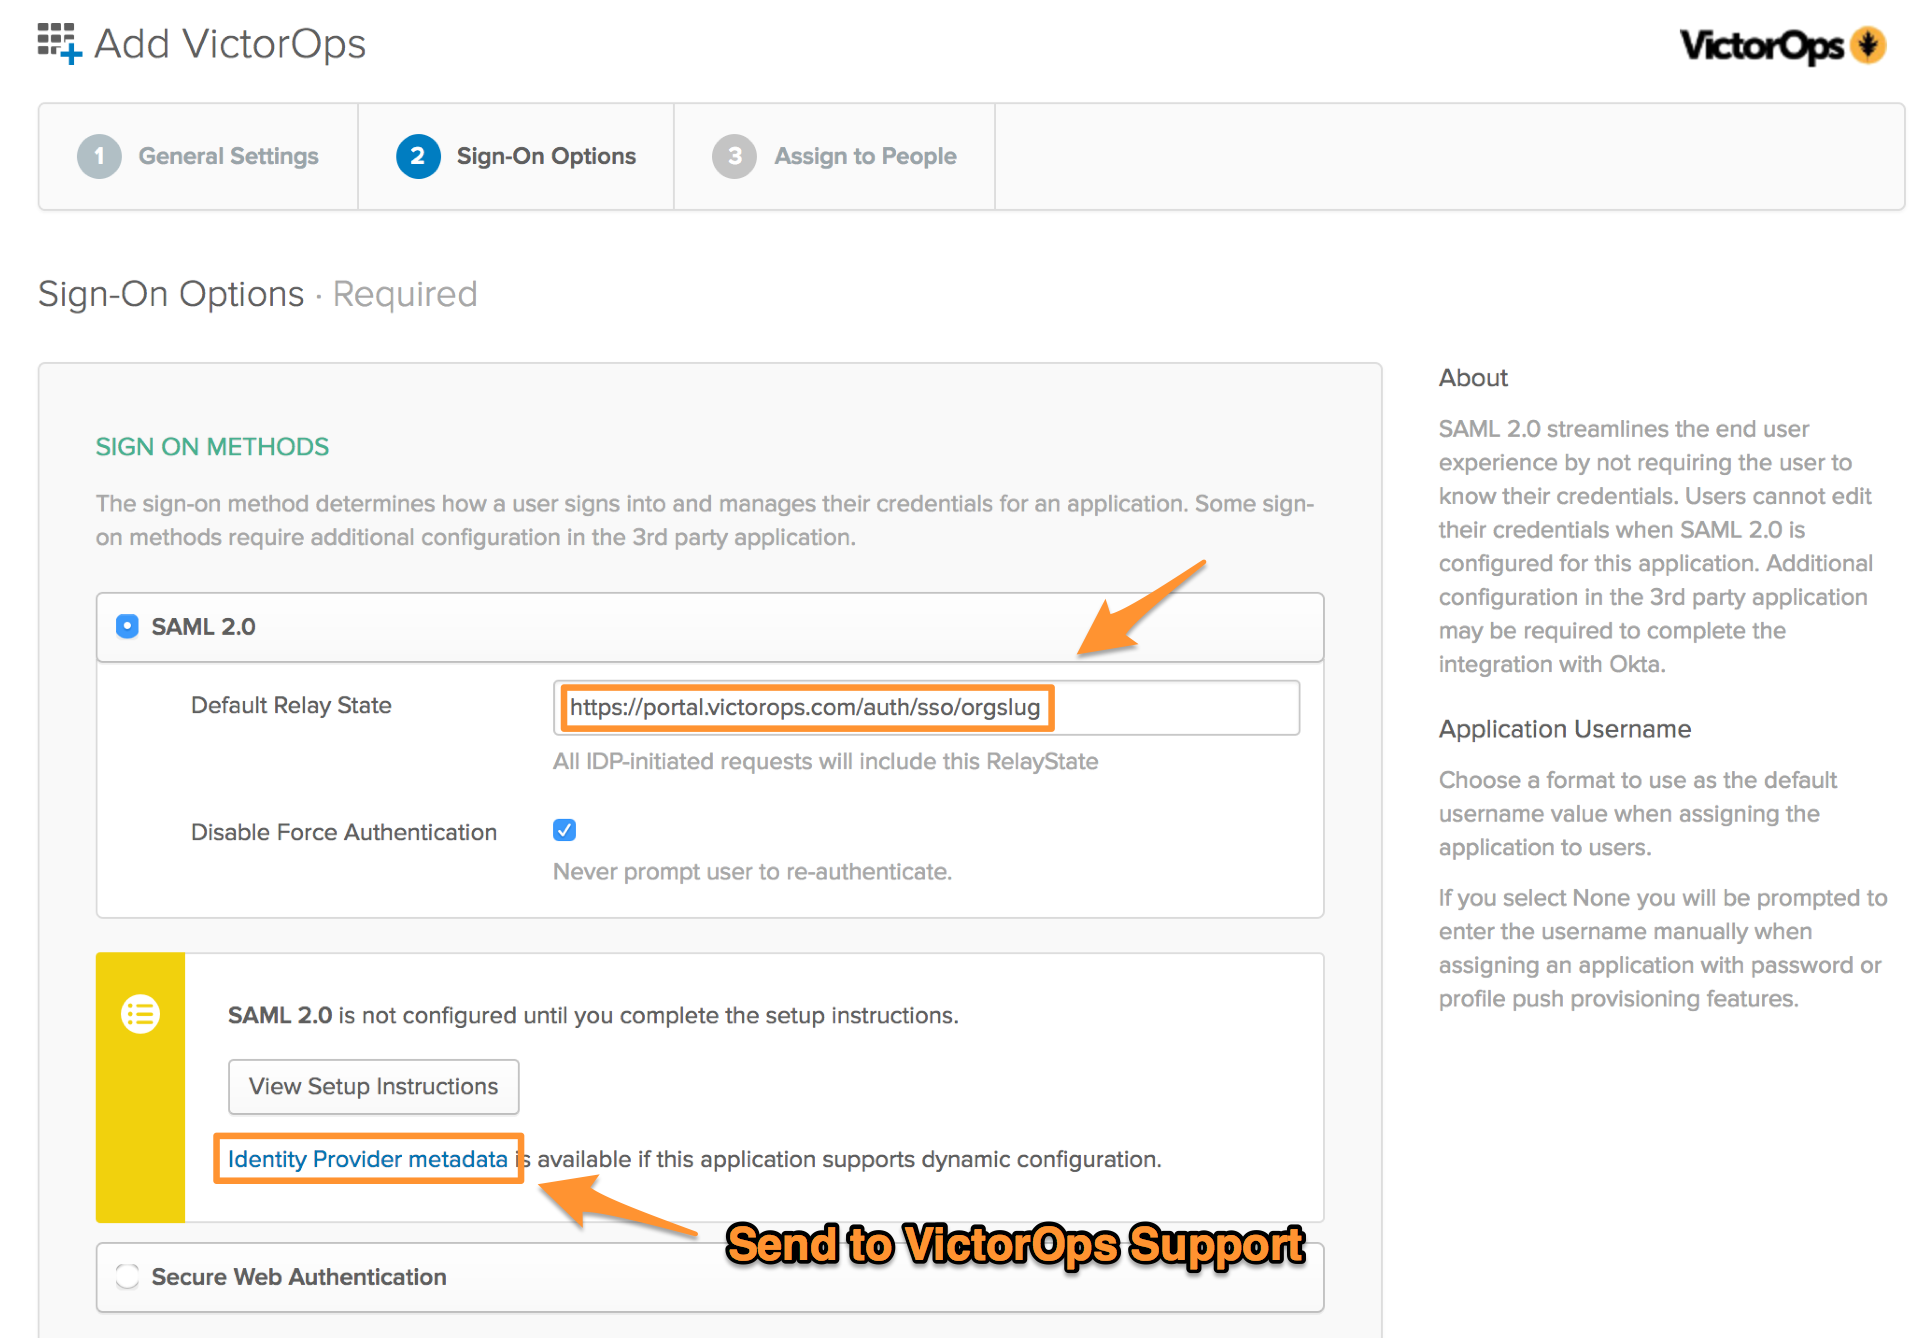
In the Default Relay State box drop in the following URL:
- Default Relay State: https://portal.victorops.com/auth/sso/org-slug-here
![]()
Once the URL has been added, click on the Identity Provider metadata to download the metadata file, needed by Splunk On-Call, to conduct the SSO configuration. Once you have downloaded the file click Next. (Don’t forget to email this file to Splunk On-Call Support.)
Once you have clicked Next, select the users that should have access to add the Splunk On-Call app to their Okta homepage and sign in to Splunk On-Call through SSO. Once all of the users have been selected, click Next.
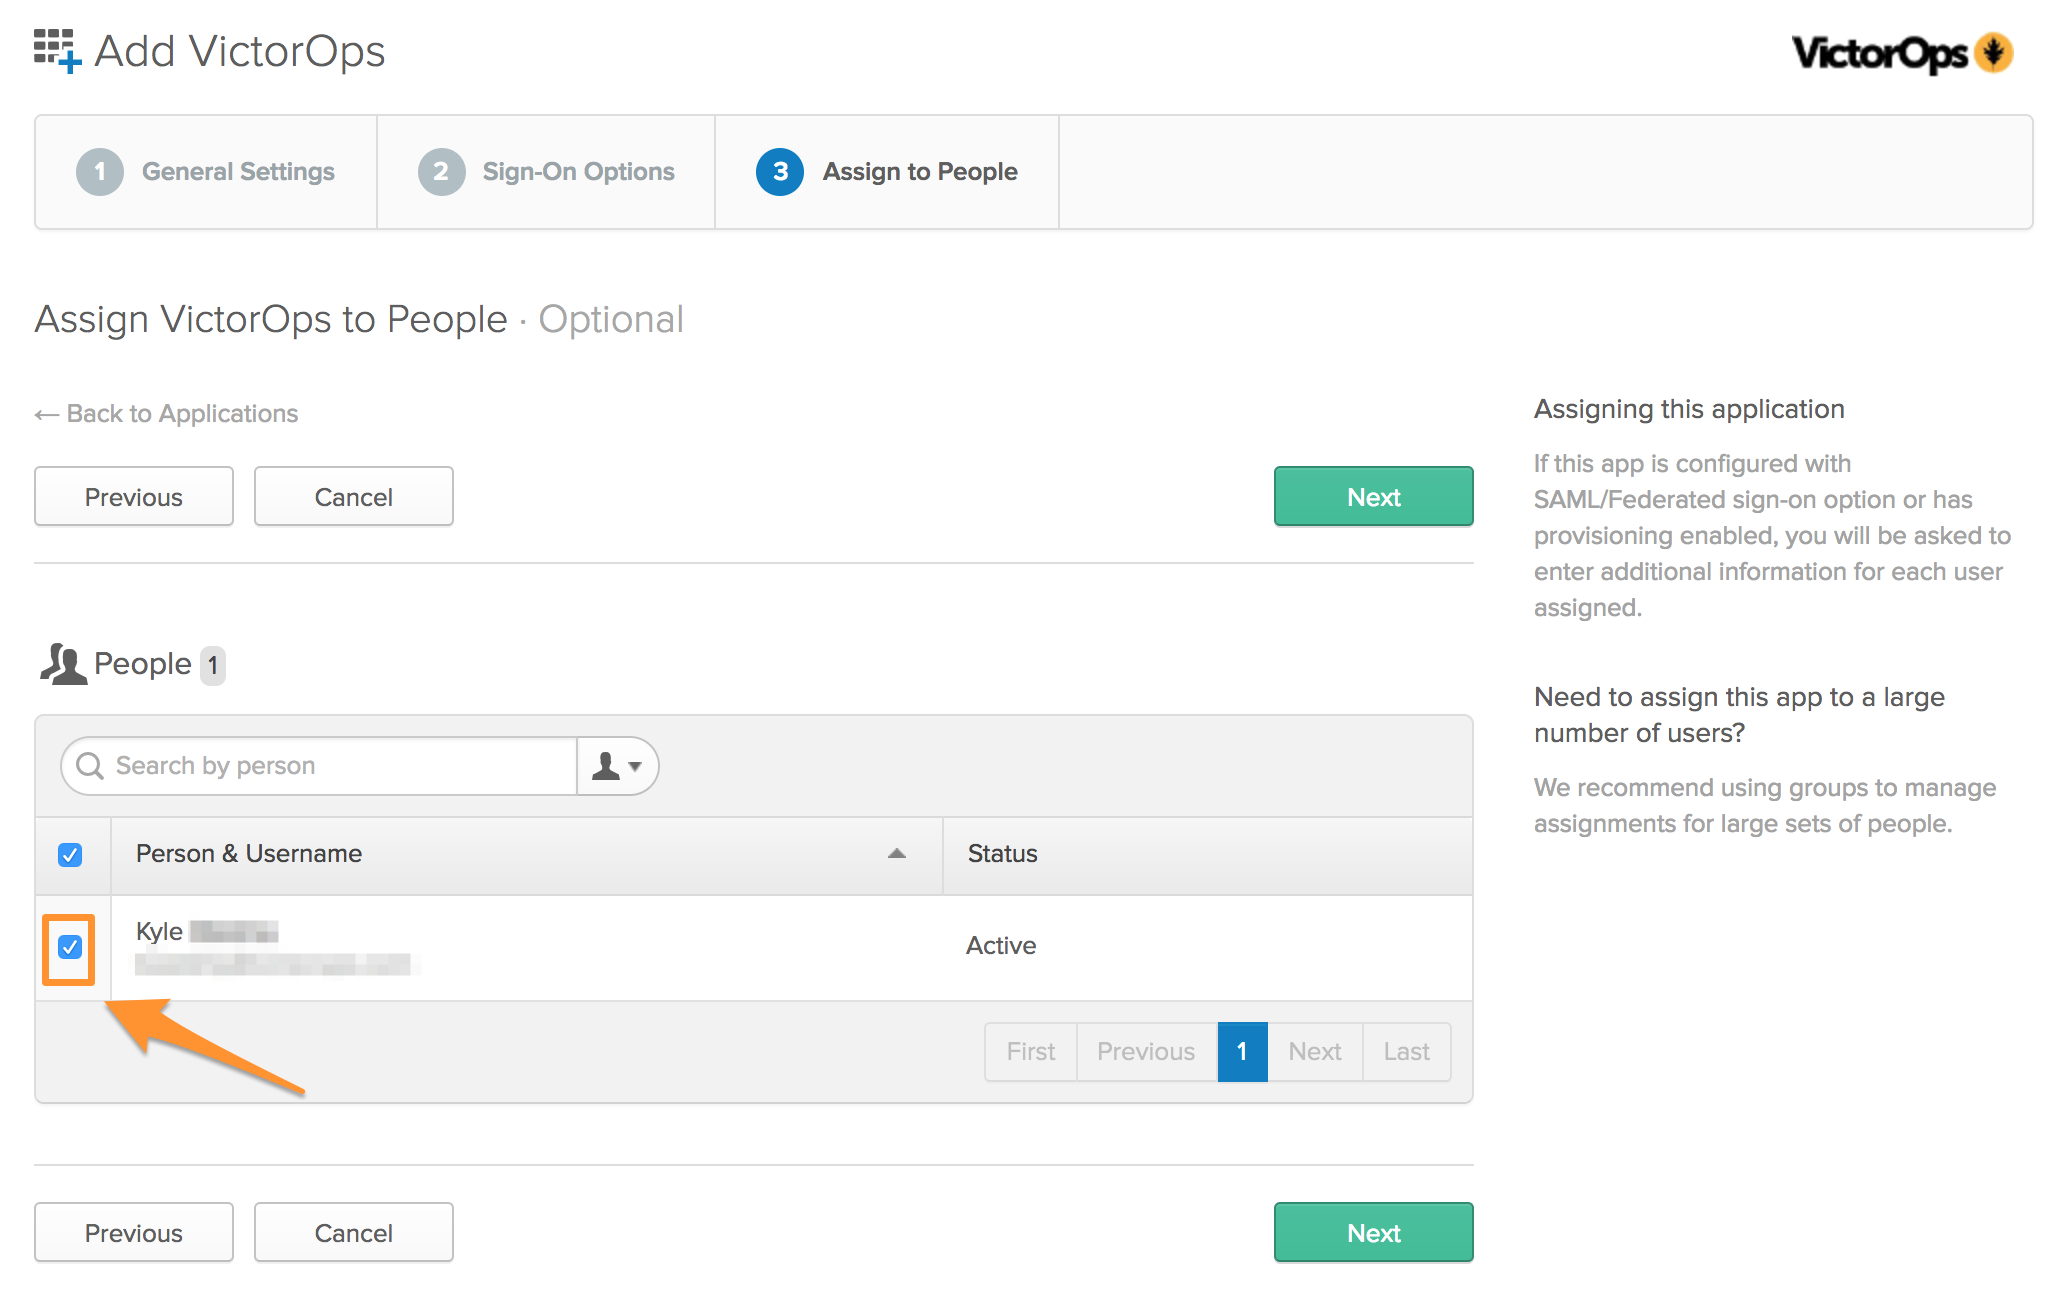
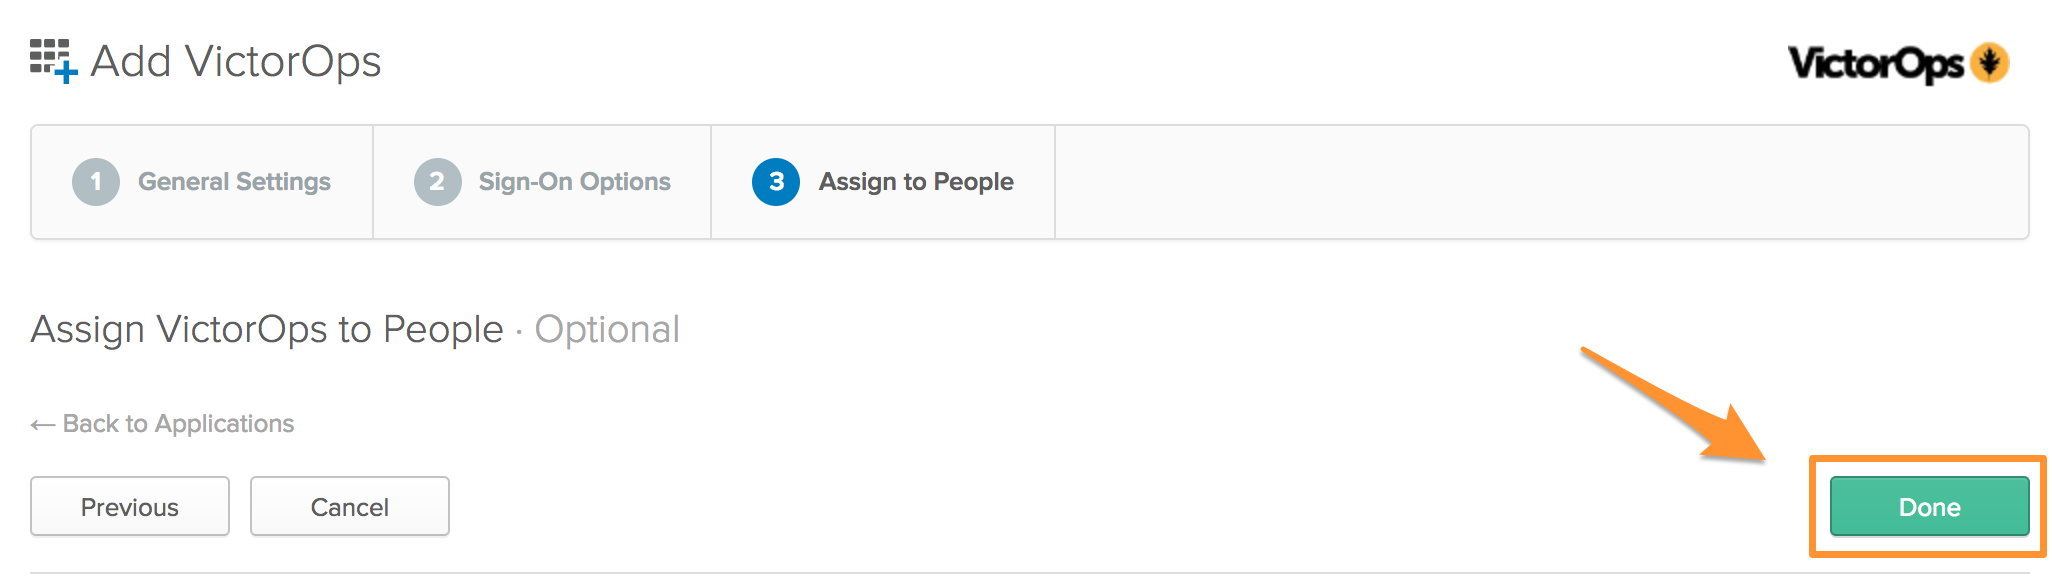
Then click Done, on the next page.
Once the users have added the App they will be directed to a one time linking process to connect their Splunk On-Call credentials to Okta, see below.
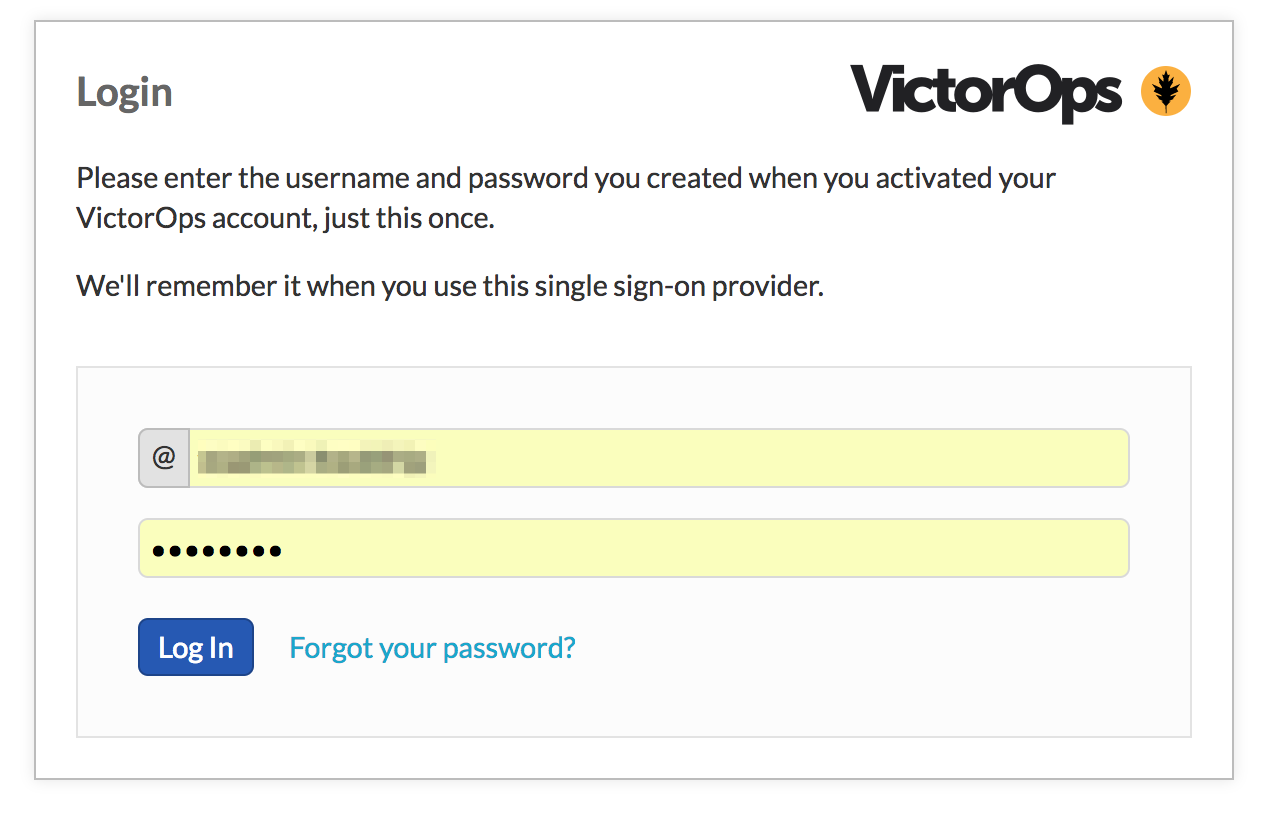
To conduct the one-time linking process outside of the Okta Homepage, please see the steps located in the “First-Time SSO Login” section above.
Google Apps
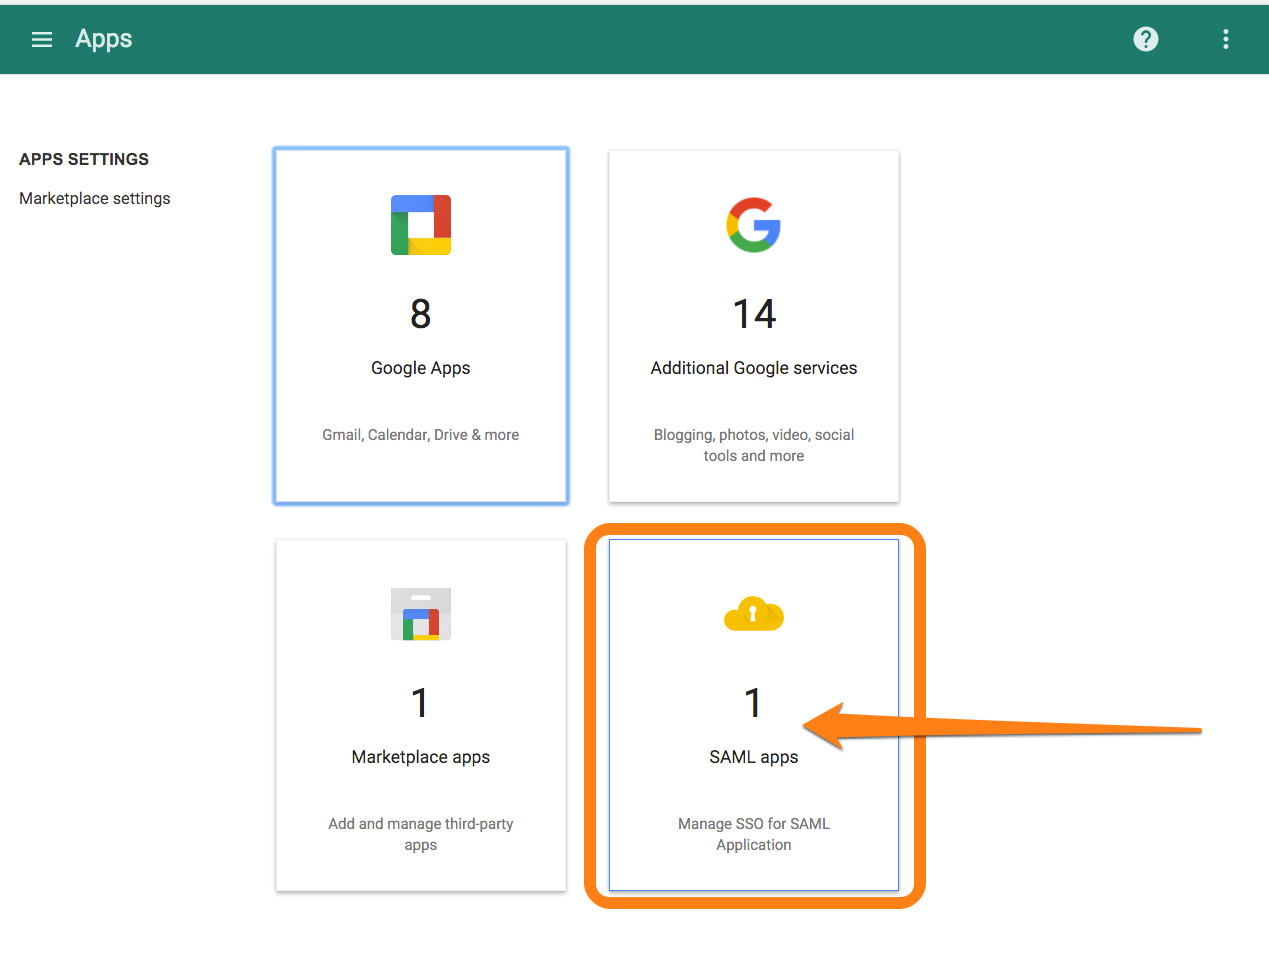
- Access the Admin portal for Google Apps and navigate to Apps >> SAML Apps:
- Select “Set up my own custom app”:
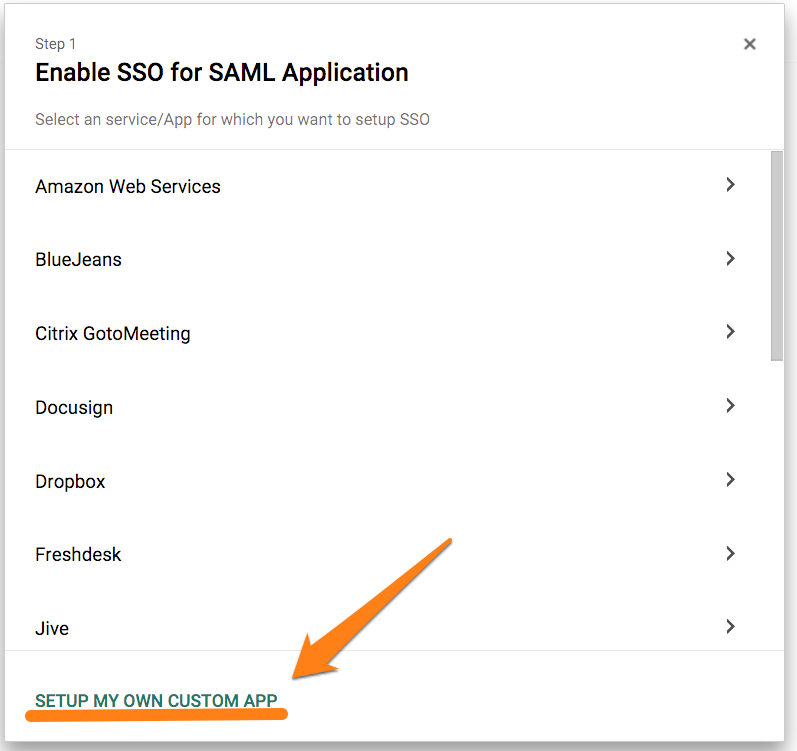
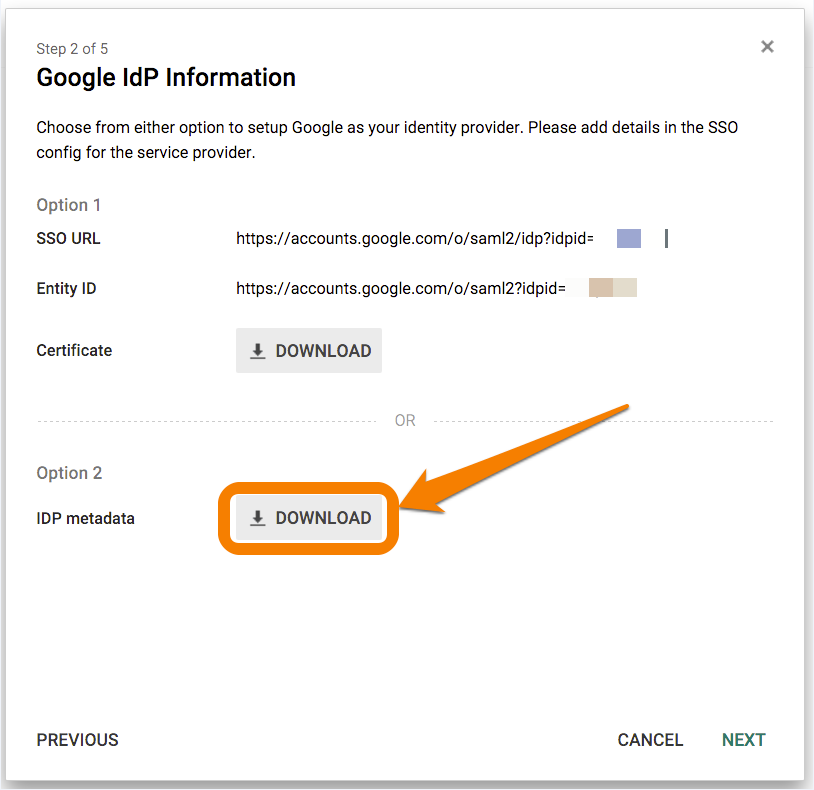
- From the following screen, select Option 2 to download IDP metadata in XML format. Attach and send the downloaded .xml file to Splunk On-Call Support.
- Save the logo image file found HERE.
- Next, give the application a name (Splunk On-Call) and upload the logo file.

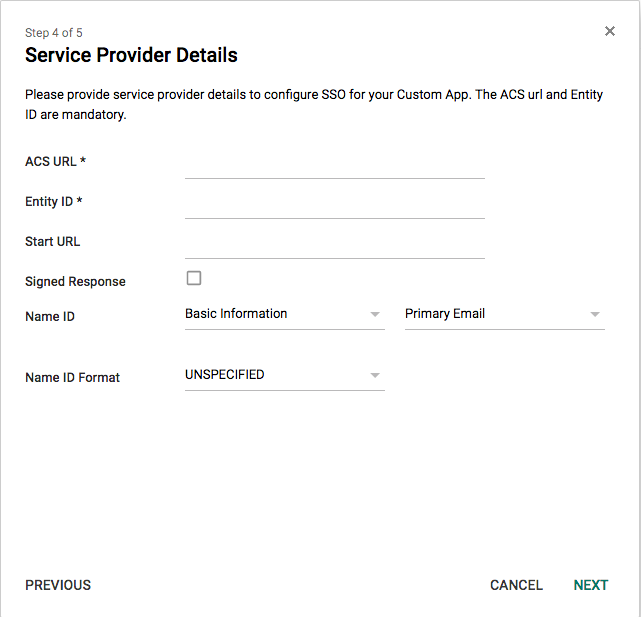
- On the “Service Provider Details” step place the following in the ACS URL line:
- https://sso.victorops.com:443/sp/ACS.saml2
- For the Entity ID place the following:
- victorops.com
- For the Start URL place the following with the correct Organization Slug at the end:
- https://portal.victorops.com/auth/sso/org-slug-here
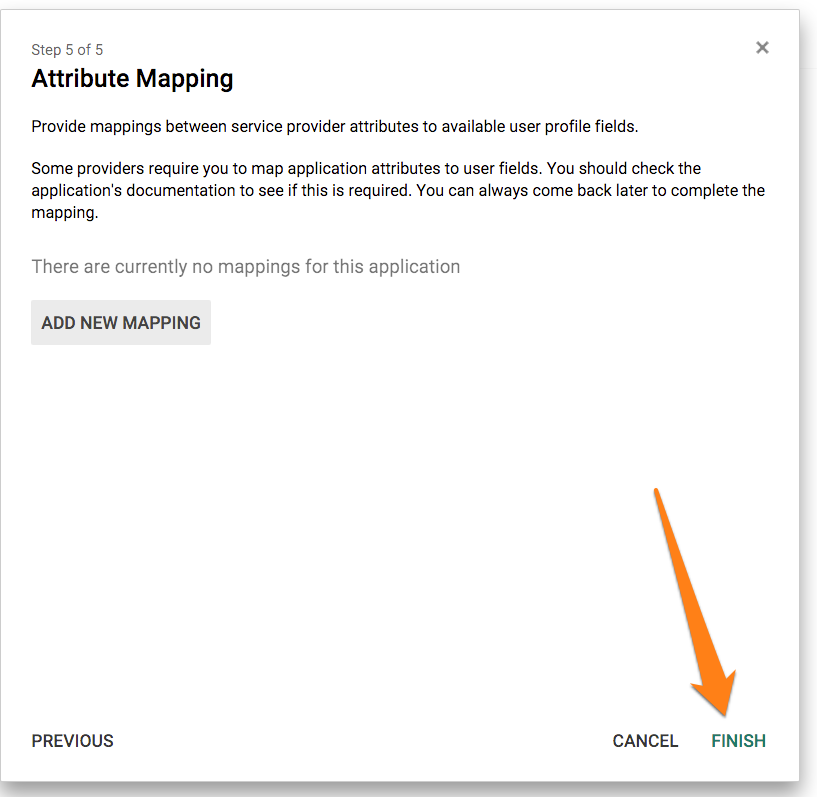
- Finally, skip the attribute mapping step and click FINISH
OneLogin
- Default relay state: https://portal.victorops.com/auth/sso/org-slug-here
ADFS (Active Directory Federation Services)
Once you have sent over your Metadata file, and the Splunk On-Call Support team has completed the Configuration, they will send you an updated metadata file needed to complete the configuration on your side.
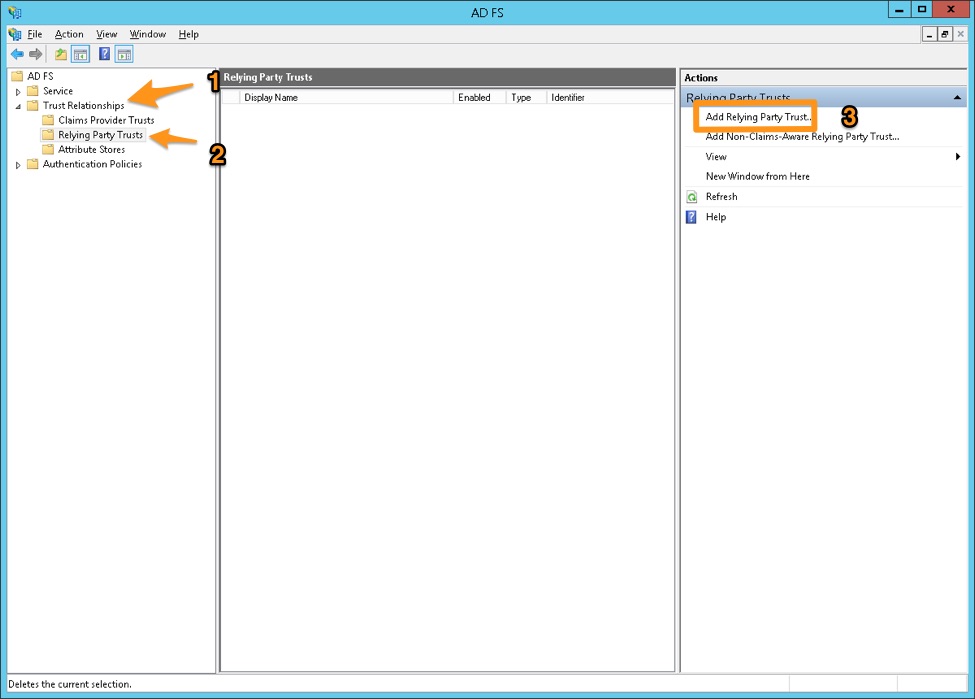
In the ADFS Management console, navigate to Trust Relationships > Relying Party Trusts and click Add Relying Party Trust in the Actions pane
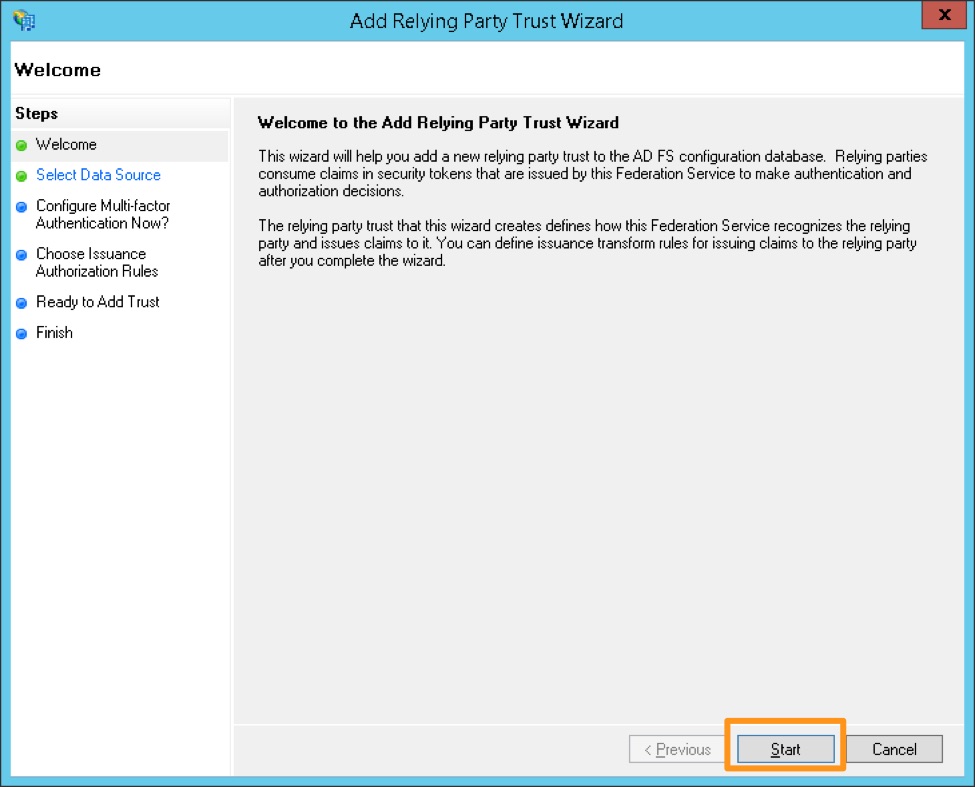
Click Start in the Add Relying Party Trust Wizard
Select the middle option, “Import data about the relying party trust from a file” and browse to the metadata.xml provided by Splunk On-Call Support, and click Next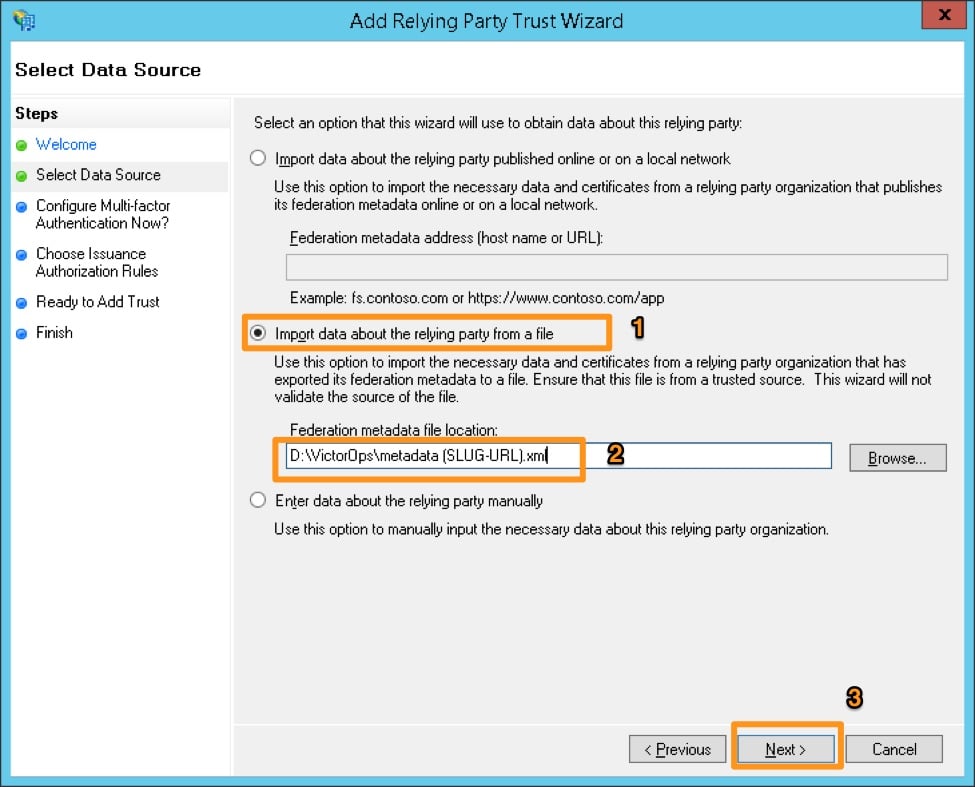
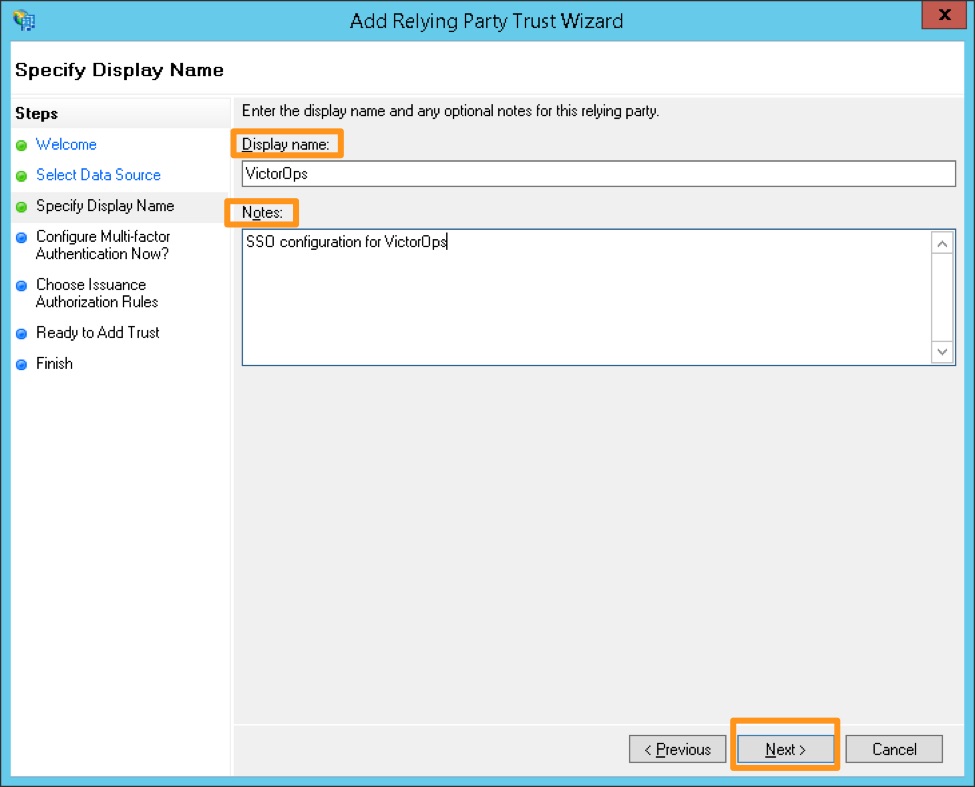
Provide a display name and any notes, and then click Next.
Choose the box next to “I do not want to configure multi-factor authentication settings for this relying party trust at this time”, and then click Next.
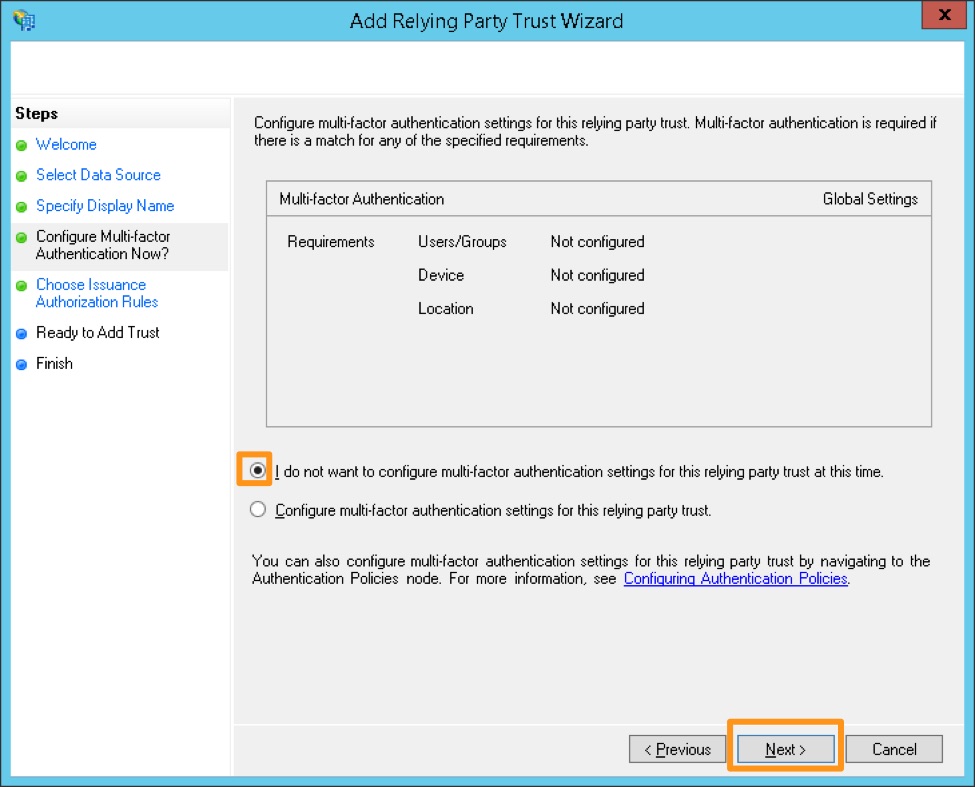
(Optional: Configure multi-factor authentication. This is not necessary for functionality, but may be required for your organization’s security compliance. This step can also be performed later if you need to verify the SAML integration with Splunk On-Call is functioning before bringing the configuration up to compliance.)
Choose “Permit all users to access this relying party”, then click Next.
(Optional: Choose “Deny all users access to this relying party” and configure access rules as needed by your organization after completing this configuration.)
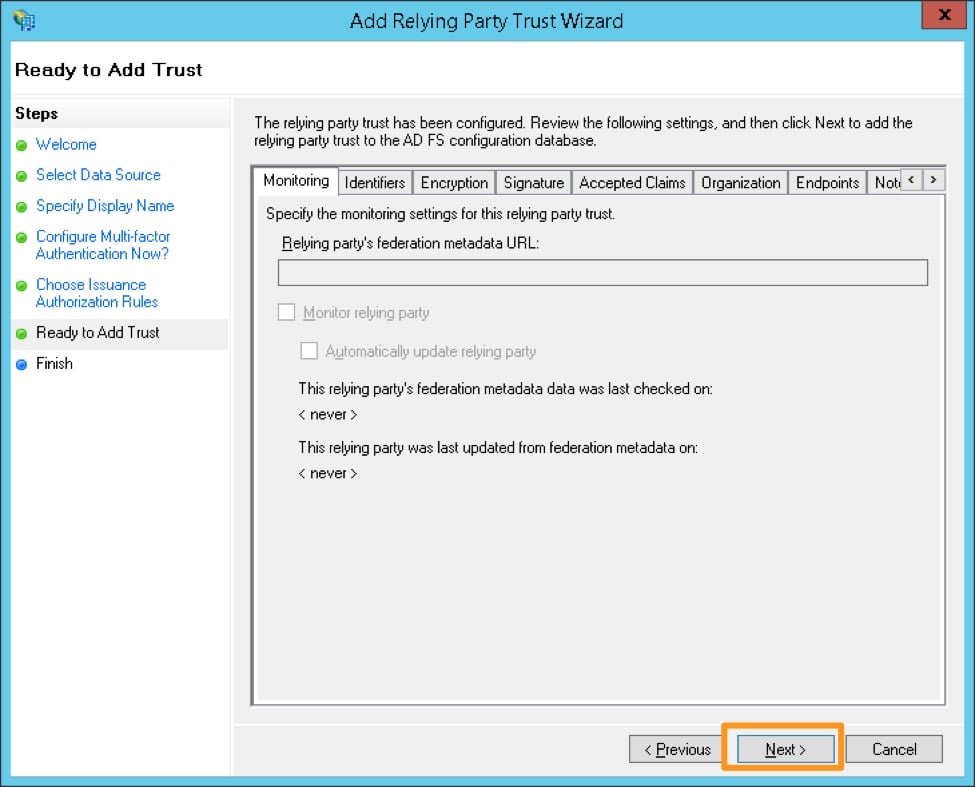
Review the configuration and click Next if it appears accurate. You will not be able to go back from the next screen and will have to manually update the configuration later, if there are any issues.
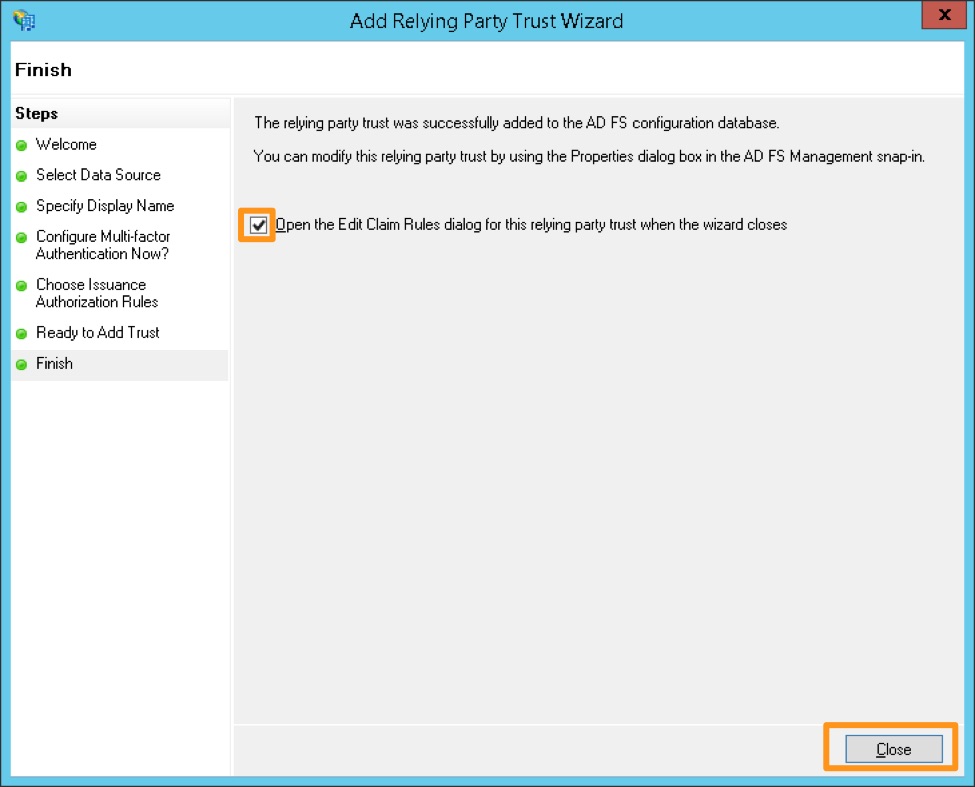
Make sure to check the box next to Open the Edit Claim Rules dialog, and click Close.
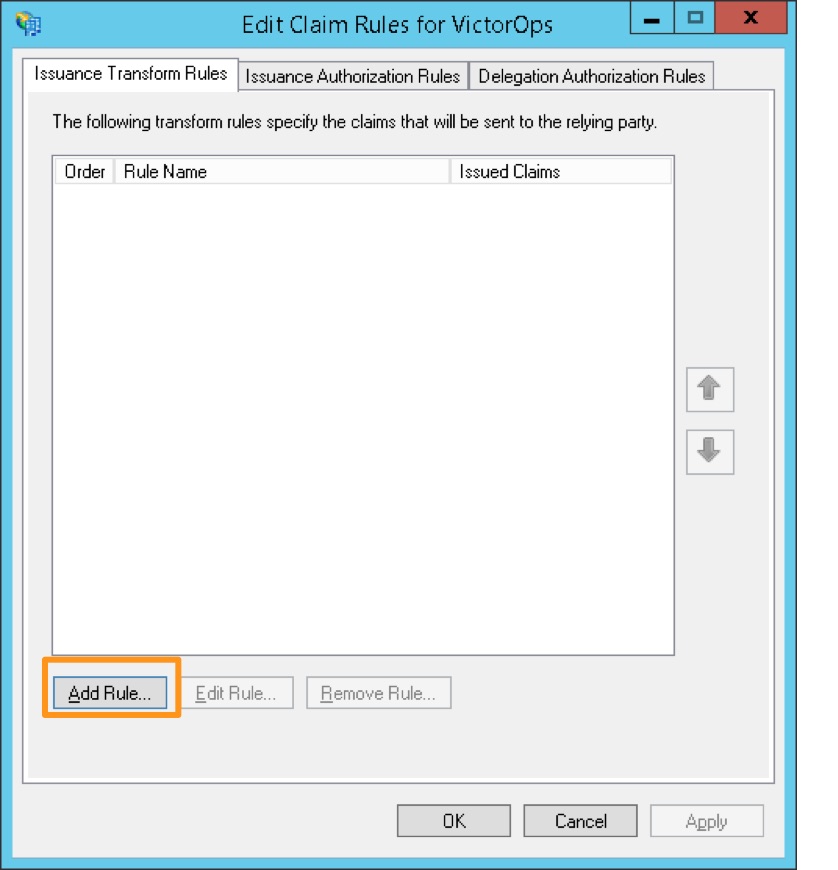
Click Add Rule
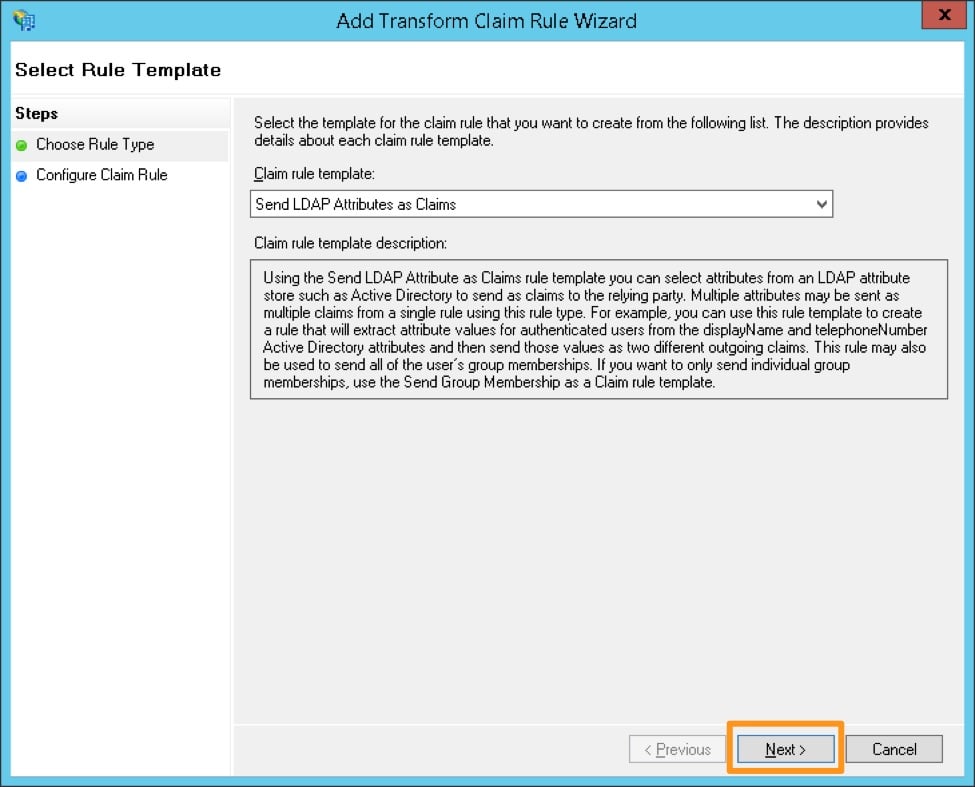
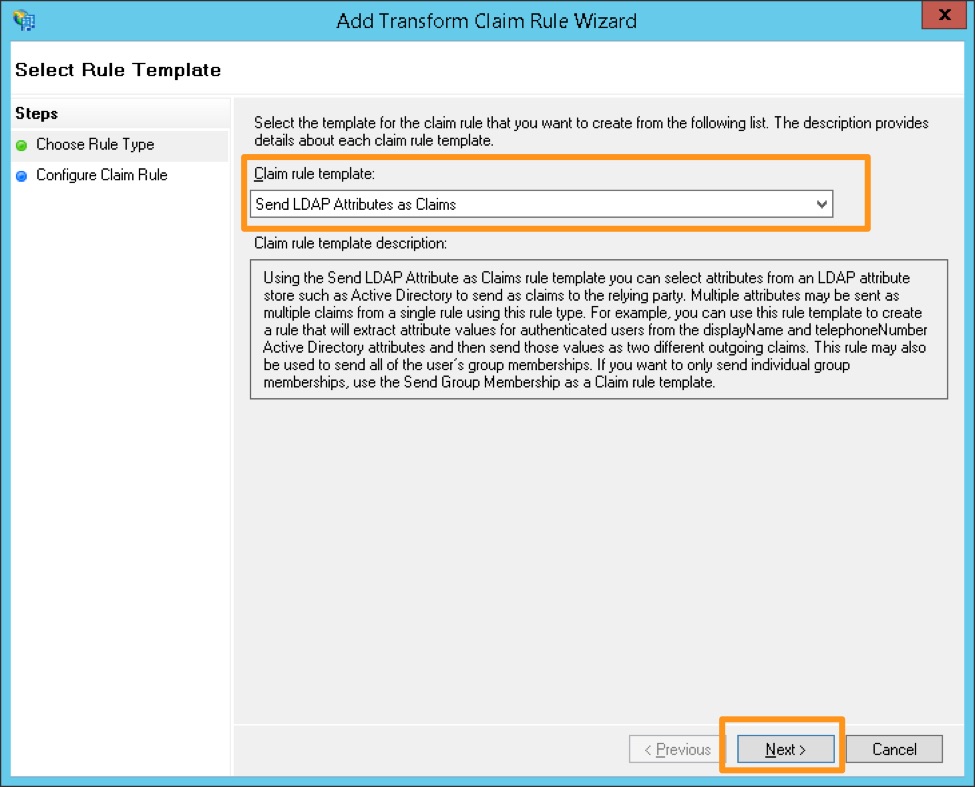
Select the claim rule template Send LDAP Attributes as Claims
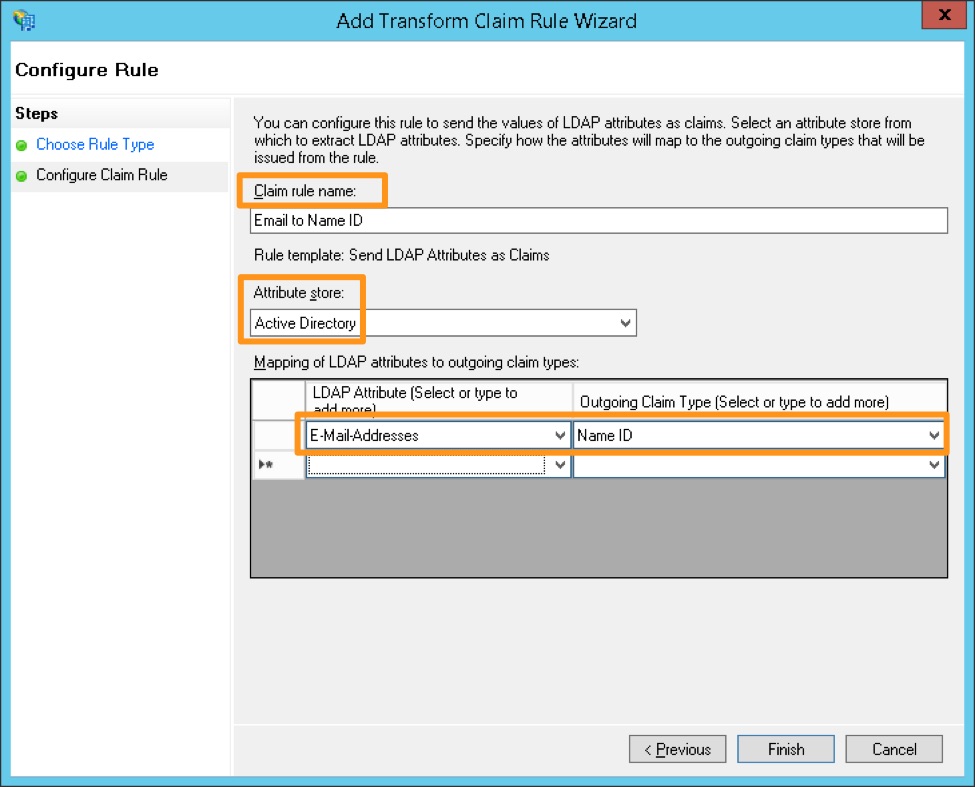
Create a name for the rule and choose Active Directory as the Attribute store. Under the LDAP Attribute, choose E-Mail-Addresses and map it to the Outgoing Claim Type of Name ID, then click Finish.
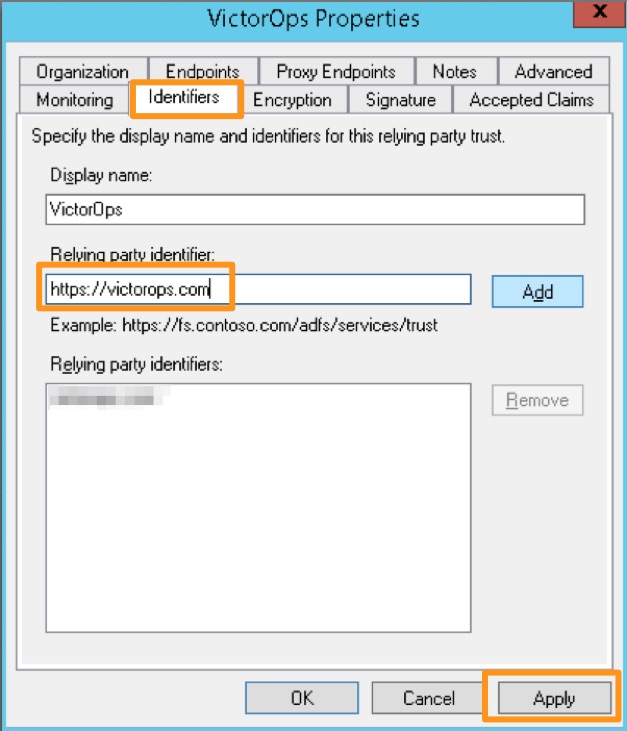
Open the Relying Party Trust you just configured for Splunk On-Call by right clicking the entry and choosing Properties. On the Identifers tab, add https://victorops.com as a Relying party identifier, then click Apply.
Azure Active Directory (SAML-based Sign-on)
- Identifier: https://victorops.com
- Reply URL: https://sso.victorops.com/sp/ACS.saml2
- Sign on URL: https://portal.victorops.com/auth/sso/org-slug-here
- Relay State: https://portal.victorops.com/auth/sso/org-slug-here
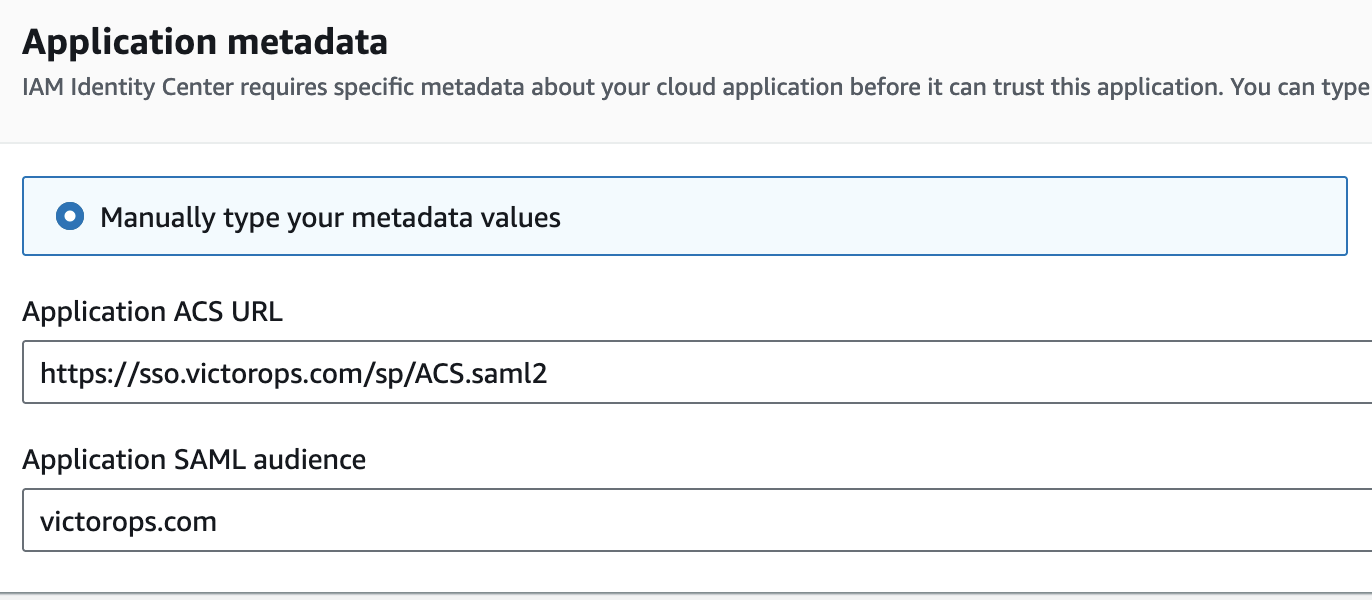
AWS IAM Identity Center – SAML
- In the IAM Identity Center console find the Applications tab.
- Hit Add Application and look for VictorOps.
- In the configuration settings make sure you set the fields as followed:
- Important – Make sure the Session Duration is set to 1hour.