About Twilio Live Call Routing and Splunk On-Call
The Splunk On-Call (formerly VictorOps) and Twilio integration creates a live call routing and alerting system – drastically improving MTTA/MTTR for DevOps and IT operations teams.
For instance, when an alert is initiated, a phone call will go out to the on-call person or team. If the responder answers the phone, a conference call is automatically initiated and the incident is marked as “Acknowledged” in Splunk On-Call – annotated with conference call details. Once the call is complete, a “Recovery” alert is sent to Splunk On-Call with additional information about the call, and the incident is marked as “Resolved.” And, if the alert is routed automatically through your escalation policies and nobody answers the phone, the caller can leave a voicemail which will be transcribed and sent into the Splunk On-Call timeline as a critical incident.
Live call routing with Splunk On-Call and Twilio creates an integrated system for on-call alerting and collaborative incident response via phone. On-call responders and cross-functional teams can leverage the Splunk On-Call and Twilio integration to collaborate around alerts in real-time and rapidly remediate critical incidents.
Live call routing and integrated on-call alerting leads to rapid incident resolution
- Create a single phone number for live call routing in Splunk On-Call – connecting multiple teams and/or escalation policies to incidents as they’re reported
- Integrate on-call schedules with alert routing, escalations and call routing in order to automate much of the incident response workflow
- Track historical incident details such as call information, alert data and chat history in a centralized timeline for better post-incident reviews
- Collaborate in real-time across multiple channels and teams with the Splunk On-Call and Twilio integration
Twilio Account
Splunk On-Call Version Required: Getting Started, Growth, or Enterprise
What you need to know: At this time, trial Twilio accounts require all phone numbers the integration may end up calling (i.e. Splunk On-Call user’s phone numbers) to be verified by following this process. If you would like to see how this integration works successfully before verifying numbers or purchasing a Twilio phone number, please contact Splunk On-Call Support.
Twilio Integration Overview
This integration allows you to use one phone number to call your on-call team(s) and be connected directly to the on-call user for that team. If the on call user does not respond the call will escalate through the escalation policy until someone answers (up to 3 called users). When someone answers, an acknowledgement alert is sent to Splunk On-Call, and an incident is opened. This alert contains information about who is calling and who was notified. Once the call is complete, a Recovery alert is sent into Splunk On-Call with additional information about the length of the call, and the incident is resolved.
In the event that the call goes through all the escalation steps and still no one answers, the caller will be prompted to leave a voicemail. That voicemail will be transcribed and sent into the timeline as a critical message routed to the team that was responsible for the call.
There are a number of additional configuration options, including:
- The ability to add a phone tree in front of this process in order to use a single number for multiple teams
- Configure separate numbers to call separate teams and escalation policies
- Prevent calling and immediately prompt the caller to leave a voicemail, creating an incident with the transcription and paging on-call users for it
- Prevent the caller from leaving a voicemail, creating an incident that notifies on-call users of the person’s phone number who called
- Send an email with recording URL of a voicemail to the static email of your choosing
The following guide will walk you through the process to get up and running with Splunk On-Call and Twilio.
Enable Twilio in Splunk On-Call
There are a few Splunk On-Call items that you will need to complete the Live Call Routing Integration setup. We will make note of those items below.
Twilio Service API Key
To locate the Twilio Service API Key, navigate to the Integrations page within the Splunk On-Call Web UI, and search for Twilio Live Call Routing or scroll down until you find the icon (integrations are listed in alphabetical order).
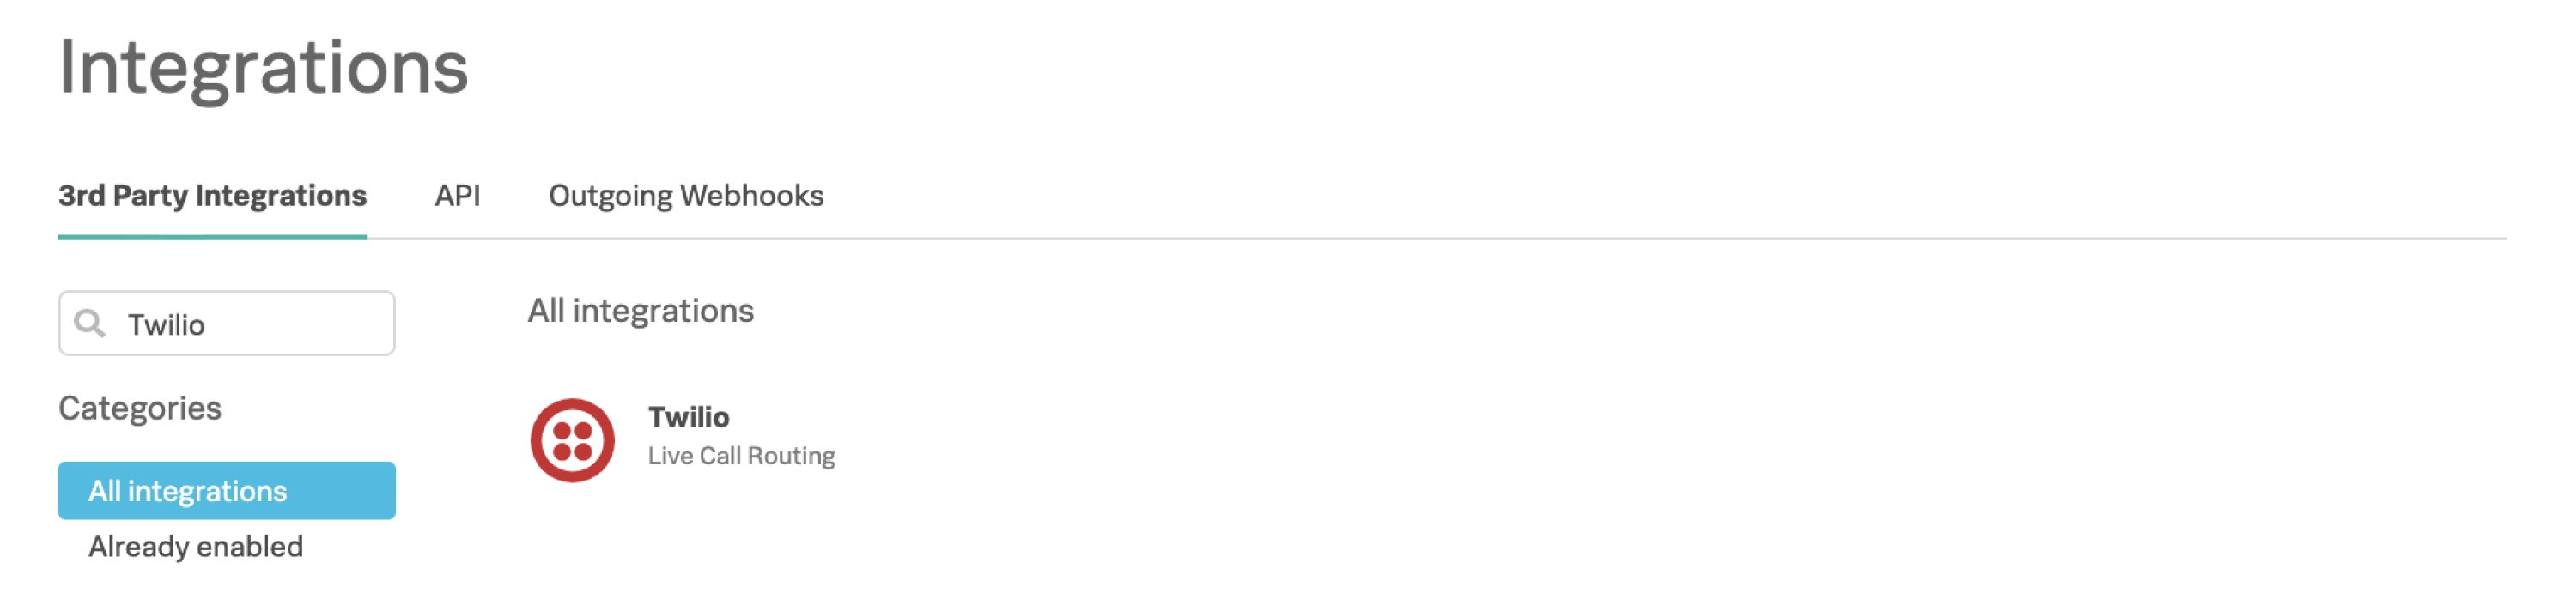
Click into and enable the integration if you have not previously done so, then copy the Service API Key, and paste it into your desired note of choice.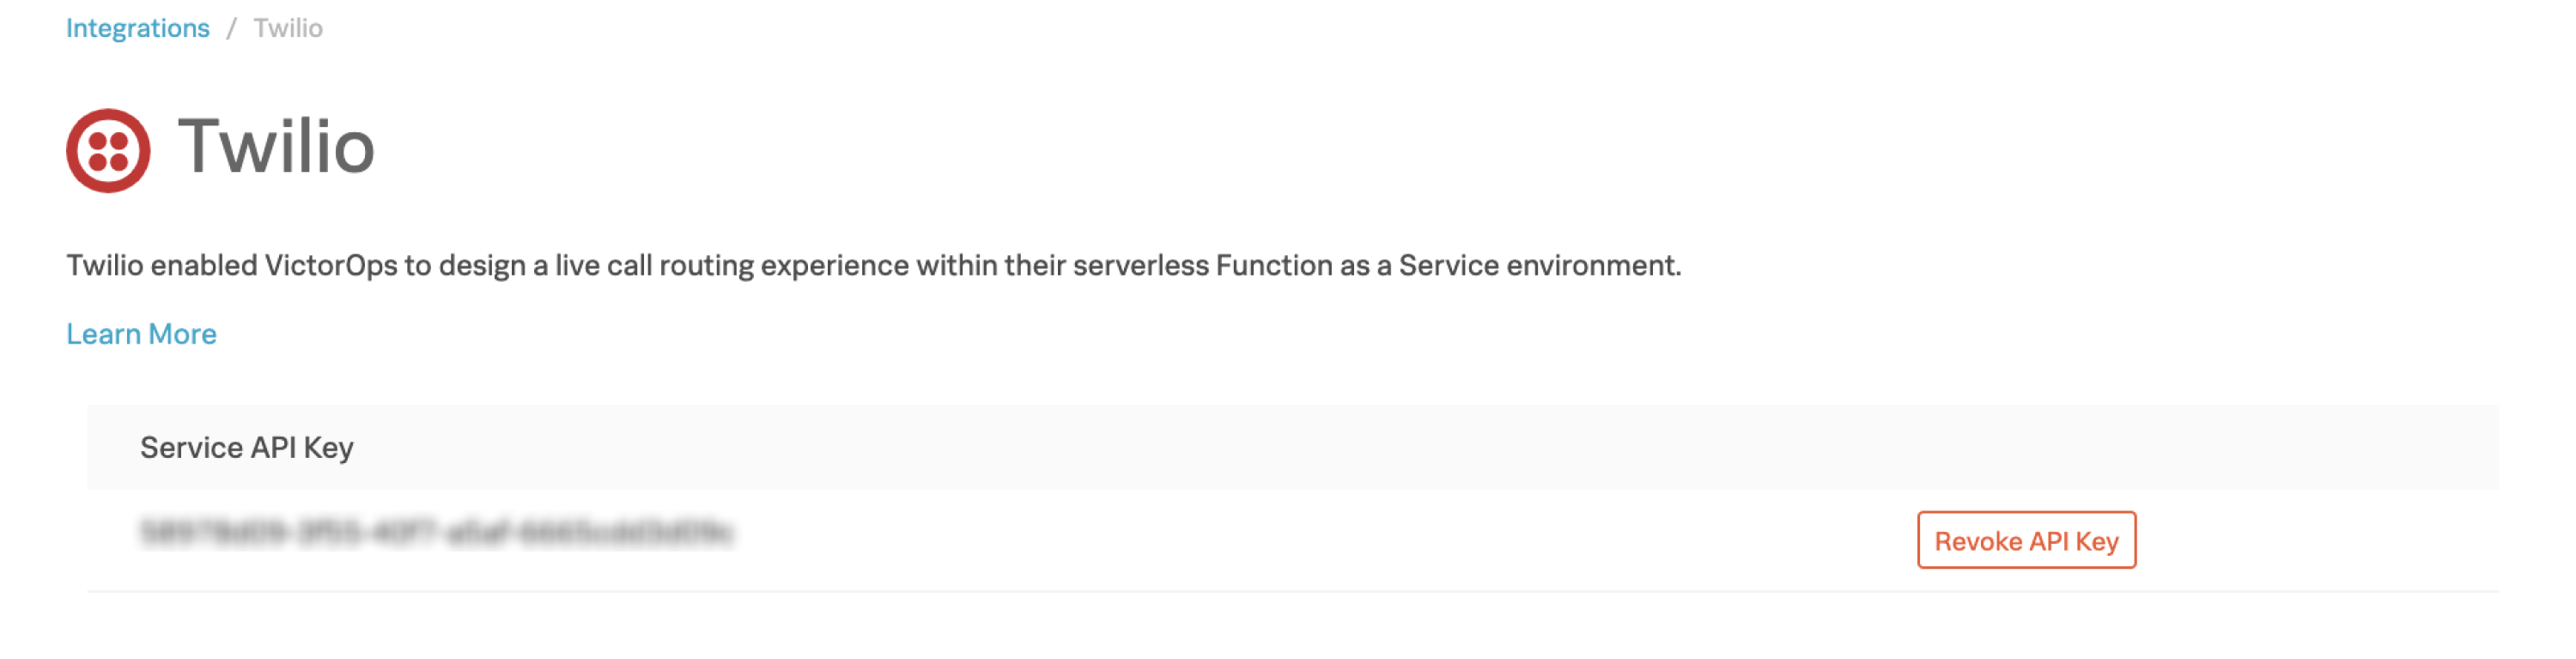
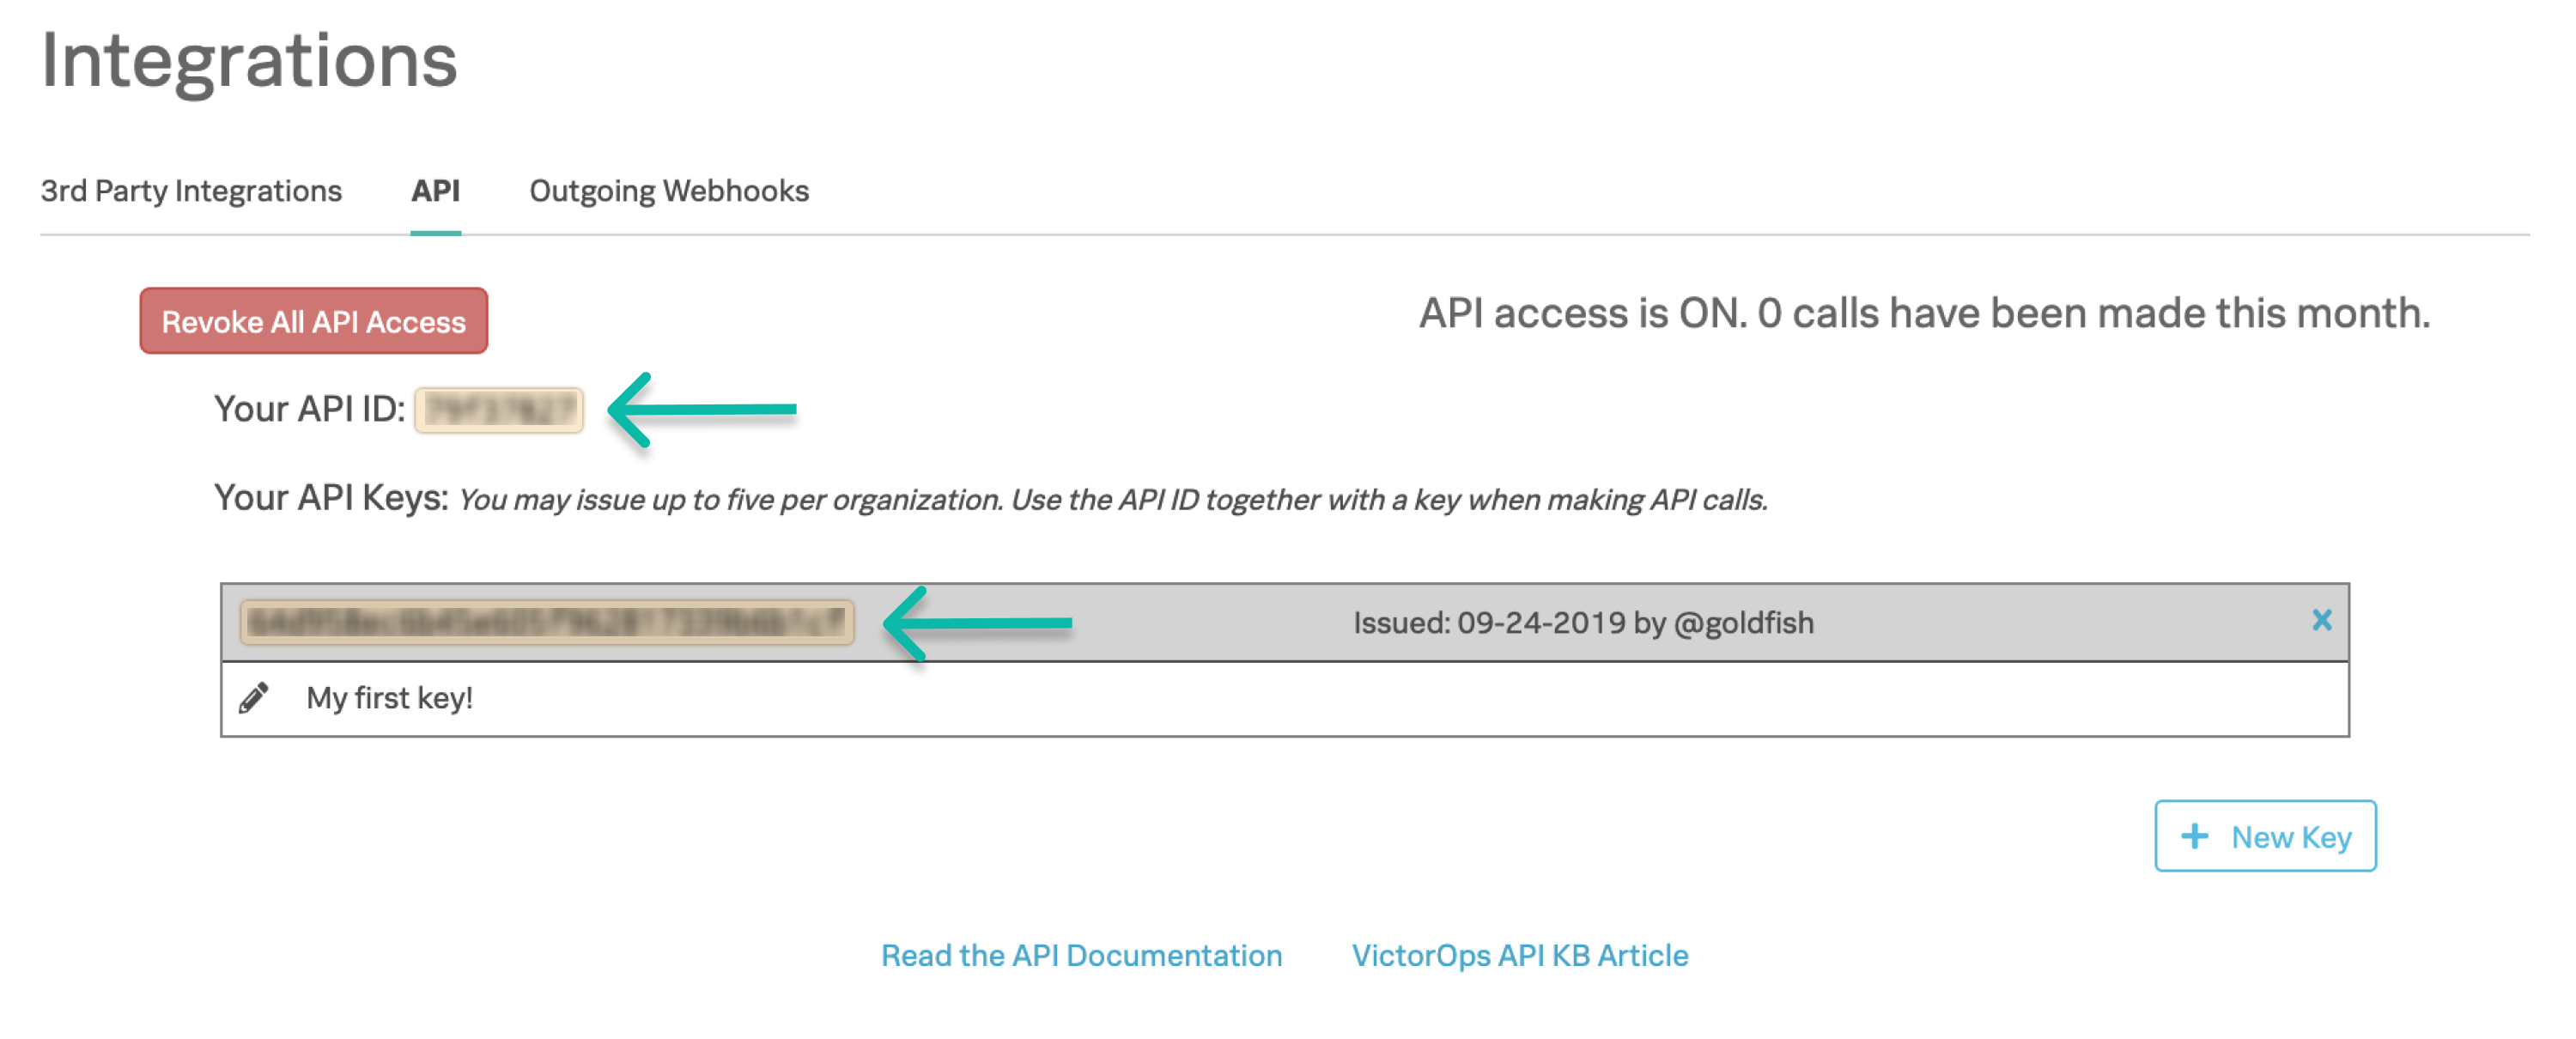
Splunk On-Call API ID and API Key
You will also need your Splunk On-Call API ID and API Key to complete this configuration. The Twilio script will leverage some of our documented API calls to pull contact information for the on-call users you are trying to contact.
To locate your API ID and Key, navigate back to the Integrations page, then click on the API tab. Enable the API if you have not previously done so, then copy the API ID and one of your API Keys (if you have multiple created), and paste it into a note of your choice for future use.
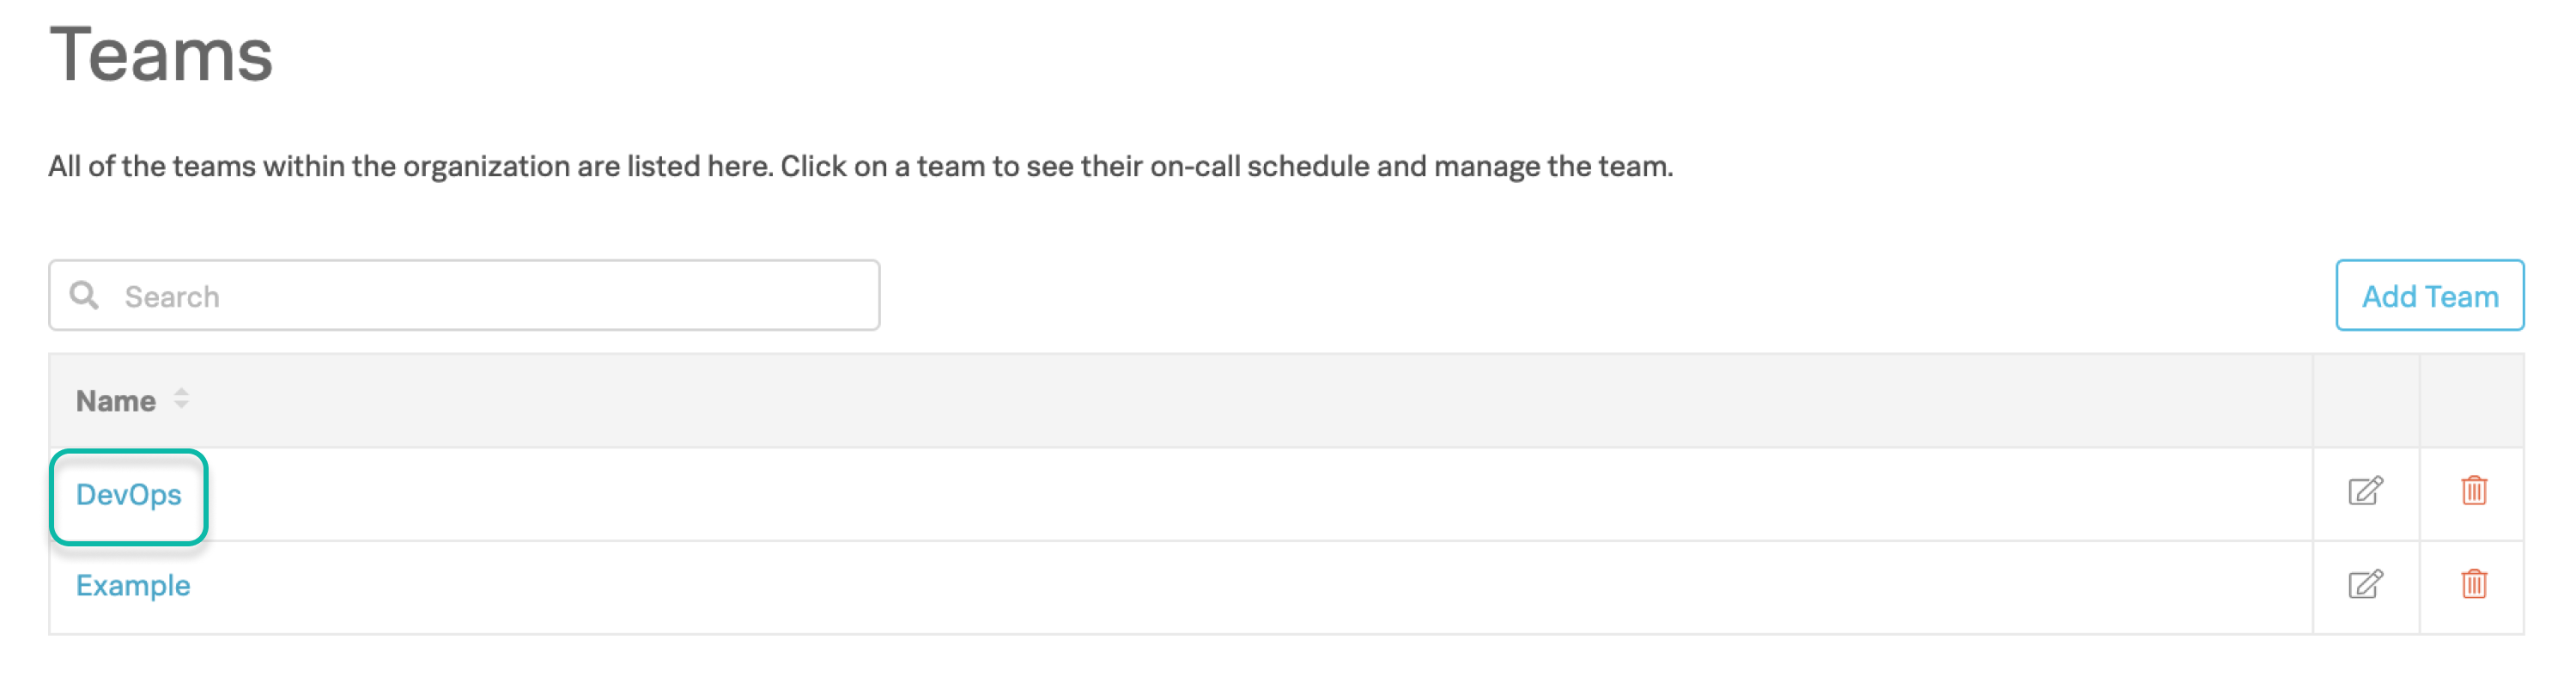
Splunk On-Call Team Name and Escalation Policy Name
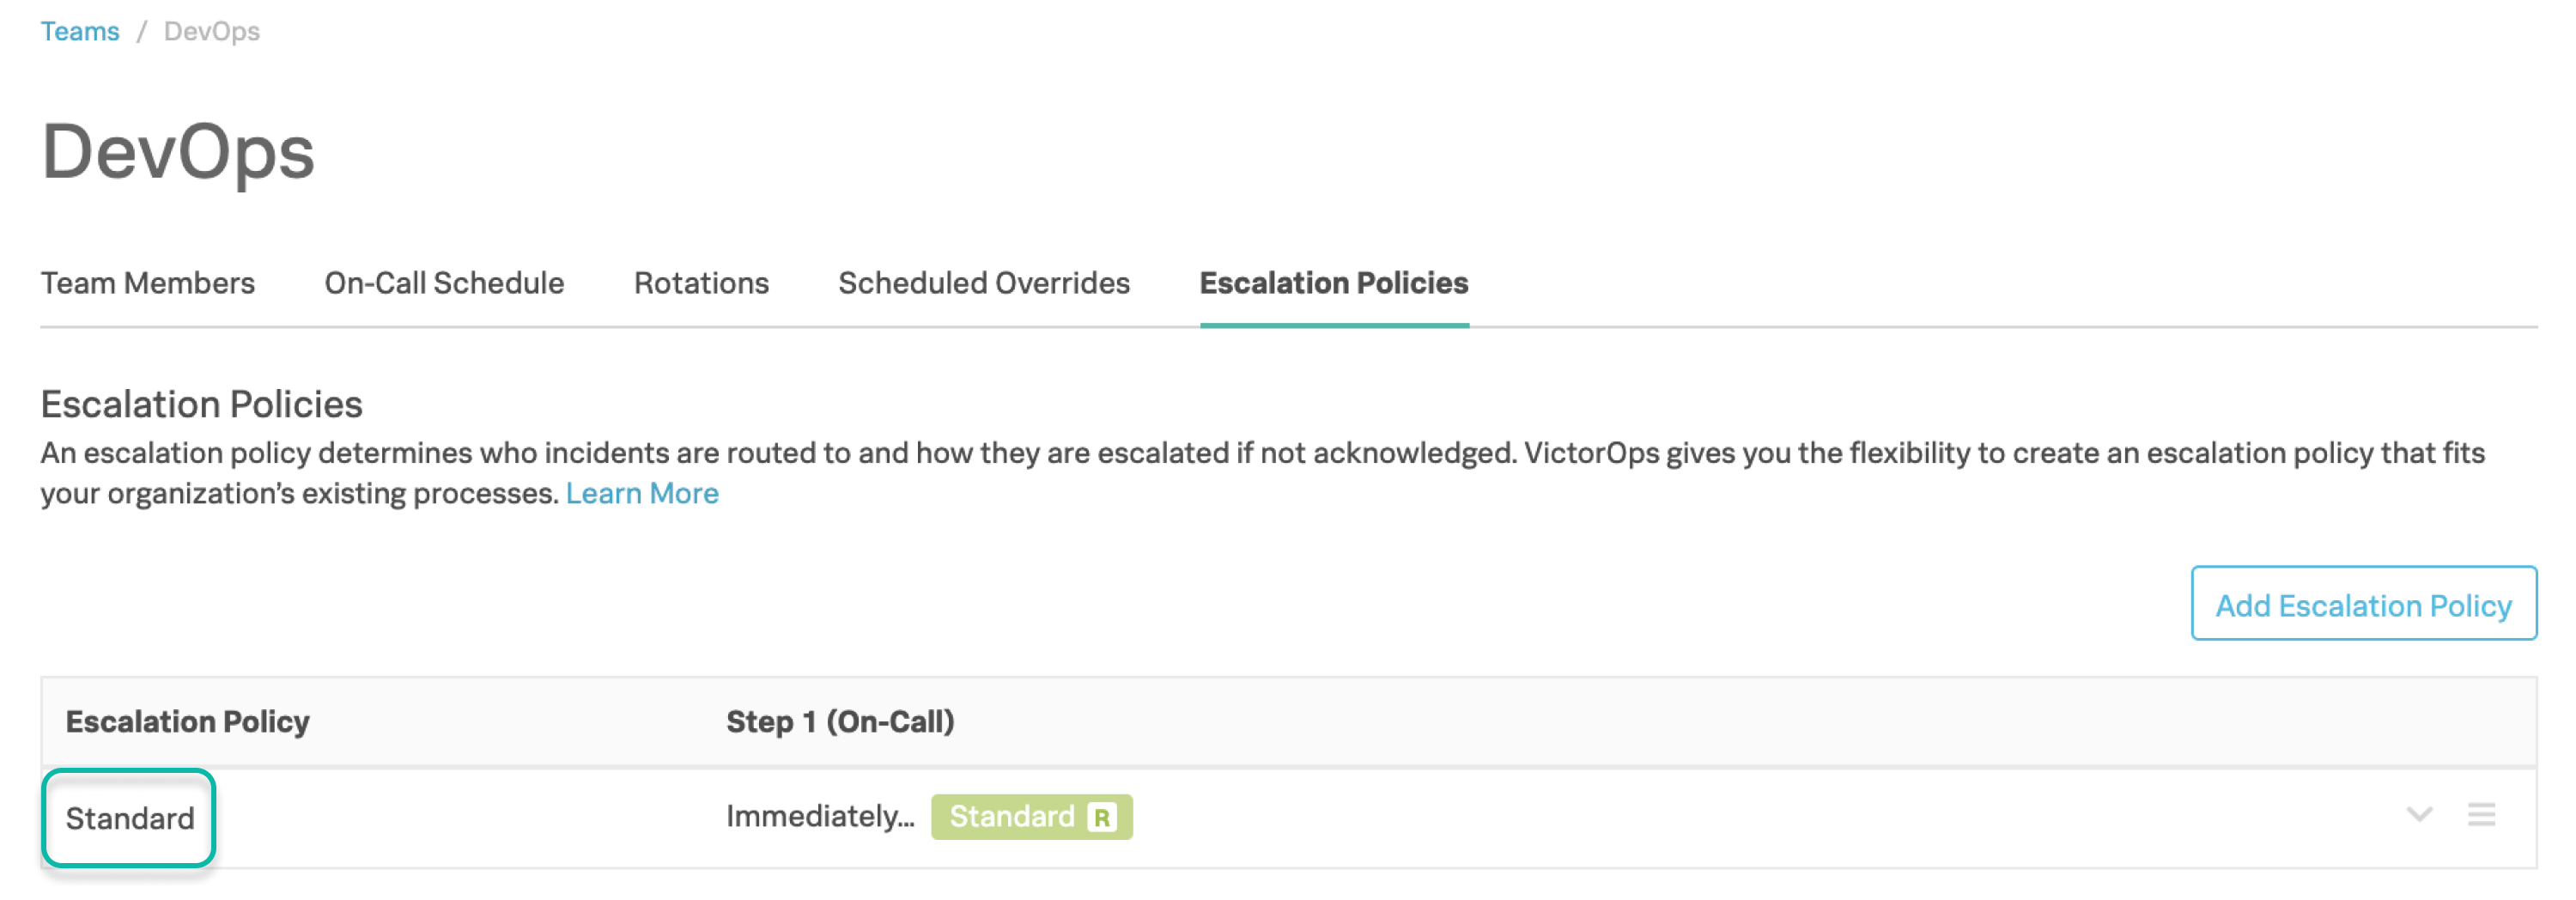
This is the Splunk On-Call team name and associated escalation policy you want to notify. To get this, go to your Splunk On-Call portal and select Teams. Copy the team name you want to use for this integration — in the example below we use the DevOps team.
To acquire the escalation policy name, we’ll go one step further. Click into your desired team, and go to the Escalation Policies tab, and copy the name of the escalation policy you’d like to use — in the example below we use the Standard escalation policy from within the DevOps team.
Please note, you can notify multiple teams and escalation policies using the Live Call Routing Integration. If you would like to add more than one team/escalation policy to the configuration, repeat this step for all of the teams and escalation policies that you would like notified.
Escalation Policy notes:
If multiple people are on-duty for a given escalation policy step, only one on-duty user will be called for that step, chosen at random. The integration will then call somebody from the next specified escalation policy step.
This integration can call a maximum of 3 users, so unless one of the escalation policy steps does not have anybody on-duty, only the first 3 steps of the escalation policy specified will be utilized.
The integration will ignore any time delay configured between each escalation policy step. For example, if Step 1 was set to occur immediately, and then Step 2 after 15 minutes, the caller will not have to wait 15 minutes for the Step 2 user to be called – the system simply look for the separation of steps and call users in that order.
If one of the steps in your escalation policy is to “Execute Policy”, the policy called out will not be executed. Only policy steps that call out rotations or users will be executed.
Routing Keys
To route the incidents created by the Twilio integration to the correct teams in Splunk On-Call, specific routing keys will need to be created. After choosing the team and escalation policy you want to use for the integration, copy the URL-friendly team slug out of Splunk On-Call. Below is the team slug for the DevOps team. Note: For teams created after 2017 the team slug will be formatted similar to: team-35Rgt19gE35g3.

Next go to Settings >> Routing Keys and create a new routing key with the URL-friendly team slug associated to that team. You’ll paste the slug you’d copied into the Routing Key field and choose the Team and Escalation Policy it associates with in the Escalation Policies field.
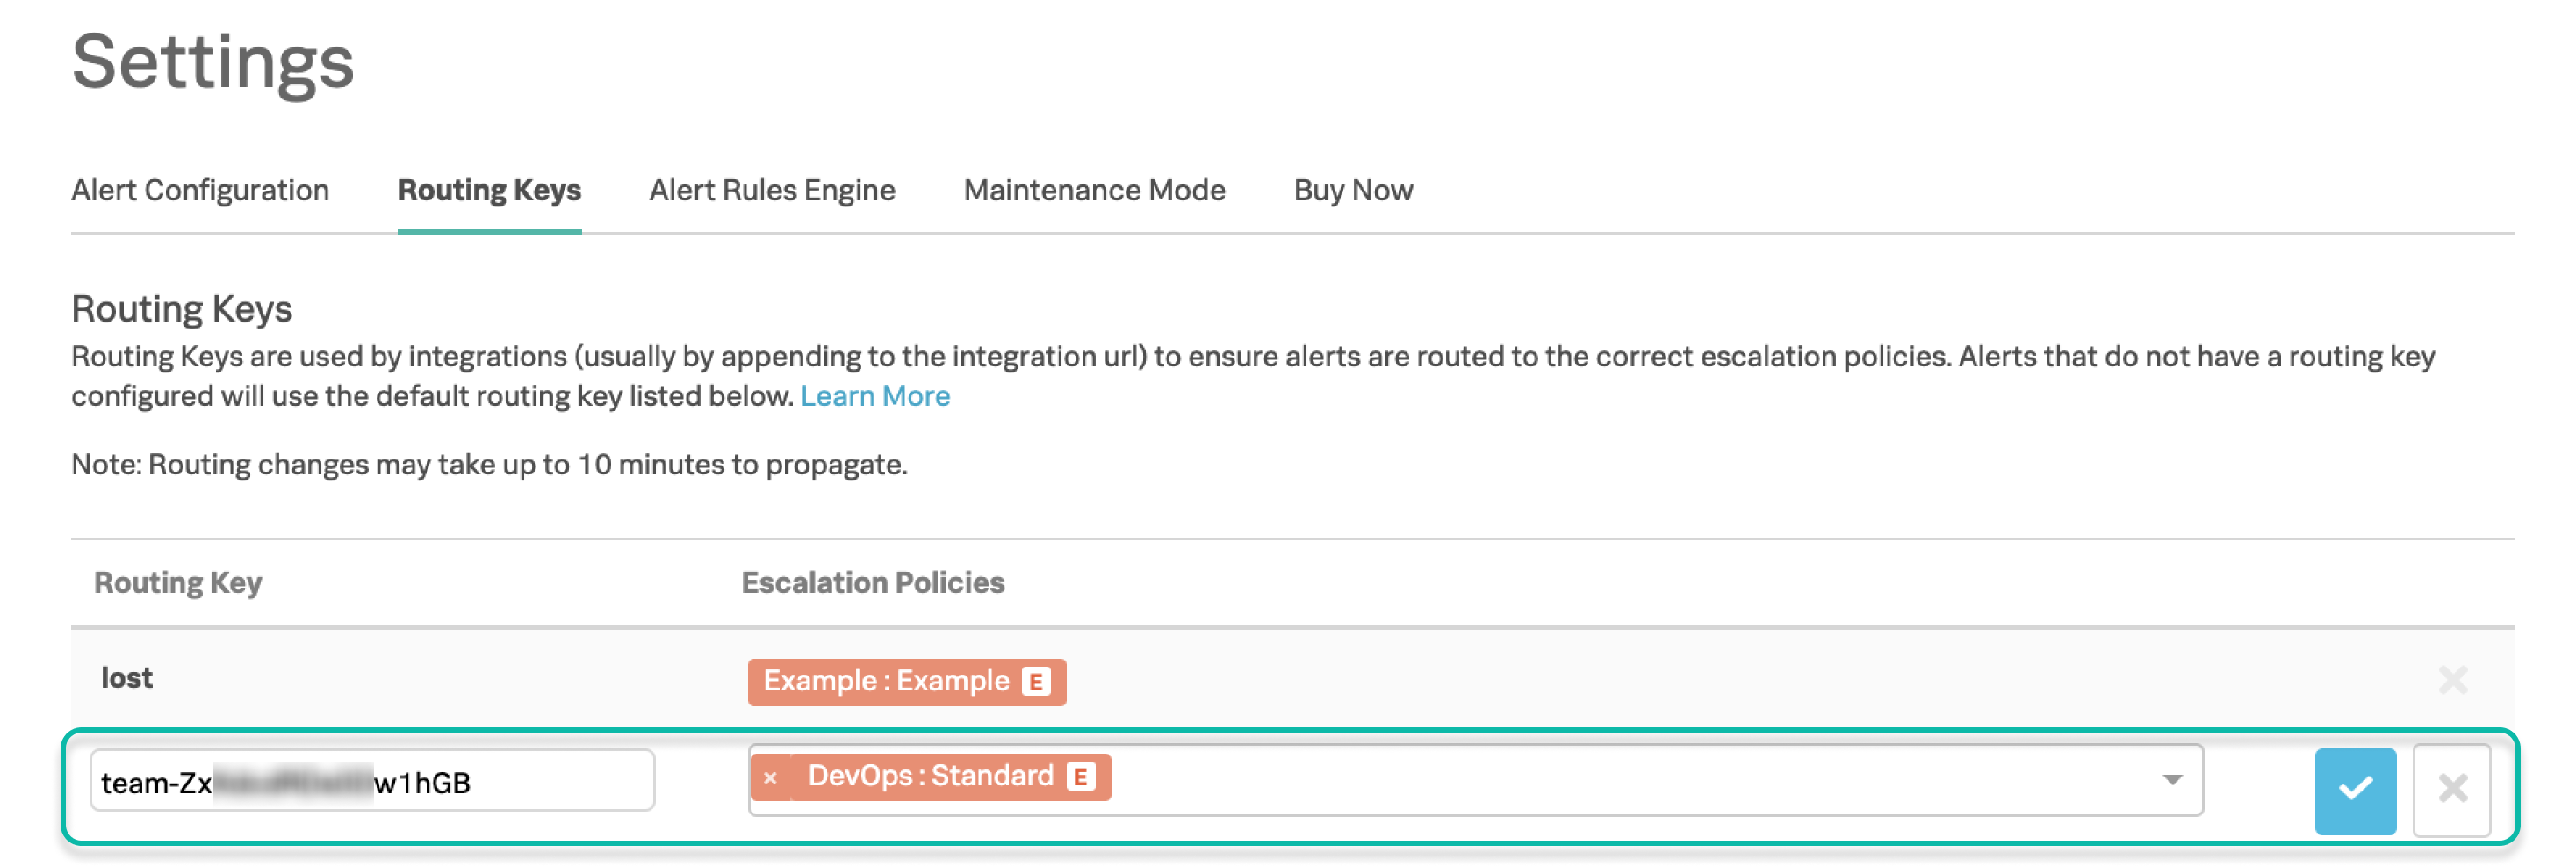
This will assure that all incidents are sent to the correct escalation policy.
Note: If you are utilizing either the Multi-Team Phone Tree or Multiple Phone Numbers to Route to Different Teams setup, you’ll need to repeat this step for all teams specified through the integration, thus creating multiple routing keys.
Integrate Splunk On-Call in Twilio
The remaining configuration will take place in Twilio. This Integration requires that you have a Twilio account and Twilio phone number. Please note, at this time trial Twilio accounts require all phone numbers the integration may end up calling (i.e. Splunk On-Call user’s phone numbers) to be verified by following this process. If you would like to see how this integration works successfully before verifying numbers or purchasing a Twilio phone number, please submit a support ticket by following this process.
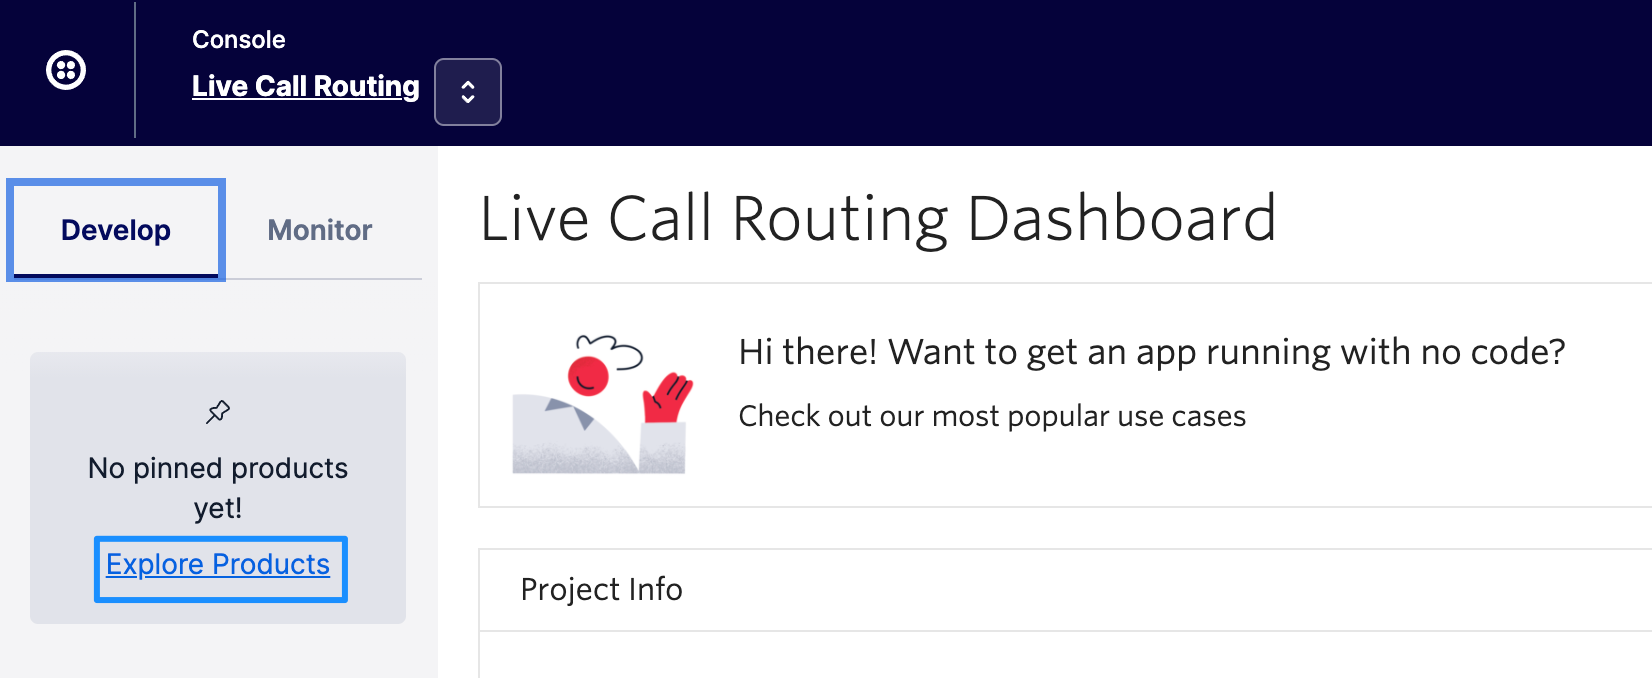
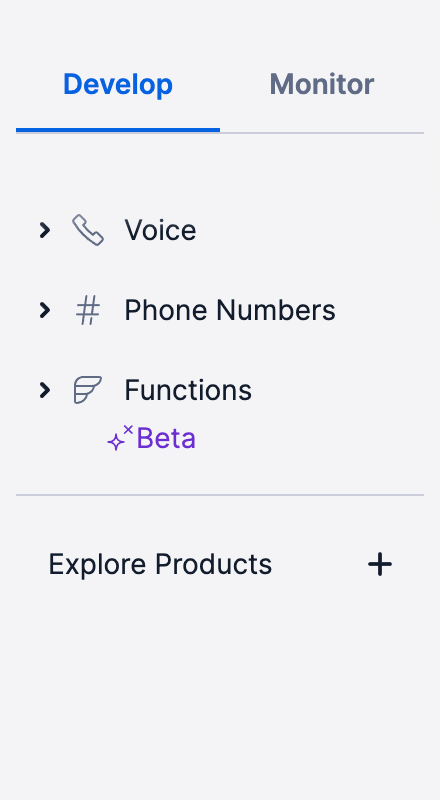
Once you have created an account in Twilio you will want to pin three items to the menu bar on the left. From your main Twilio console, click on “Explore Products” on the left hand side under the “Develop” tab.
First you will want to locate the Voice app under Programmable Communications and click on the pin icon located on the top right of the tile. This will pin the app to the side bar for easy access later on.
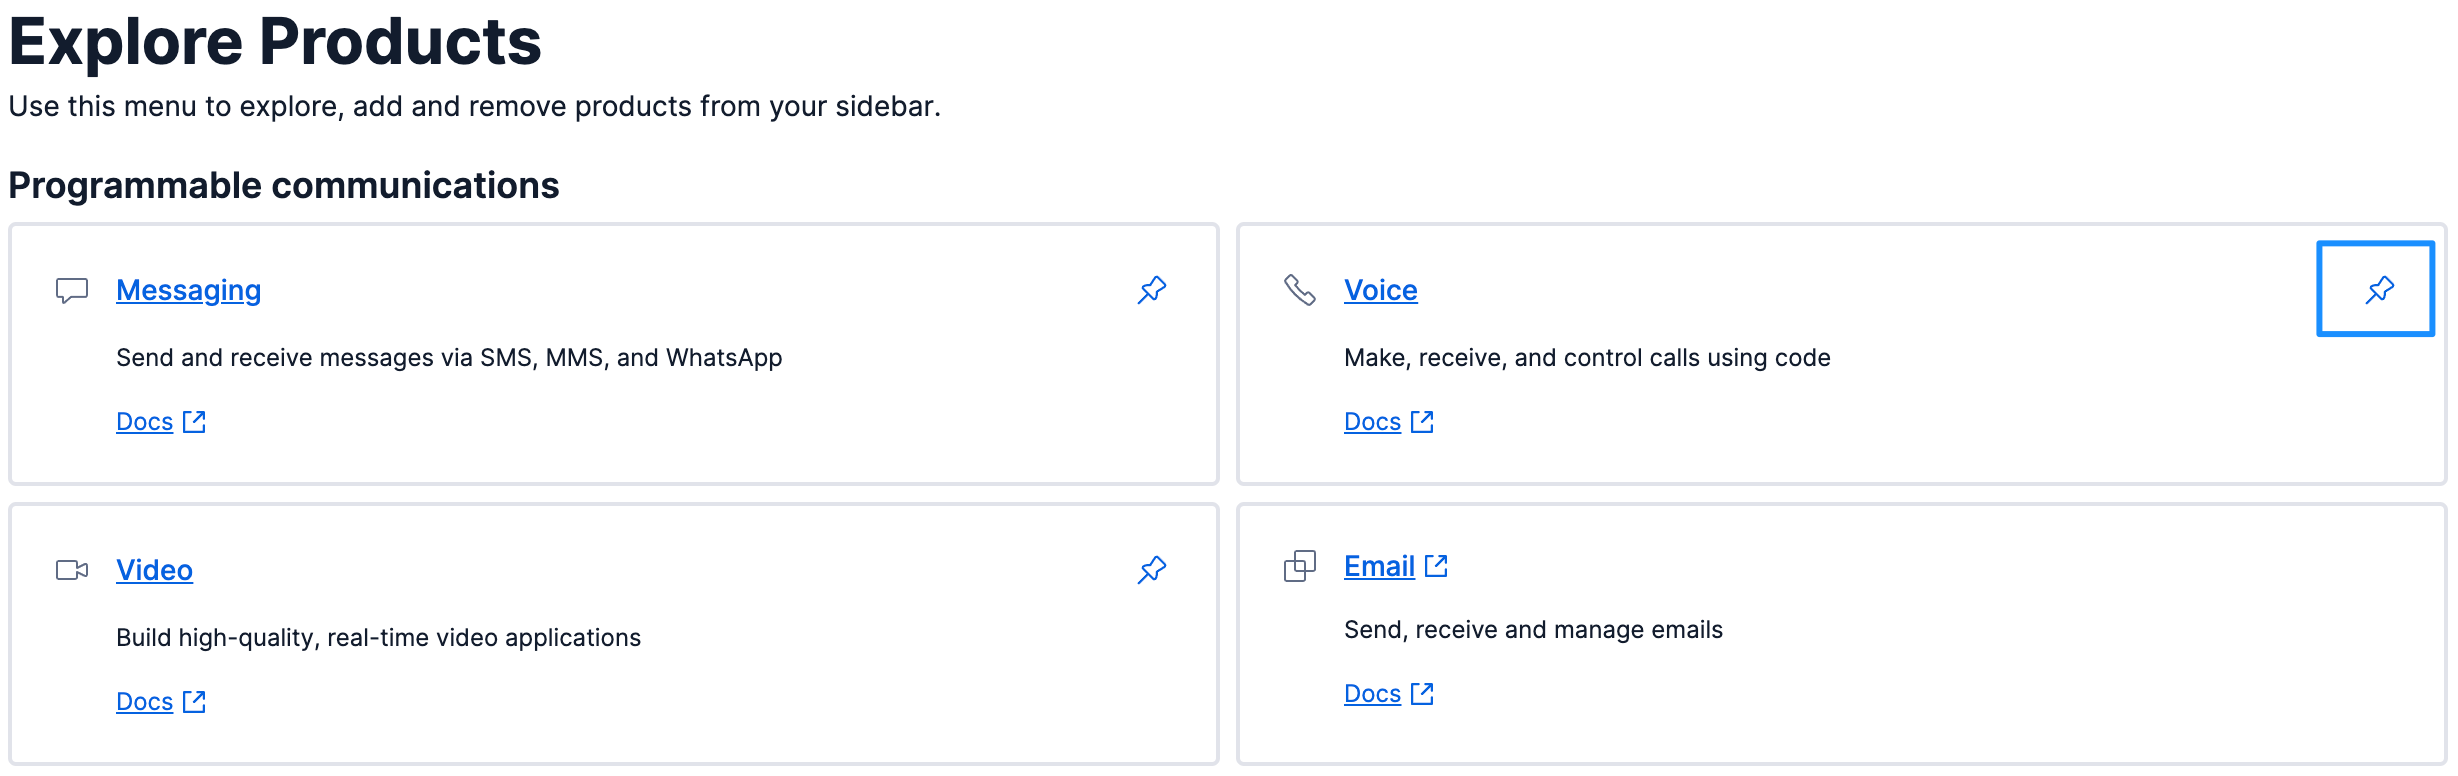
Repeat this process to pin the Phone Numbers app (located under Super Network) and the Functions (Beta) app (located under Developer Tools).
Acquiring a Twilio Phone Number
From the main console dashboard click on Phone Numbers and then Manage. Thenselect Buy a Number, if you haven’t done so already, set the Capabilities to Voice, and click Search.
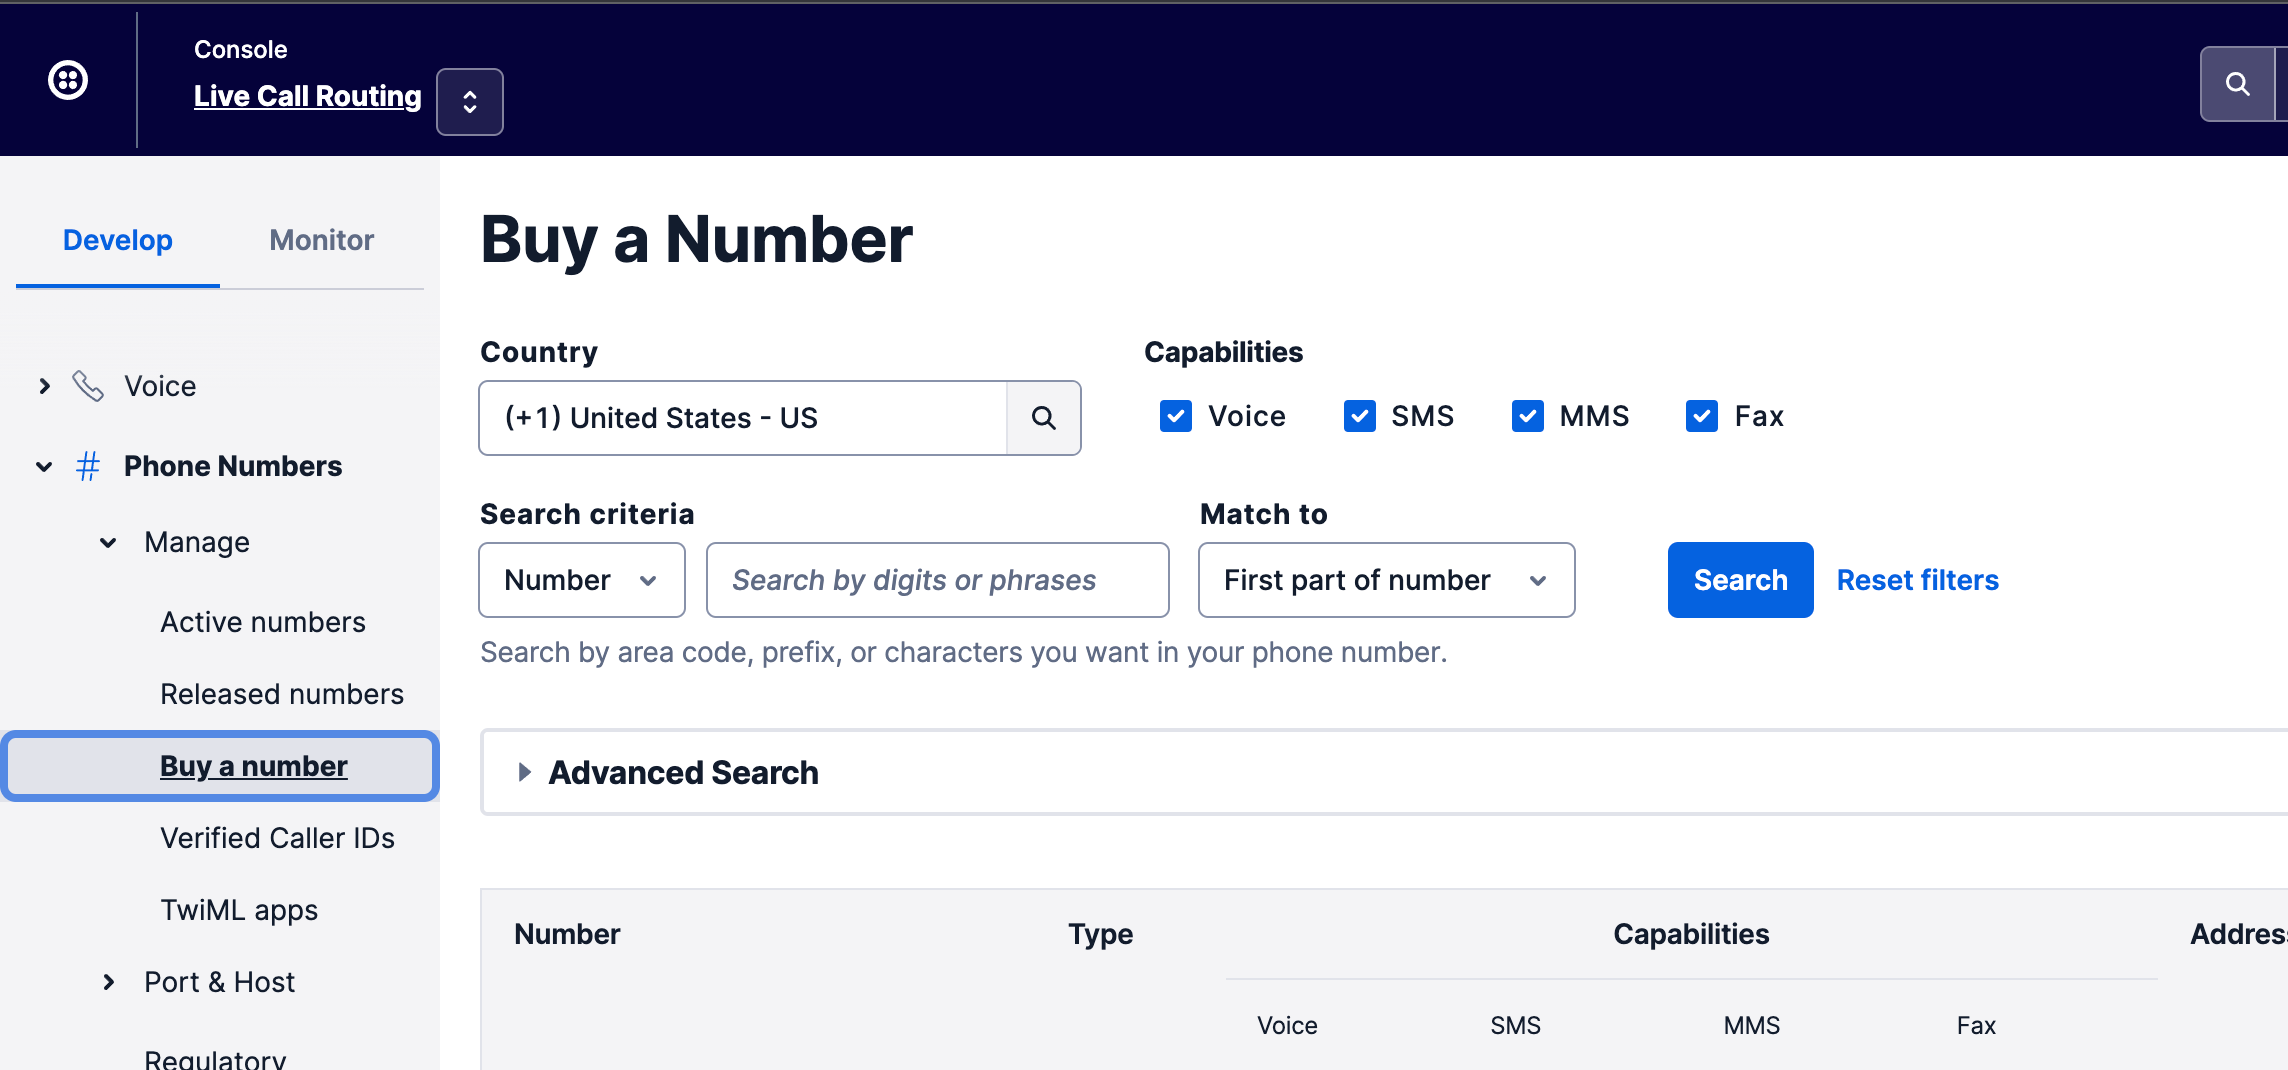
Once you find the number that bests suits your needs, click Buy for the number. The fee should be $1.00 monthly.
Twilio Voice
To enable some features used in Live Call Routing, you will need to enable Enhanced Programmable SIP Features.
To do this, go to Voice -> Settings -> General. Then scroll down to the bottom of the page until you see Enhanced Programmable SIP Features. Click Disabled under the name to enable the feature then save.

Twilio Functions
This integration makes use of Twilio’s Functions feature.
Configuration
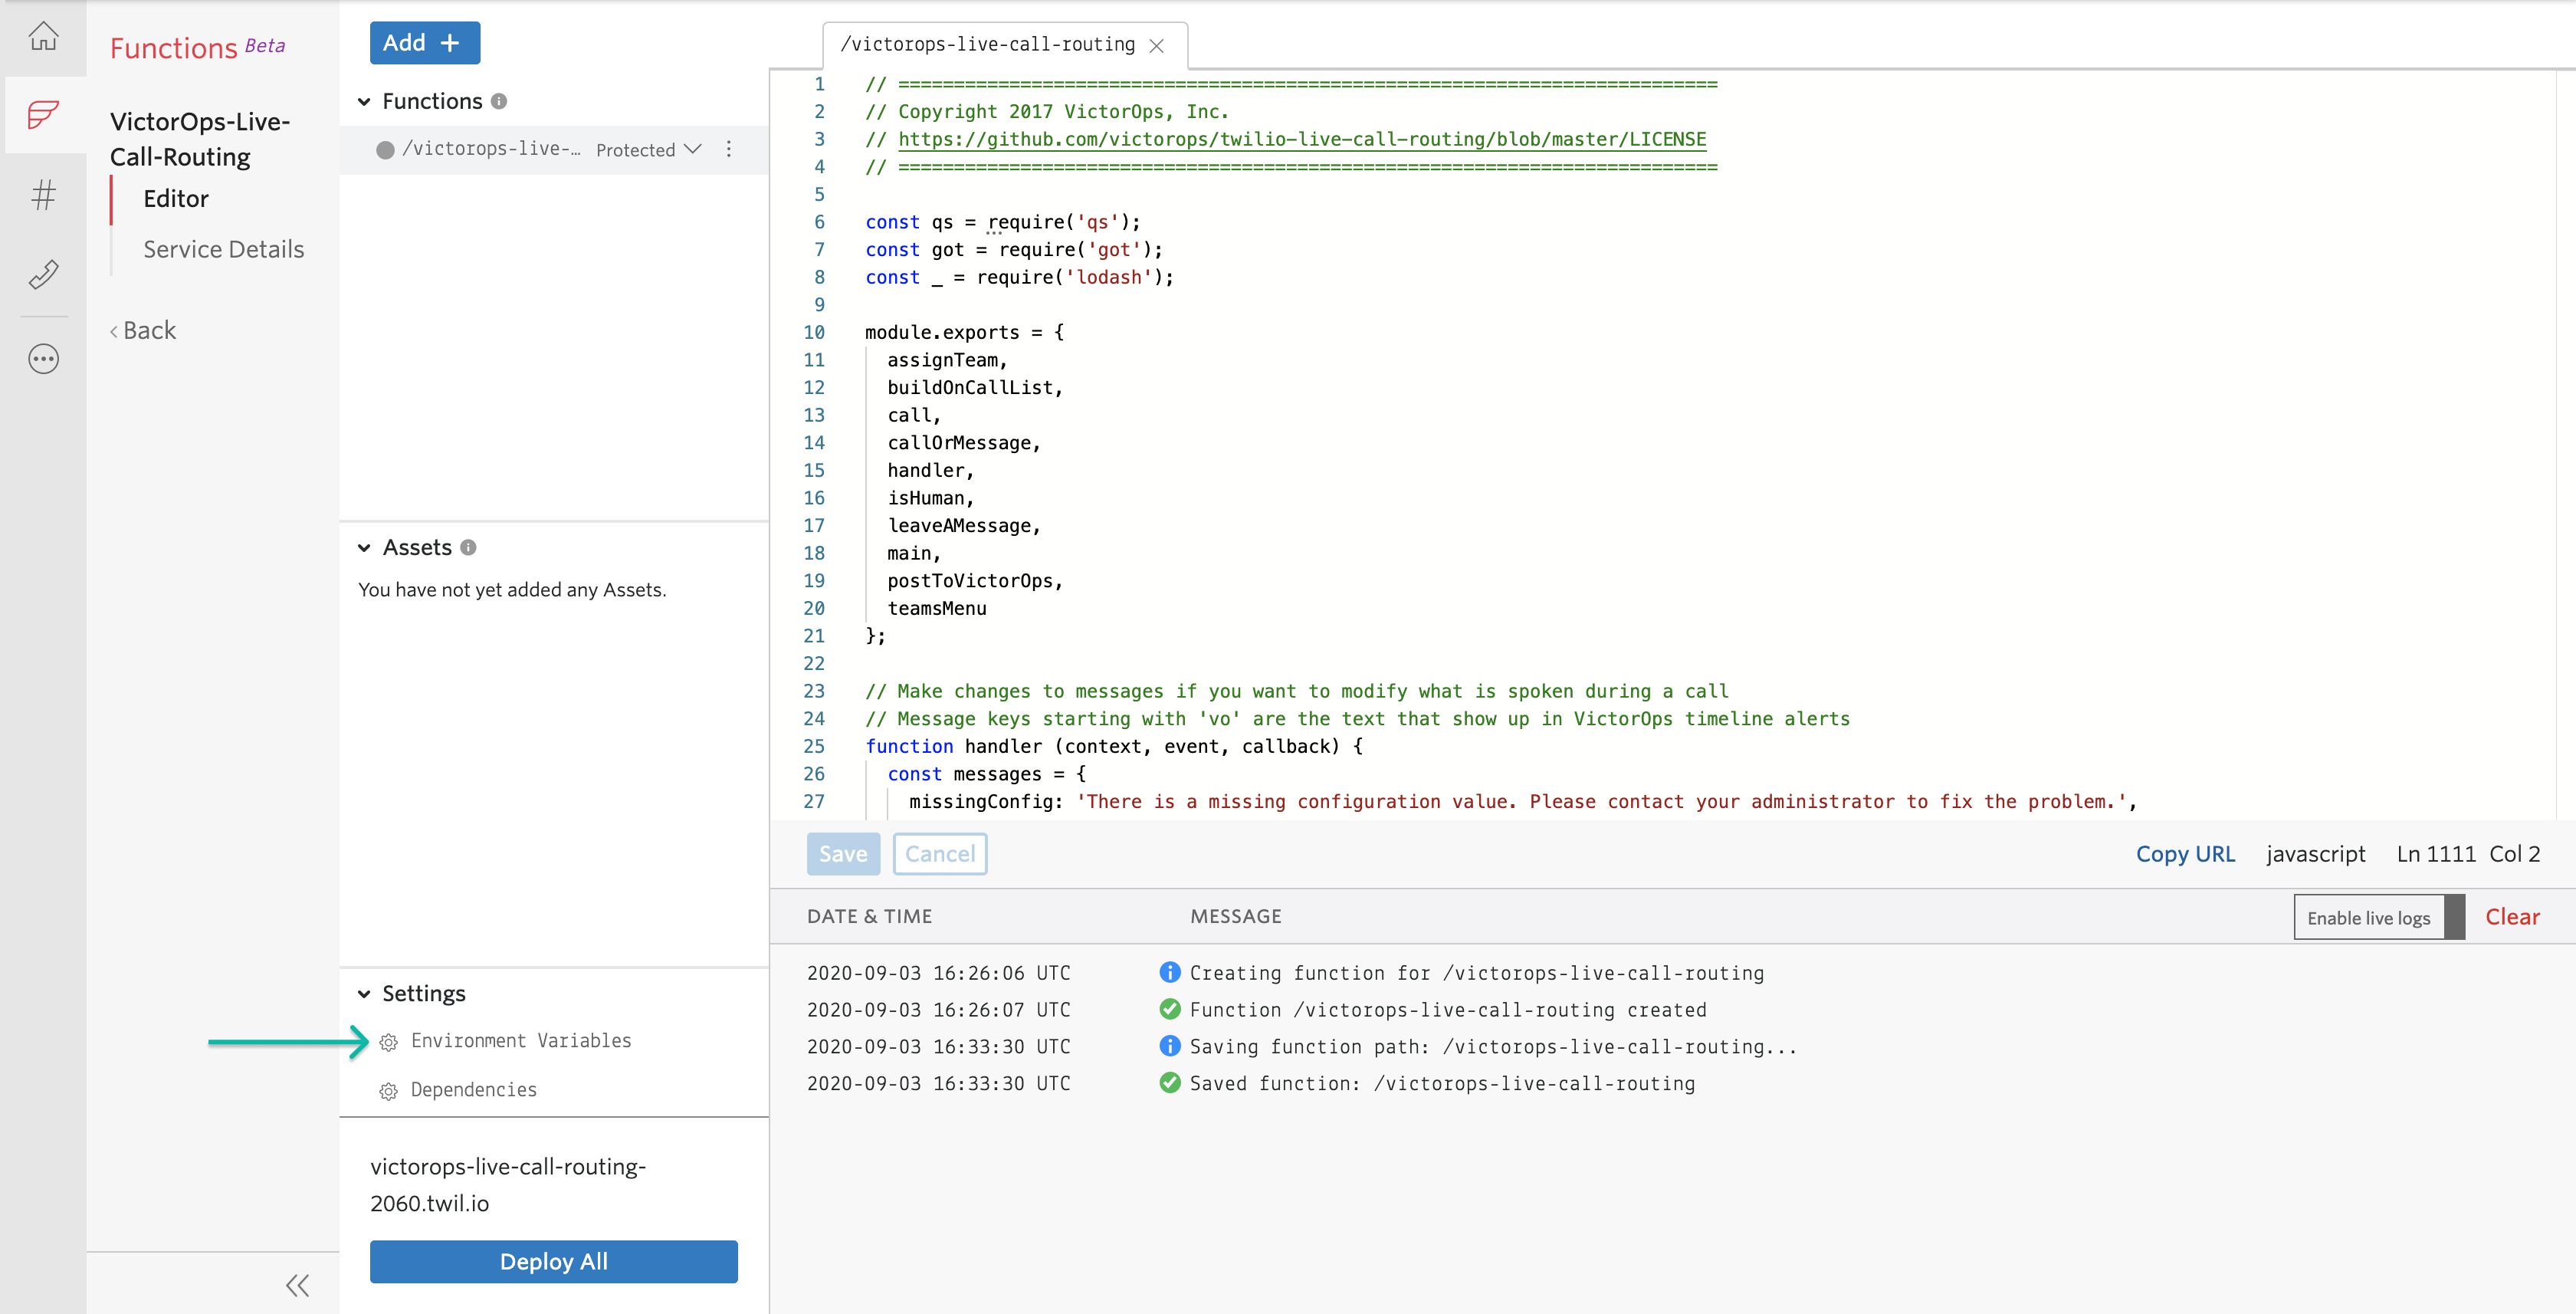
To navigate to the Functions feature from the Twilio console select Runtime from the left menu bar. Next select Functions and click the Create Service button.
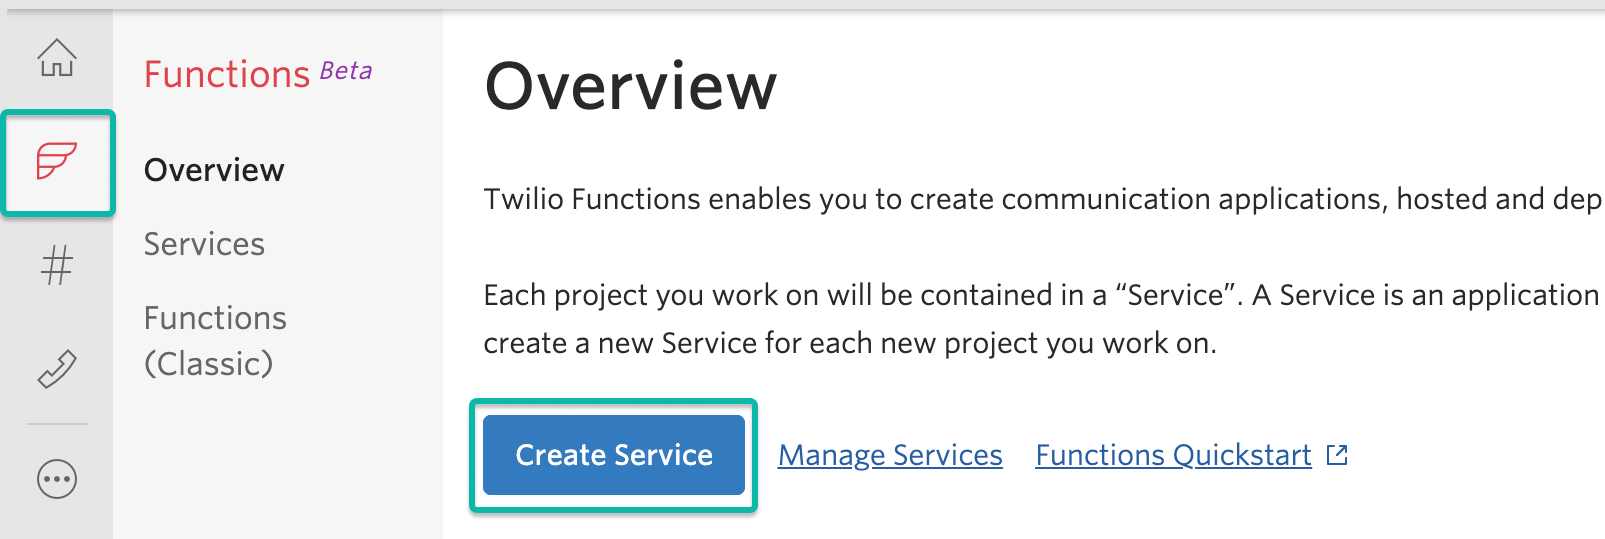
Name the service “VictorOps-Live-Call-Routing” and click Next.
On the next screen, click the blue “Add +” button and select Add Function.
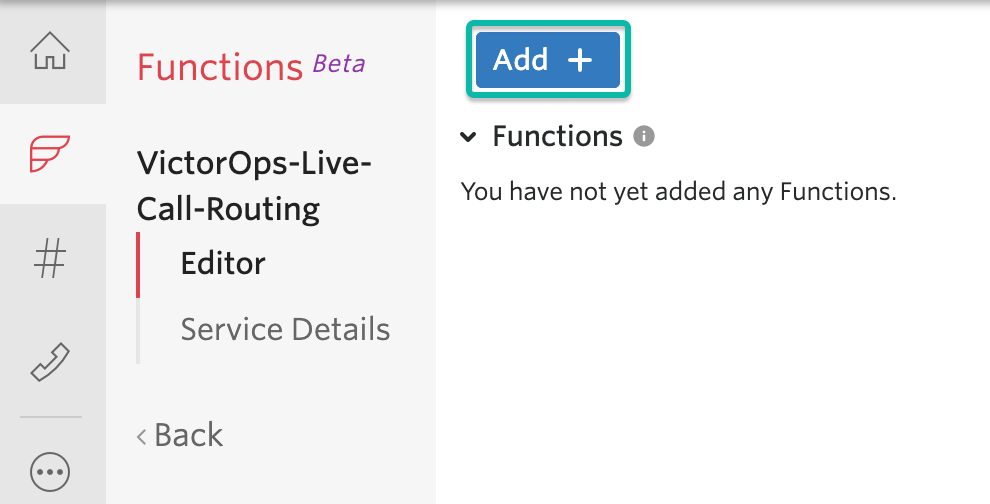
You’ll be directed to name the path for the function, which you should set as “/victorops-live-call-routing”. Click elsewhere in the screen and some default code for the function will show on the righthand side of your screen.
The Code
Highlight the default code that Twilio provides (often begins with “// This is your new function”) and delete it. Next, locate the code you’ll want to copy and paste in there at the following link:
https://github.com/victorops/twilio-live-call-routing/blob/master/Splunk-On-Call-Twilio
Paste this code into your function and click Save.
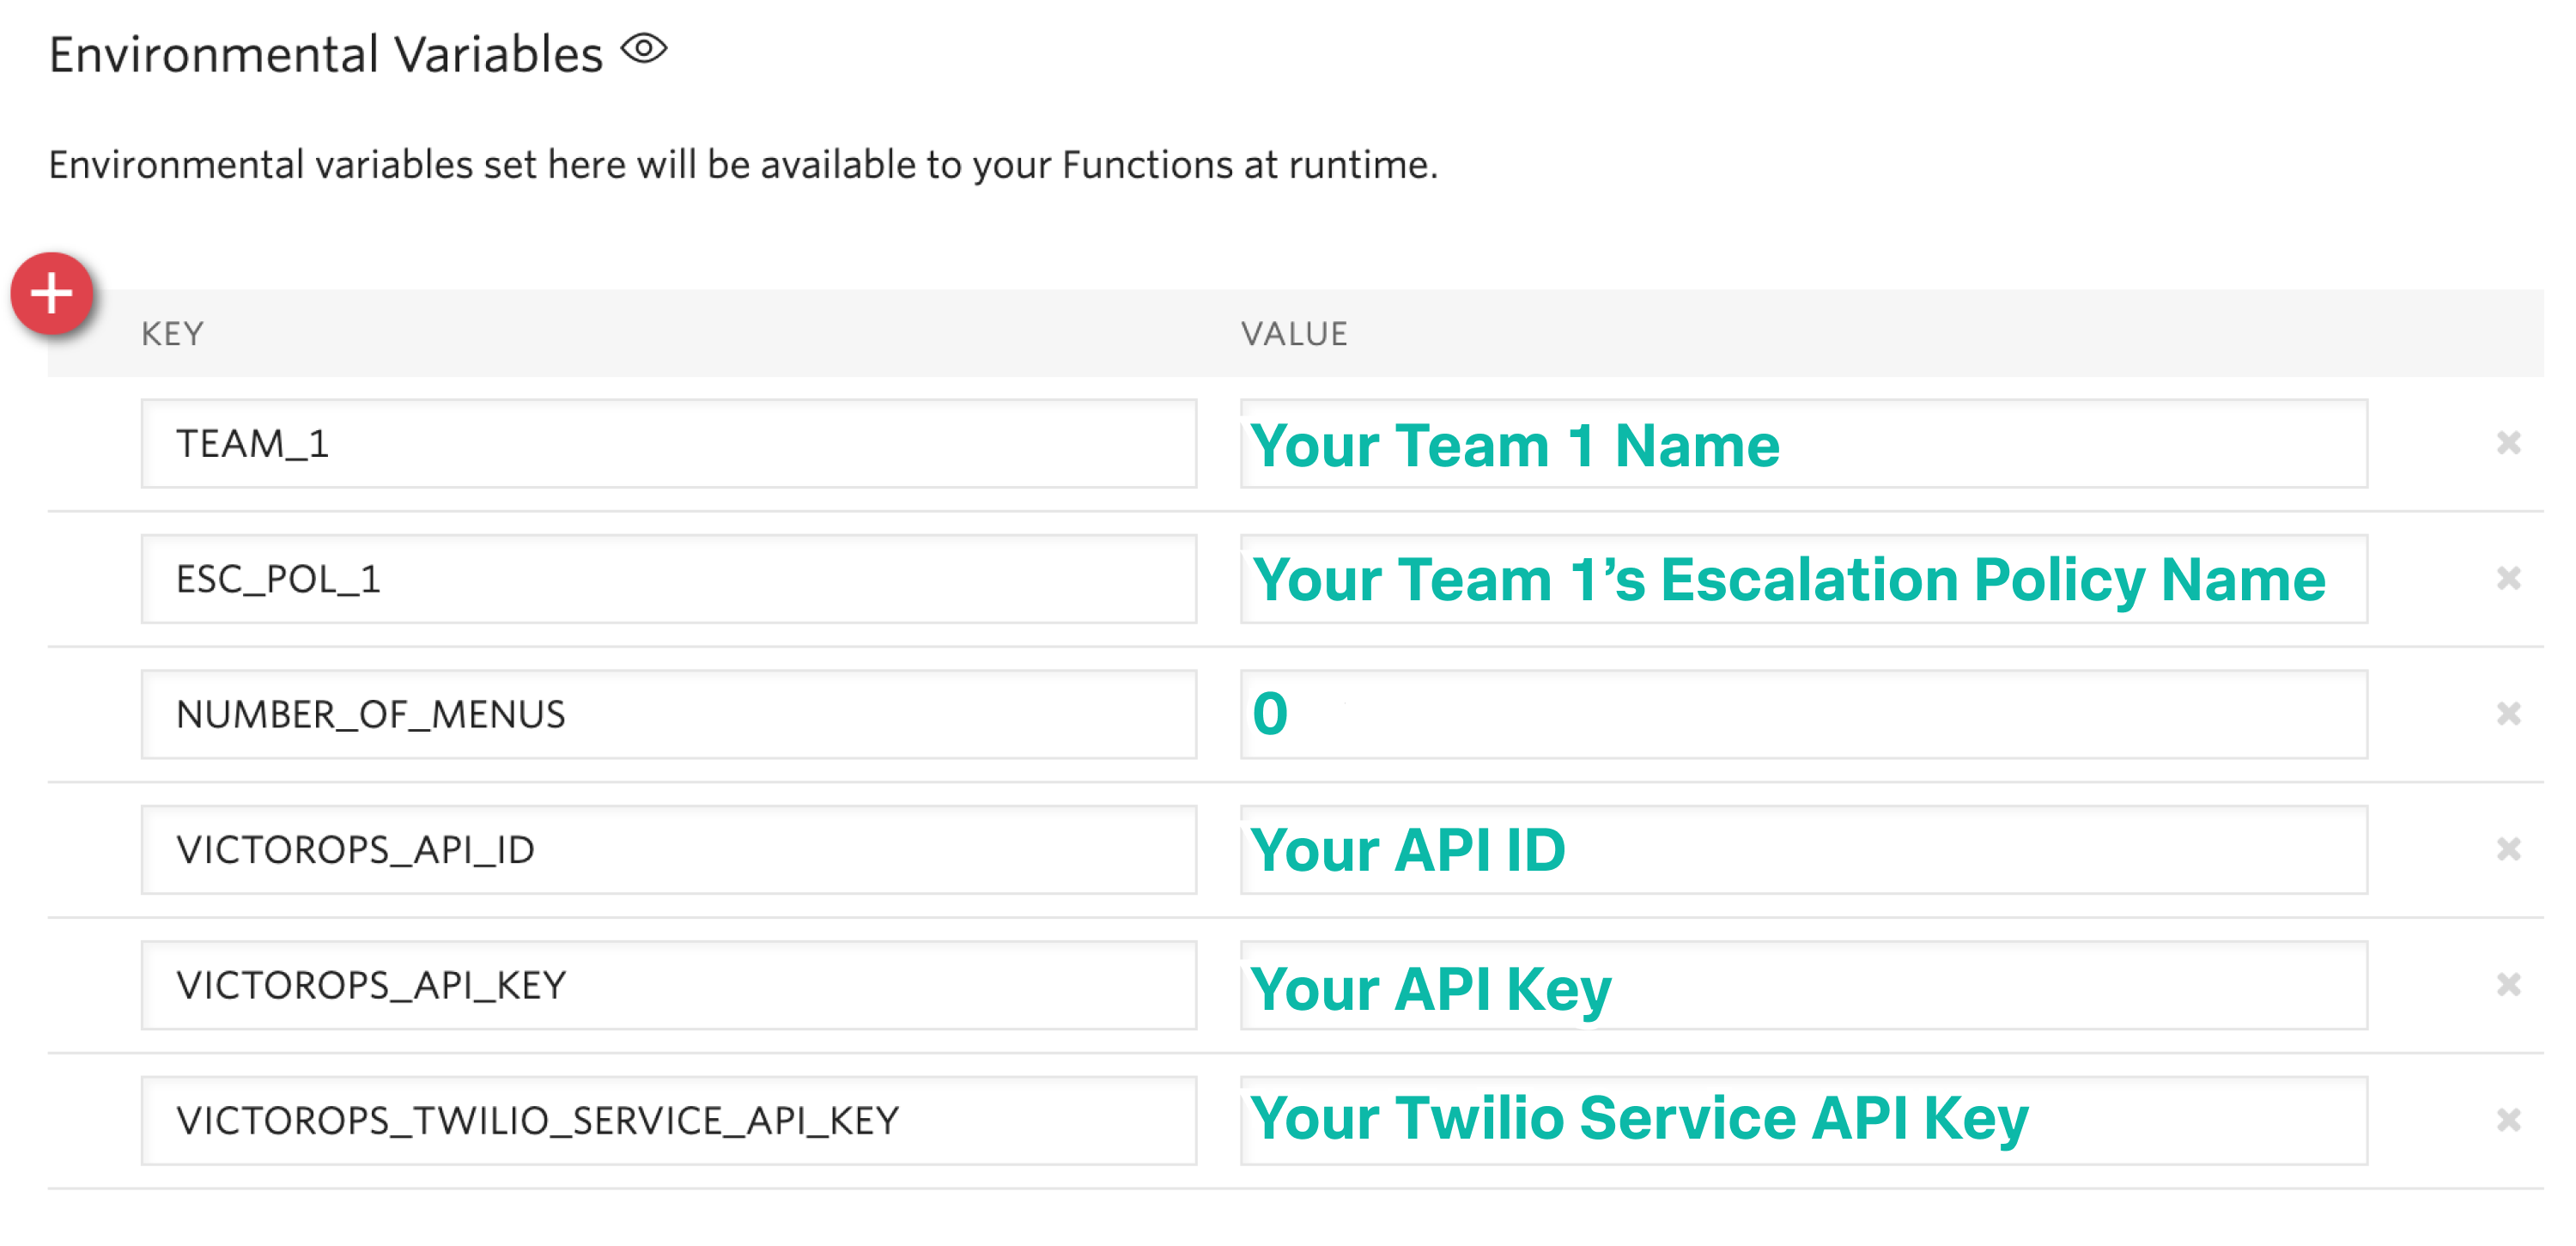
Configure Environment Variables
Once you save your Function you will need to configure a few variables. Under Settings towards the bottom of your screen, click on the Environment Variables option.
First, make sure Add my Twilio Credentials (ACCOUNT_SID) and (AUTH_TOKEN) to ENV is checked.
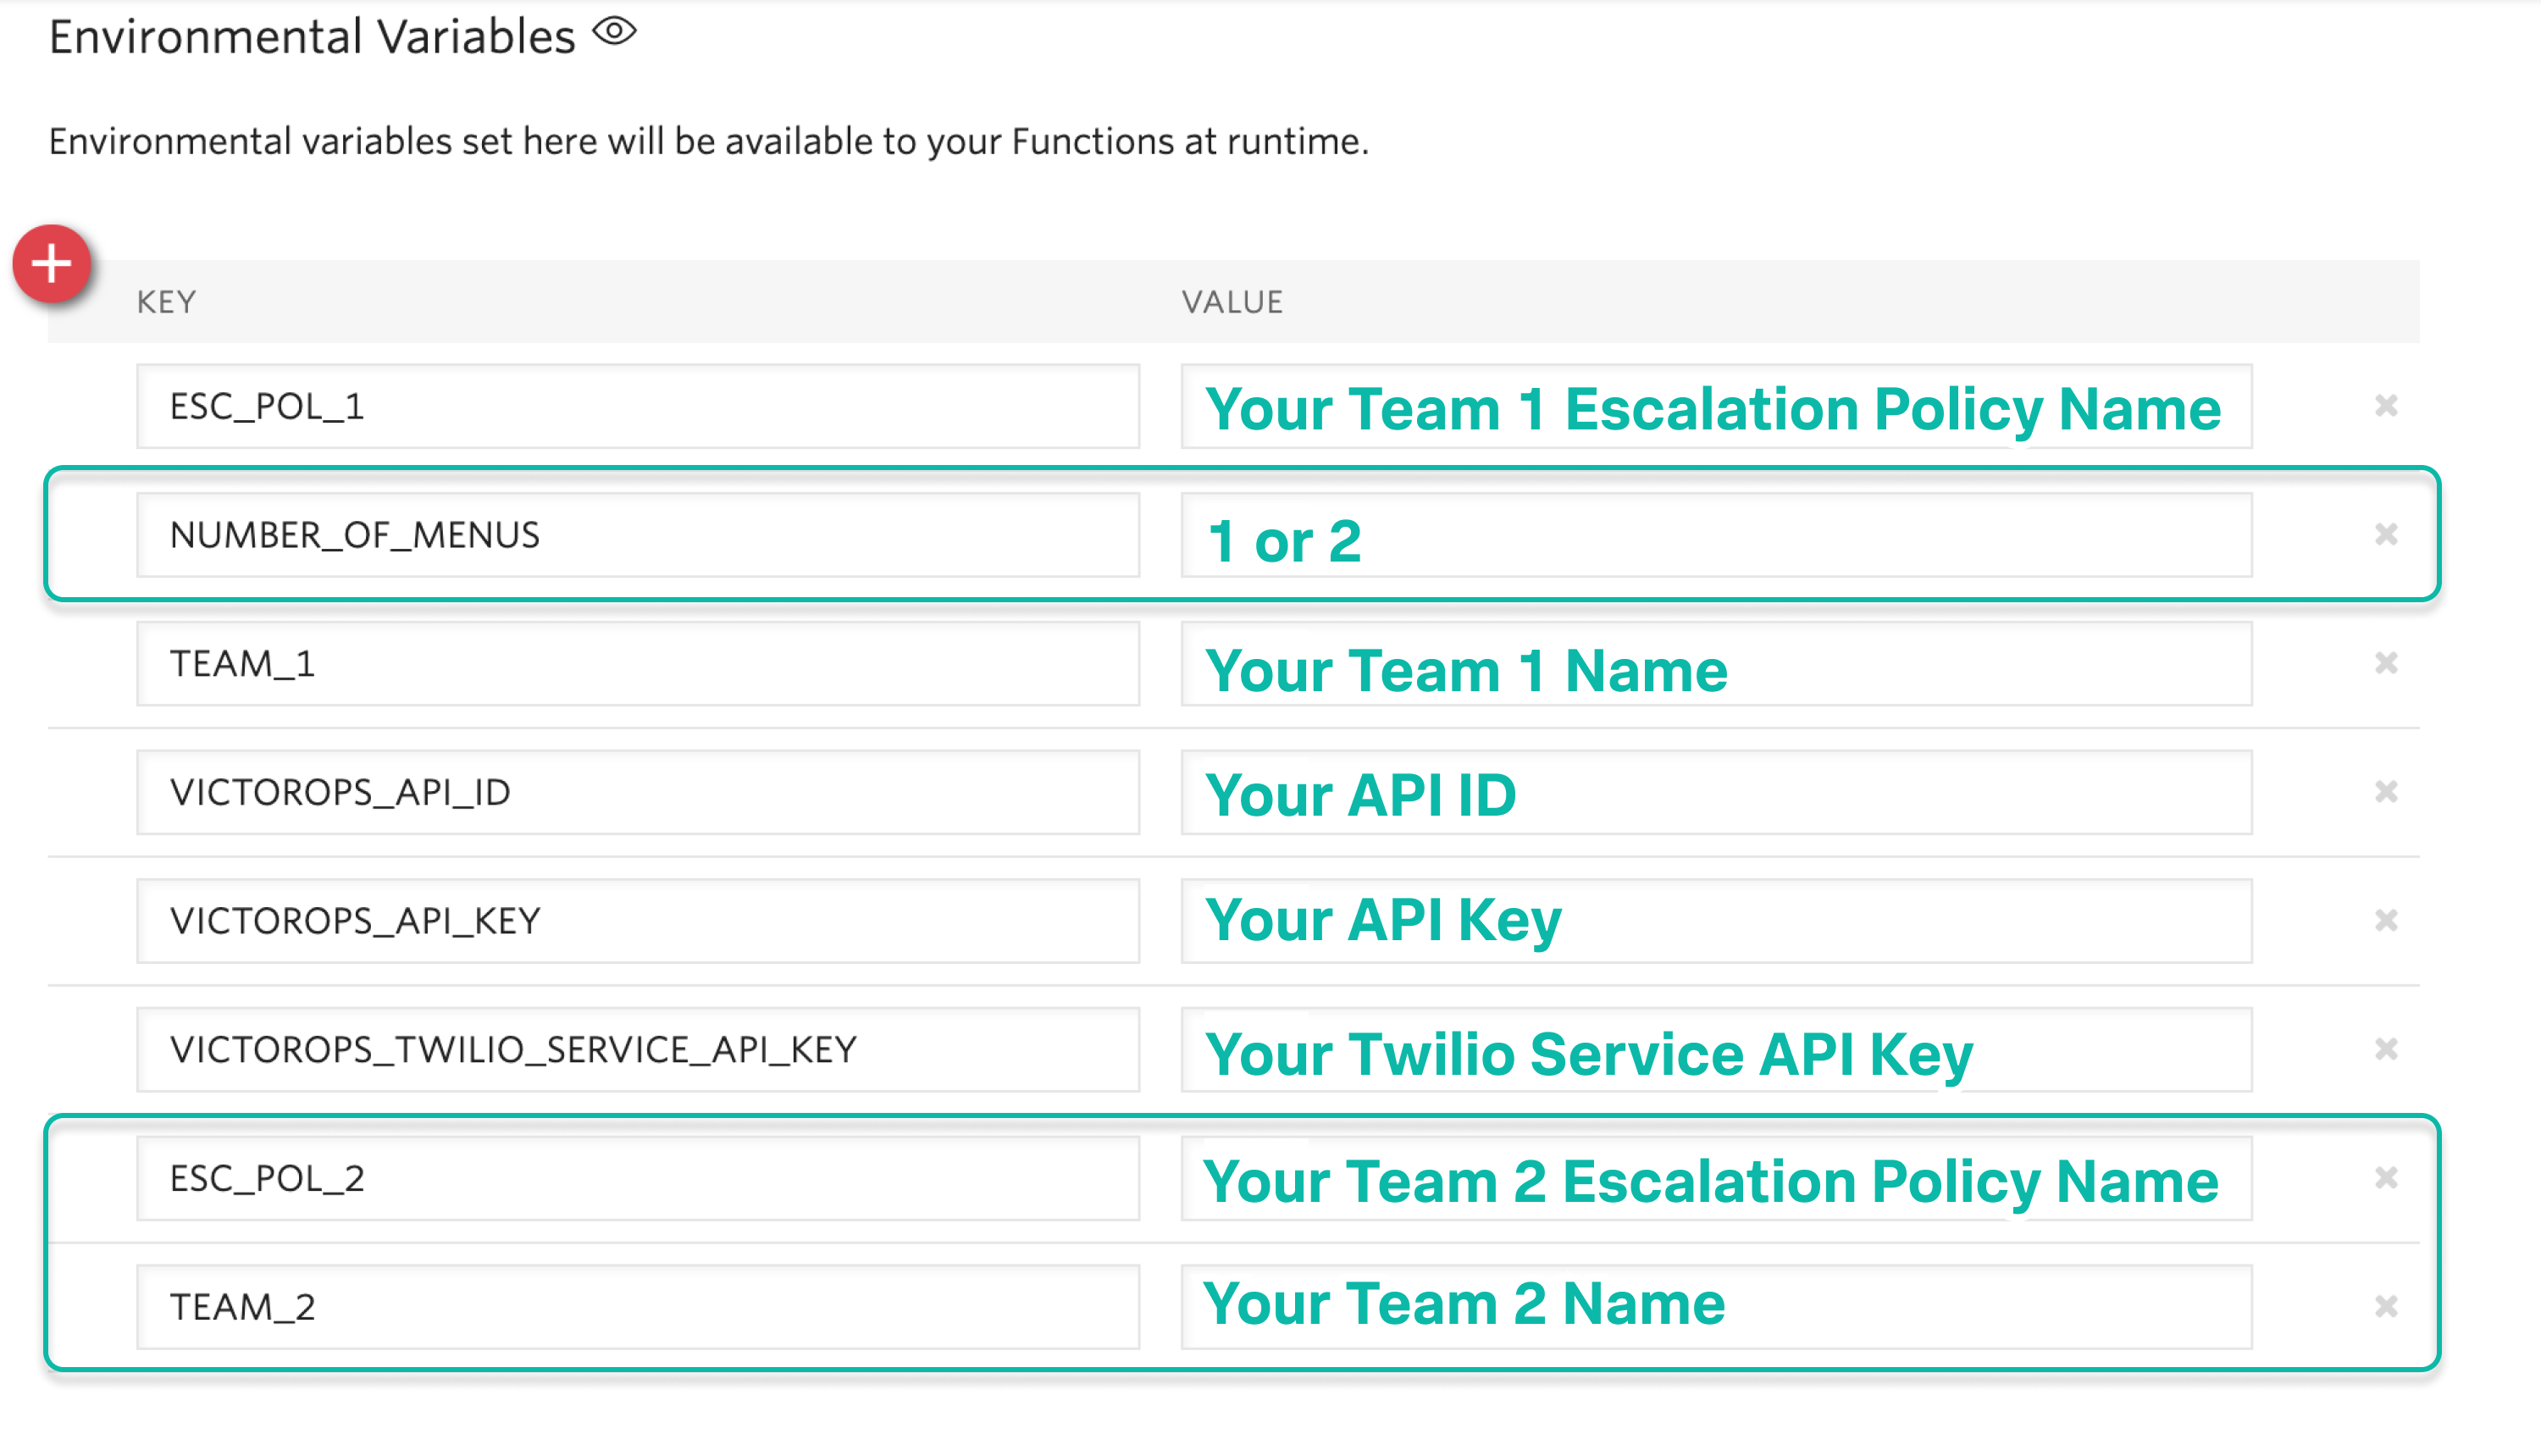
Next, add in all the environment variables shown in the screenshot below. The order of them doesn’t matter but each one needs to be entered as specified below. You’ll enter in your API credentials and Twilio service API key that we located (in Splunk On-Call) earlier. For TEAM_1, use the team name copied from your VictorOps account. For ESC_POL_1, use the name of the target escalation policy. For NUMBER_OF_MENUS, input 0 unless you want a multi-team phone tree (see below).
Note that the TEAM_1 and ESC_POL_1 values are case sensitive, and have to match the Splunk On-Call spelling/capitalization exactly.
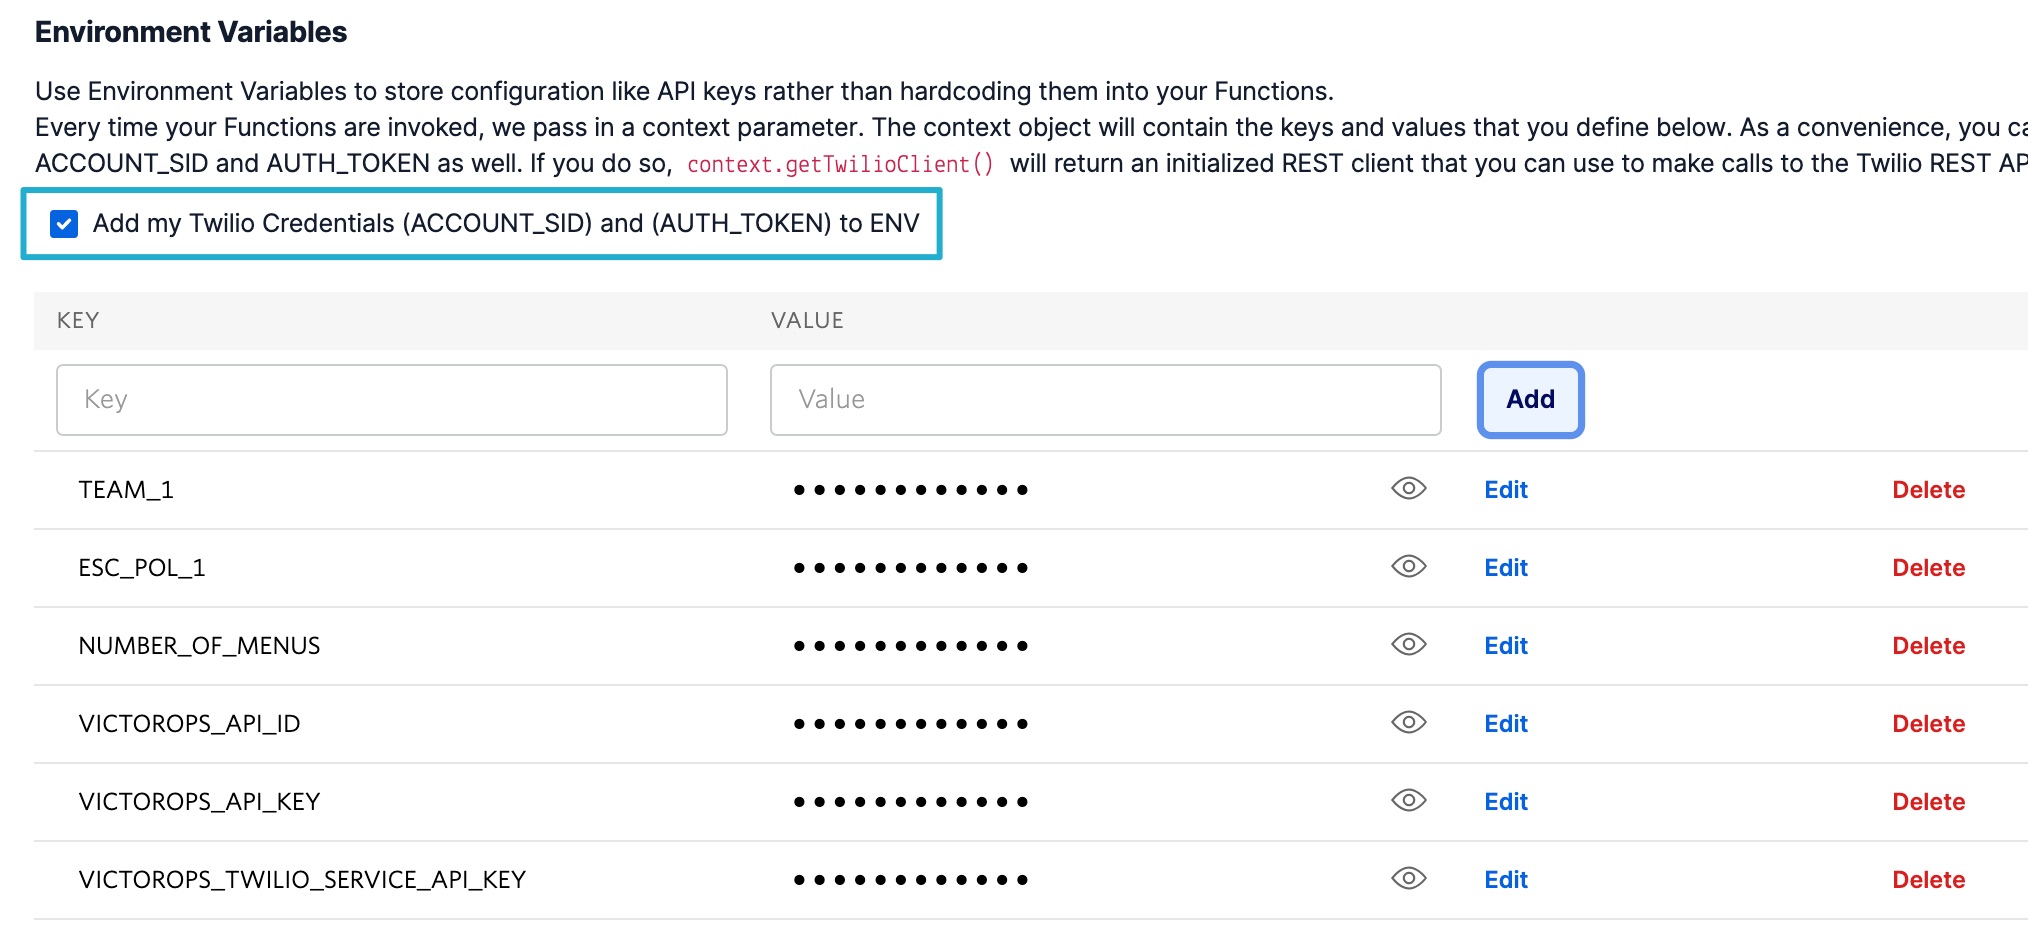
The “Key” column’s inputs are listed below for convenient copying/pasting:
| TEAM_1 |
| ESC_POL_1 |
| NUMBER_OF_MENUS |
| VICTOROPS_API_ID |
| VICTOROPS_API_KEY |
| VICTOROPS_TWILIO_SERVICE_API_KEY |
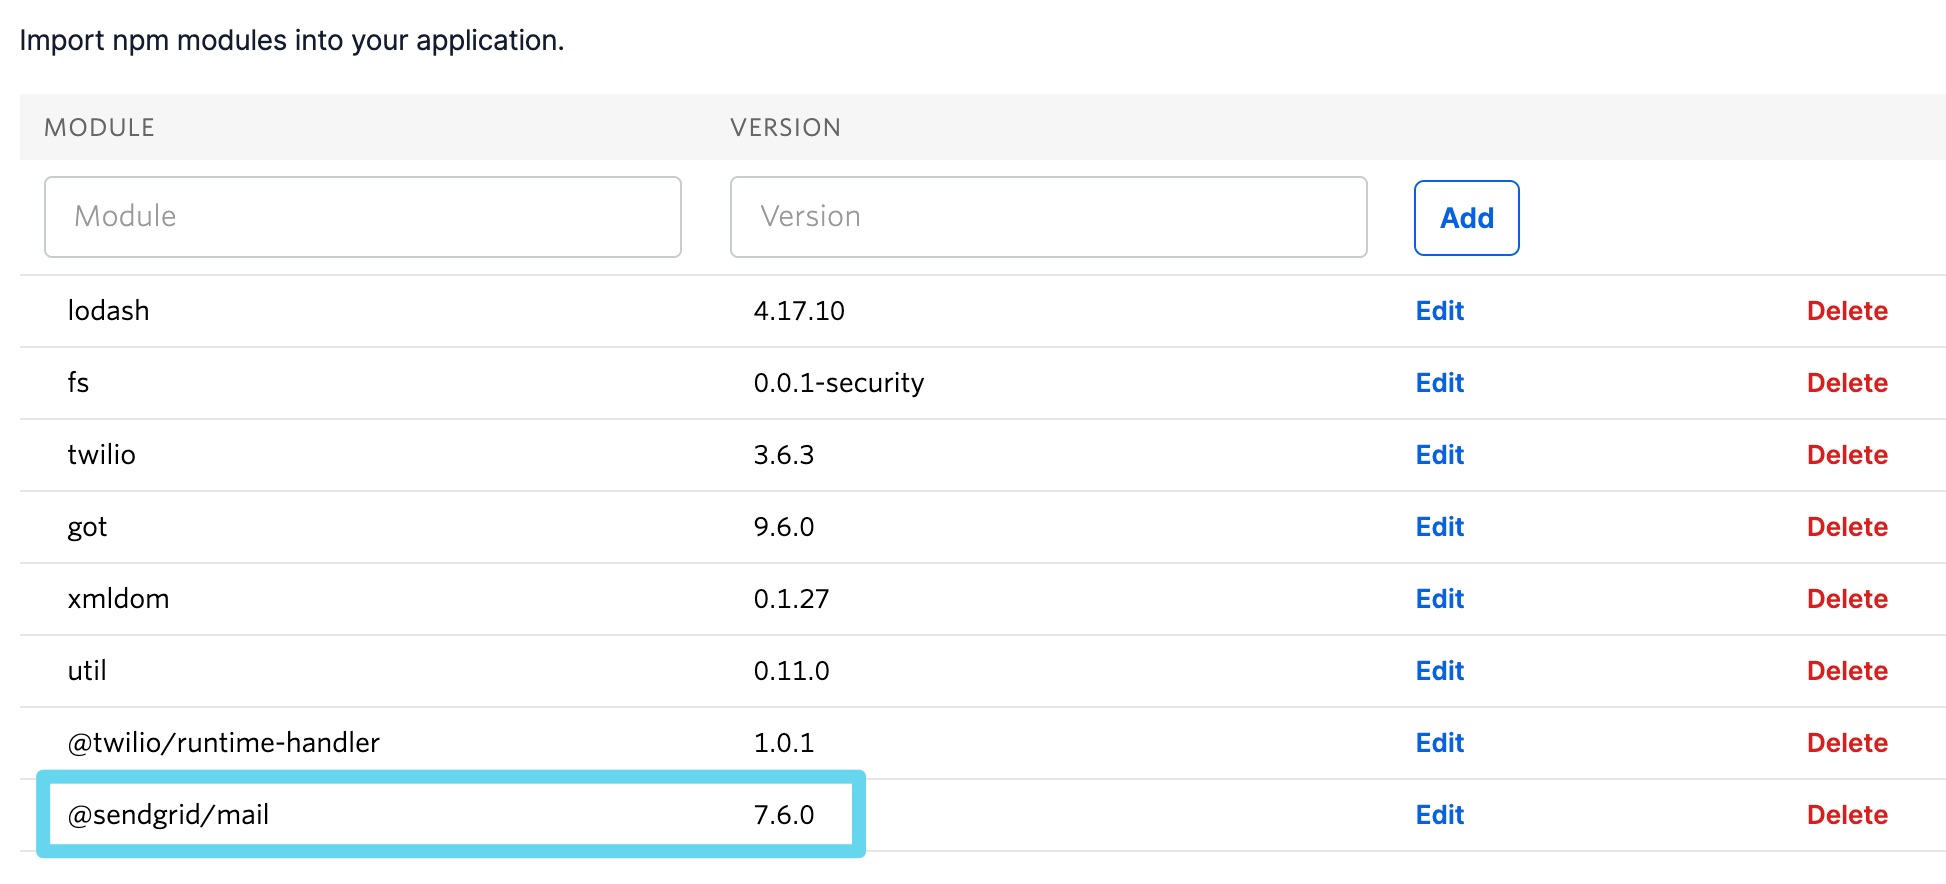
Configure Dependencies
Just below where you selected Environment Variables (under Settings towards the bottom of the screen), select Dependencies.
Ensure that the Node Version selected on the dropdown picker is Node v18.
Then, similar to the inputs for Environment Variables, enter the Modules and Versions to match the below screenshot (again, order doesn’t matter).
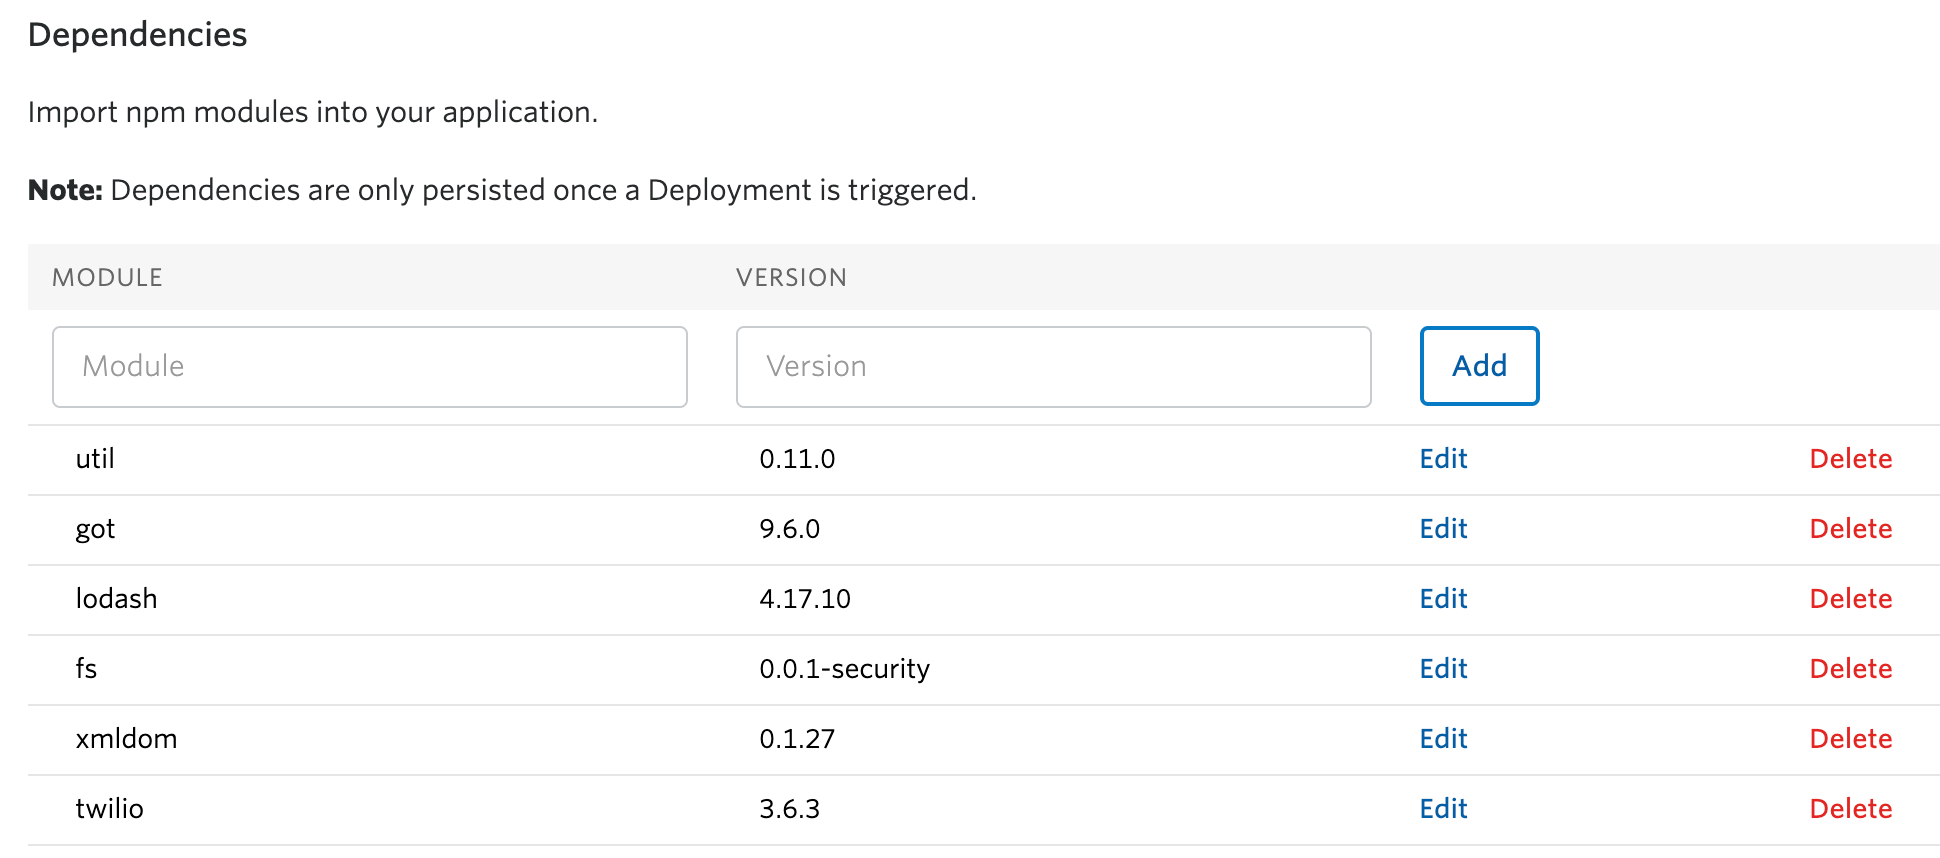
Again, for copy/paste convenience:
| xmldom | 0.1.27 |
| lodash | 4.17.10 |
| fs | 0.0.1-security |
| twilio | 3.6.3 |
| got | 9.6.0 |
| util | 0.11.0 |
IMPORTANT: after completing these steps, click the blue Deploy All button near the bottom lefthand corner of the screen. This publishes your Function, Environment Variables, and Dependencies and is necessary for the integration to operate. You’ll see a green check mark next to the function and a “Deployed to environment:” message at the bottom of the logs when successfully deployed (generally takes 5-15 seconds).
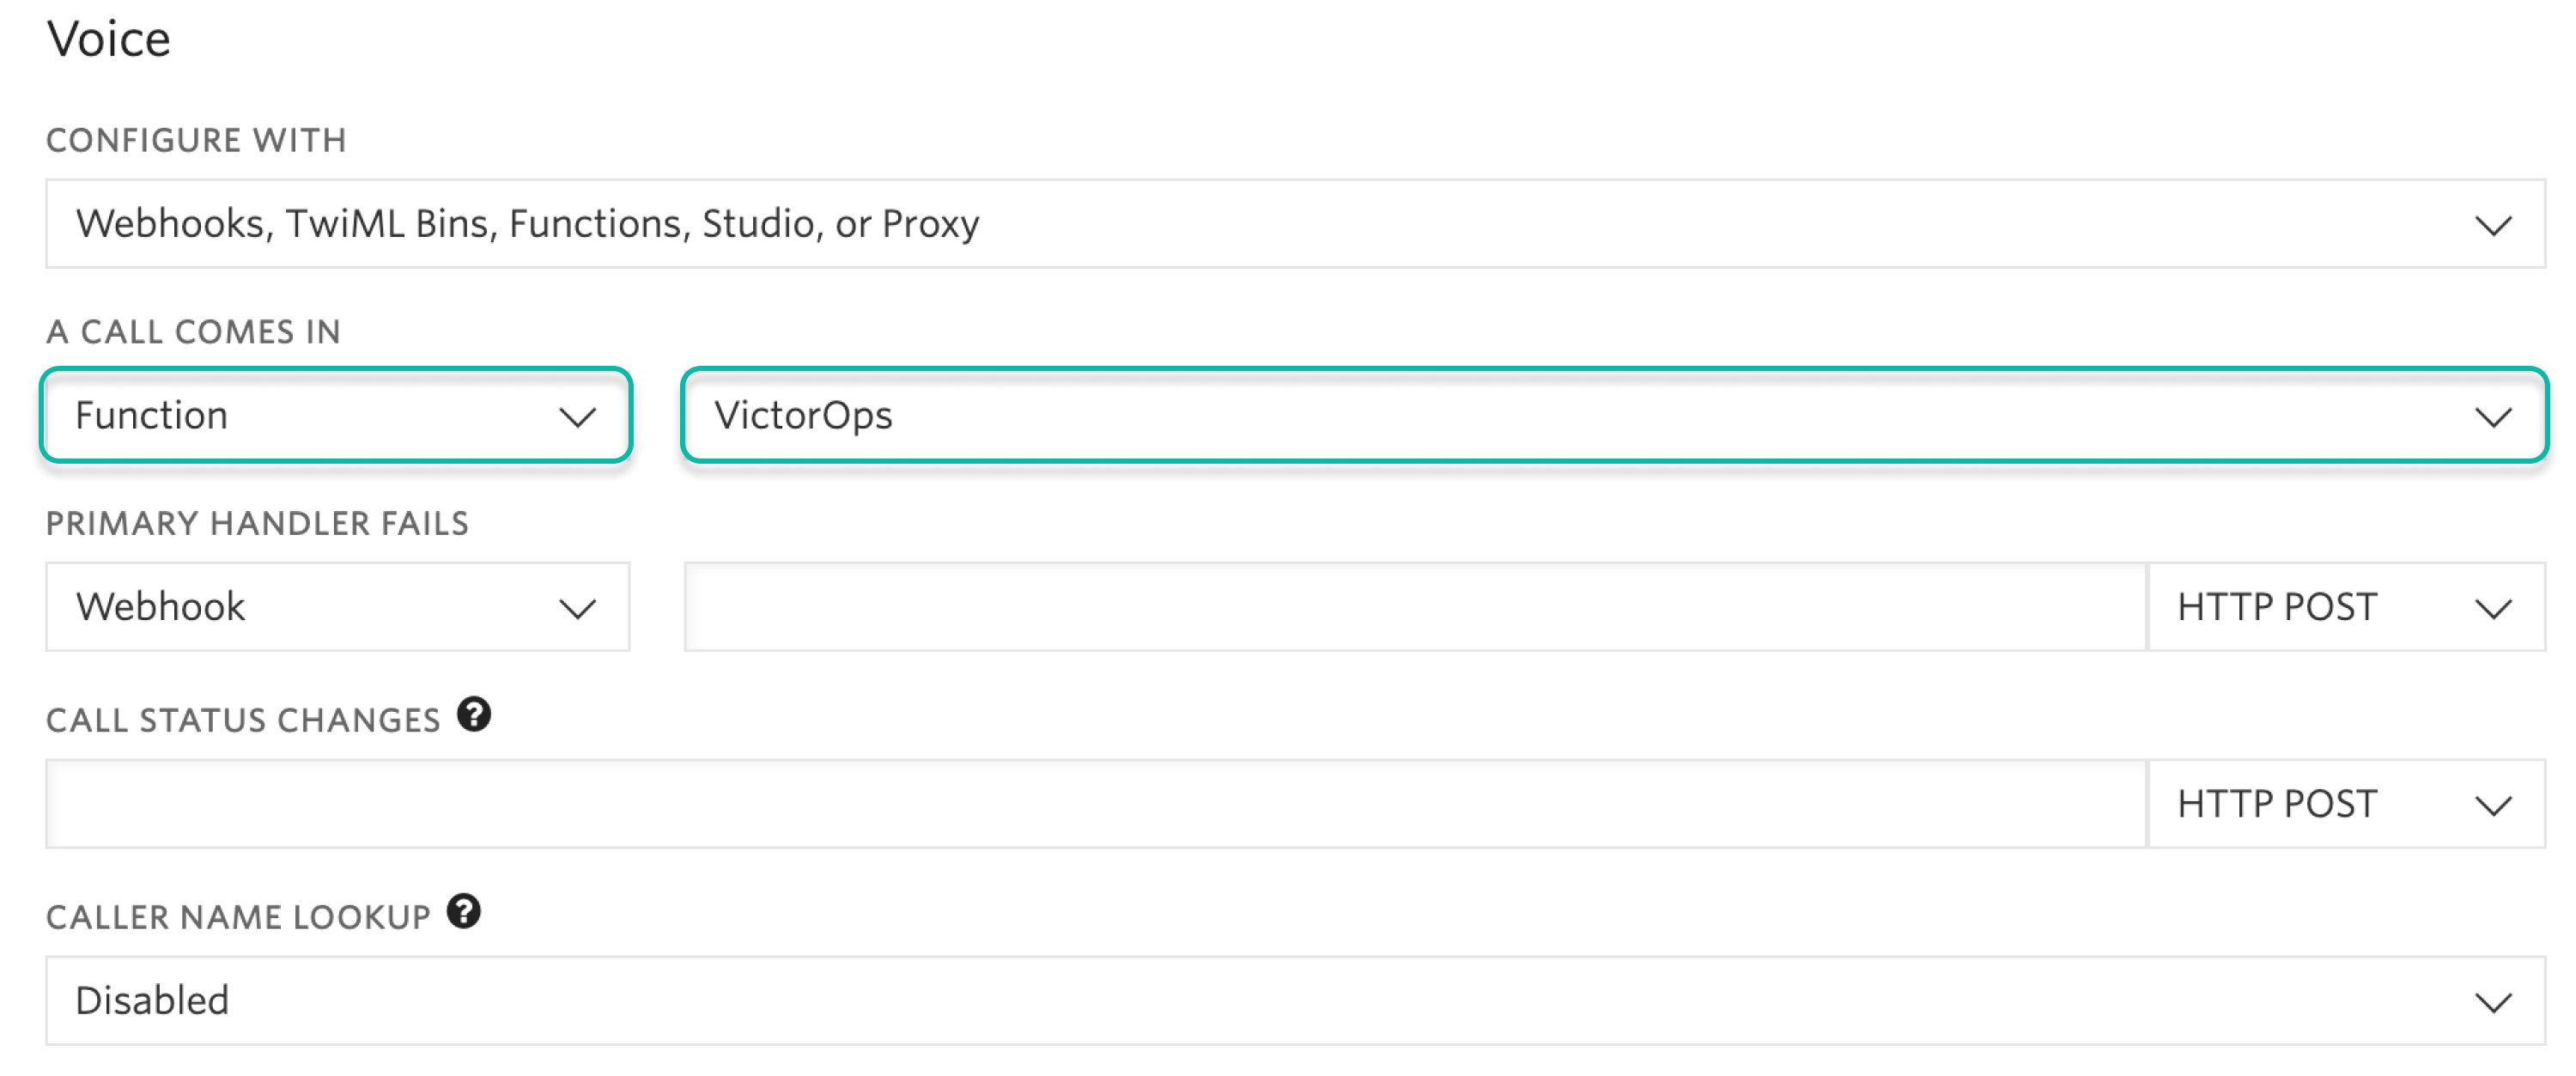
Add Function to a Phone Number
The last step in Twilio is to add the function to the phone number you plan on using for this integration. From the left side Twilio menu, select Phone Numbers and then select the specific phone number you plan to use.

Under the Voice and Fax section set the A CALL COMES IN to Function. Select VictorOps-Live-Call-Routing as the Service, ui as the Environment, /victorops-live-call-routing as the Function Path.
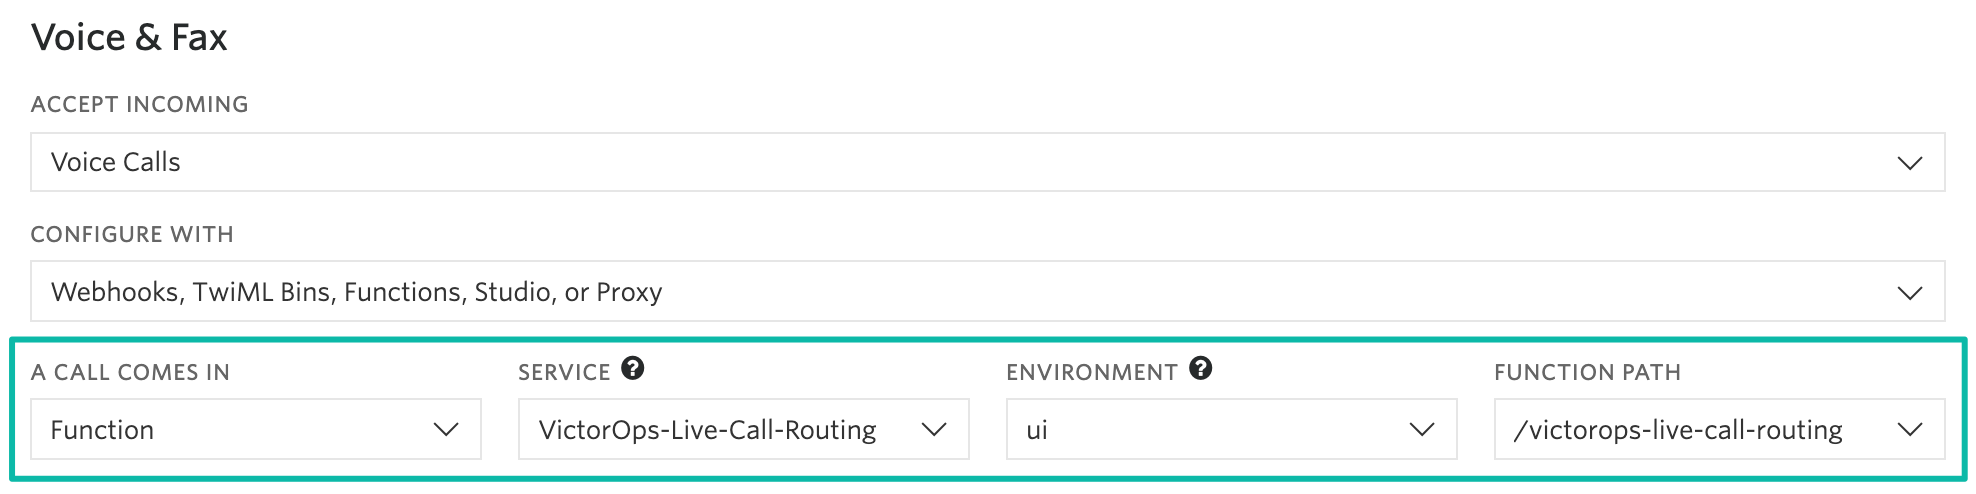
Occasionally after saving these changes, Twilio will visually change the Function to a Webhook. While different in name, these operate identically and should not impact the functionality of your integration.
The standard setup is now complete. If you’d like to adjust any functionality, follow the below guides. Otherwise, your setup is now finished.
Optional Configuration Settings
A number of optional configuration settings are available. For each, please follow the standard setup as described above and then proceed with the configuration setting you’d like to implement.
Multi Team Phone Tree
To add a phone tree (press 1 for Operations, press 2 for Support…) additional environment variables are required. For every additional team you want in the phone tree, enter “TEAM_2, TEAM_3, and so on…” into the Key box. Then, enter the corresponding Escalation Policy with a Key of ESC_POL_2, ESC_POL_3, and so on, specifying the Escalation Policy’s name in the Value box. You will also need to set a variable called NUMBER_OF_MENUS and set it to 1 or 2. Setting this to 1 will result in the operator reading “Press 1 for <Team 1>, Press 2 for <Team 2>. Setting this to 2 will result in an initial option of “Please press 1 to reach an On-Call representative or press 2 to leave a message”, before reading out the available team names.
Note: teams are read out from the phone tree in reverse alphabetical order, meaning that a team beginning with ‘A’ will always be read out after a team beginning with ‘Z’, regardless of how they are entered amongst TEAM_1, TEAM_2, etc.
The end result should look like so:
Each team added to this function should correspond to a unique Routing Key that was created during the “Routing Keys” step.
After adding these environment variables, click the blue Deploy All button at the bottom of the screen in Twilio.
Multiple Phone Numbers to Route to Different Teams
If instead of the phone tree, you’d like designated phone numbers to route to different Splunk On-Call teams, a few additional steps are necessary on top of the standard setup. You’ll need to purchase additional Twilio numbers, create new a new Service and Function (with matching Environment Variables and Dependencies), and assign the Service and Function to your new phone number.
To purchase additional Twilio numbers, follow the process specified in the above Acquiring a Twilio Phone Number section.
Next, you’ll need to create a new Service and Function. Repeat the steps specified above from Twilio Functions through Add Function to a Phone Number, this time specifying the Team and Escalation Policy you want this number to call. Note: you’ll need to name your new service something slightly different than you named the first one. This name is visual only and doesn’t affect functionality, so we recommend naming it after the team it’s designed to reach.
Routing Keys
The last part of the configuration will take place in Splunk On-Call. For detailed instructions, see the above Routing Keys section.
No Call Functionality
If you would like to prevent the live-calling functionality of this integration that tries to connect a caller live on the phone with an on-call individual, instead immediately prompting the caller to leave a voicemail, an additional Environment Variable is necessary.
In Twilio, navigate to Develop >> Functions >> Services and locate the service you’d previously created.
Next, click on Environment Variables at the bottom of the screen and add a new Environment Variable. Set the Key as NO_CALL and Value as TRUE
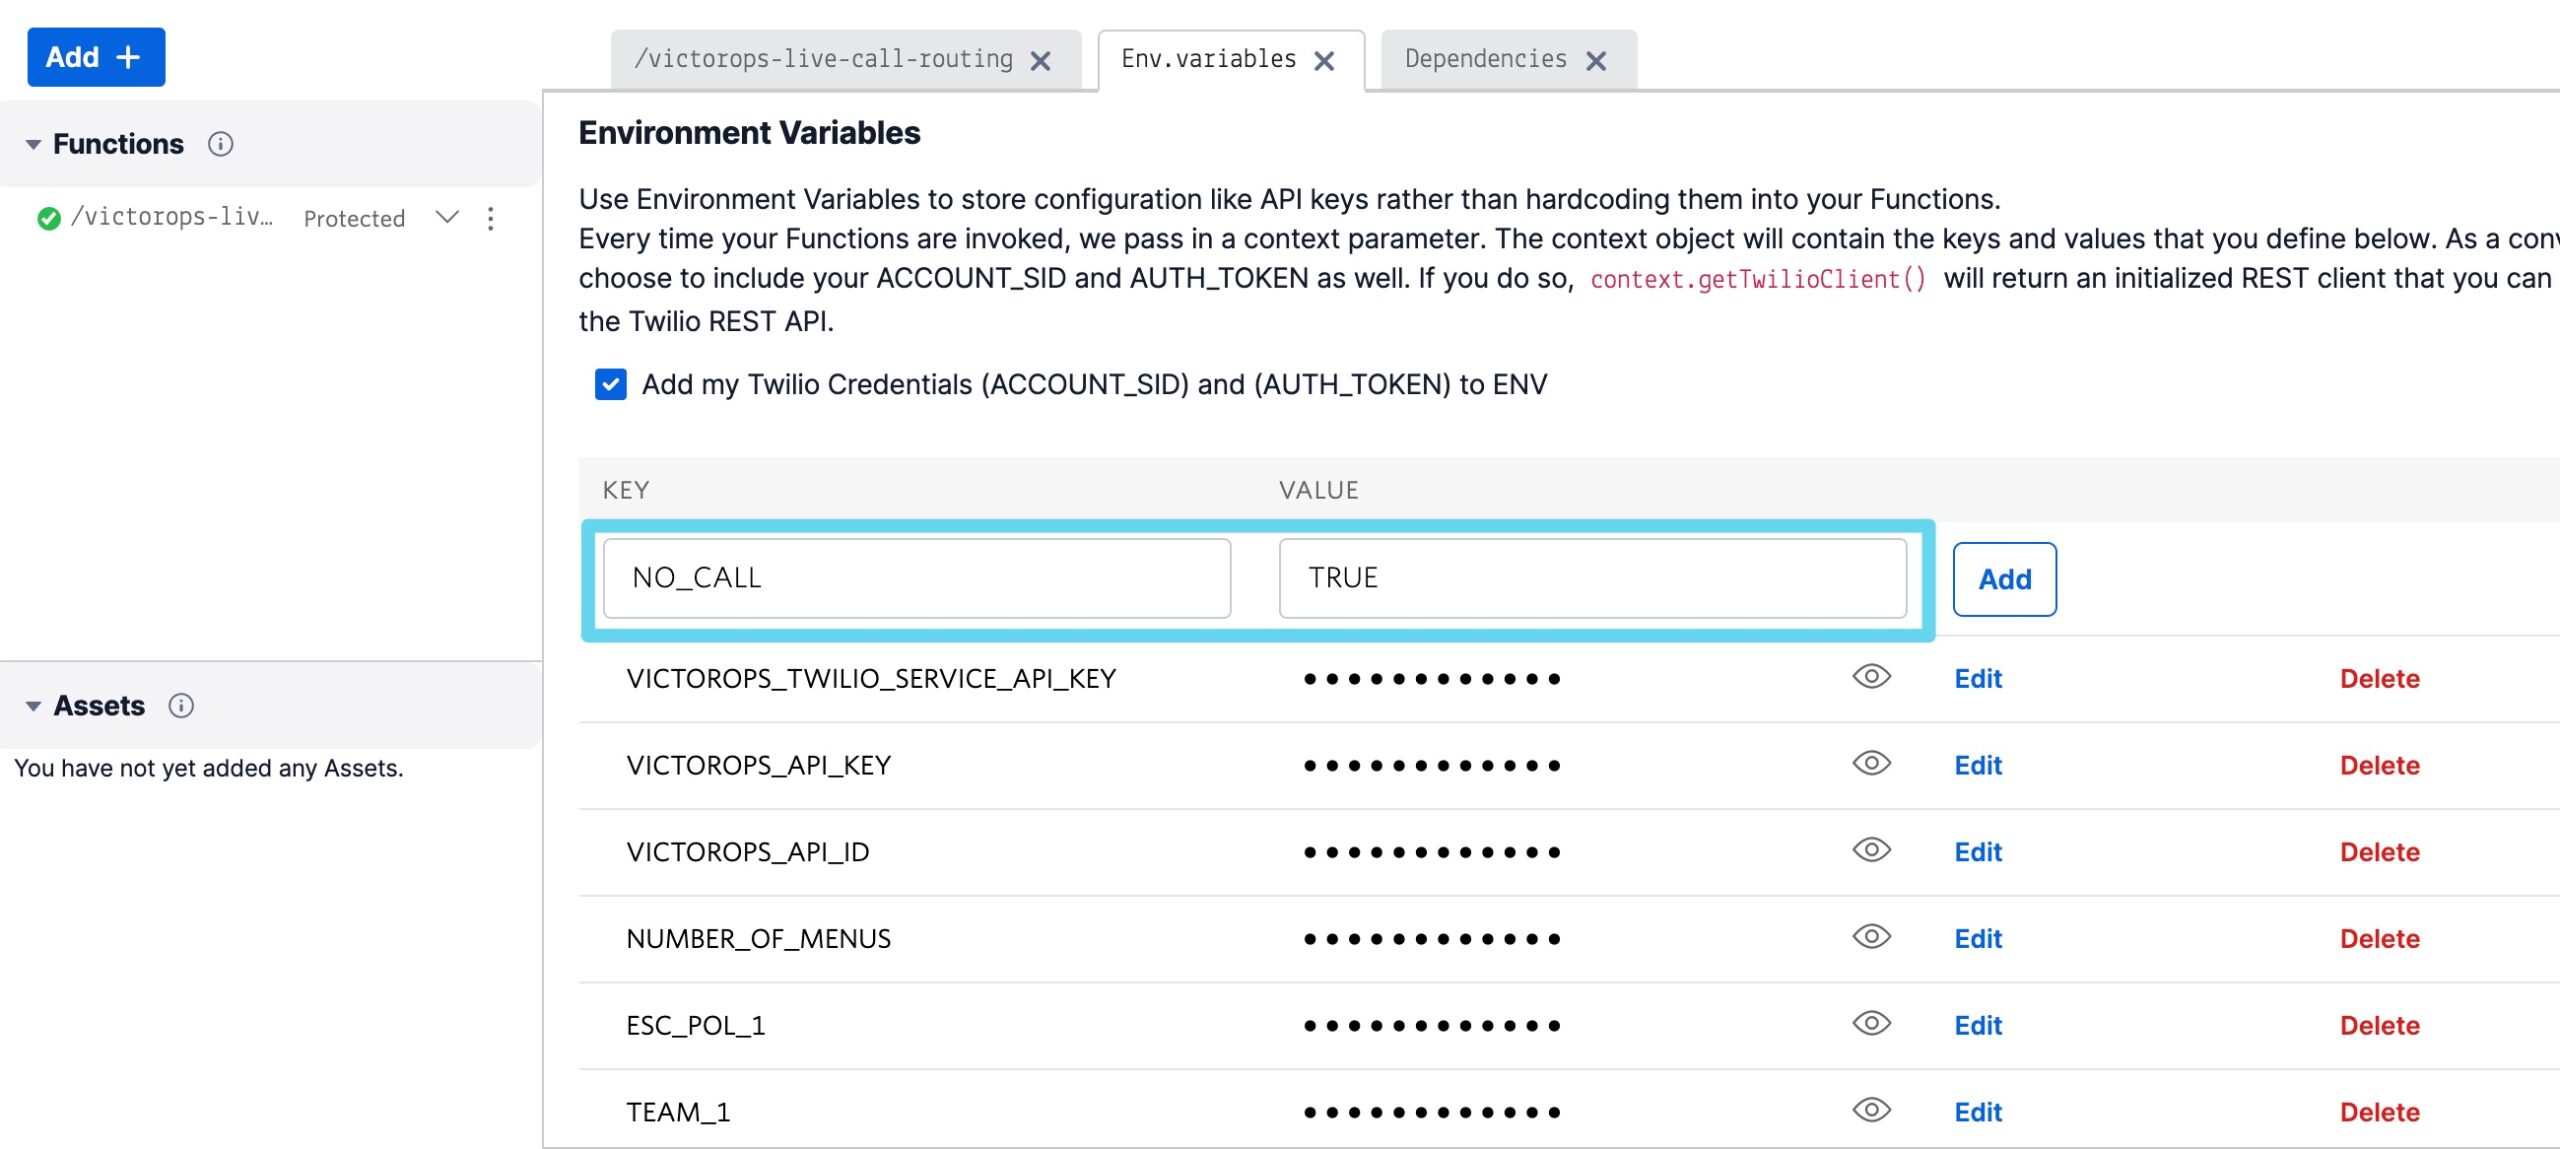
Once this is added, click the blue Deploy All button towards the bottom of the screen to push your changes.
No Voicemail Functionality
If you would like to prevent the ability for a caller to leave a voicemail if no on-call individuals answer the phone, instead informing the caller that an incident will be created and they’ll be called back shortly, an additional Environment Variable is necessary.
In Twilio, navigate to Develop >> Functions >> Services and locate the service you’d previously created.
Next, click on Environment Variables at the bottom of the screen and add a new Environment Variable. Set the Key as NO_VOICEMAIL and Value as TRUE
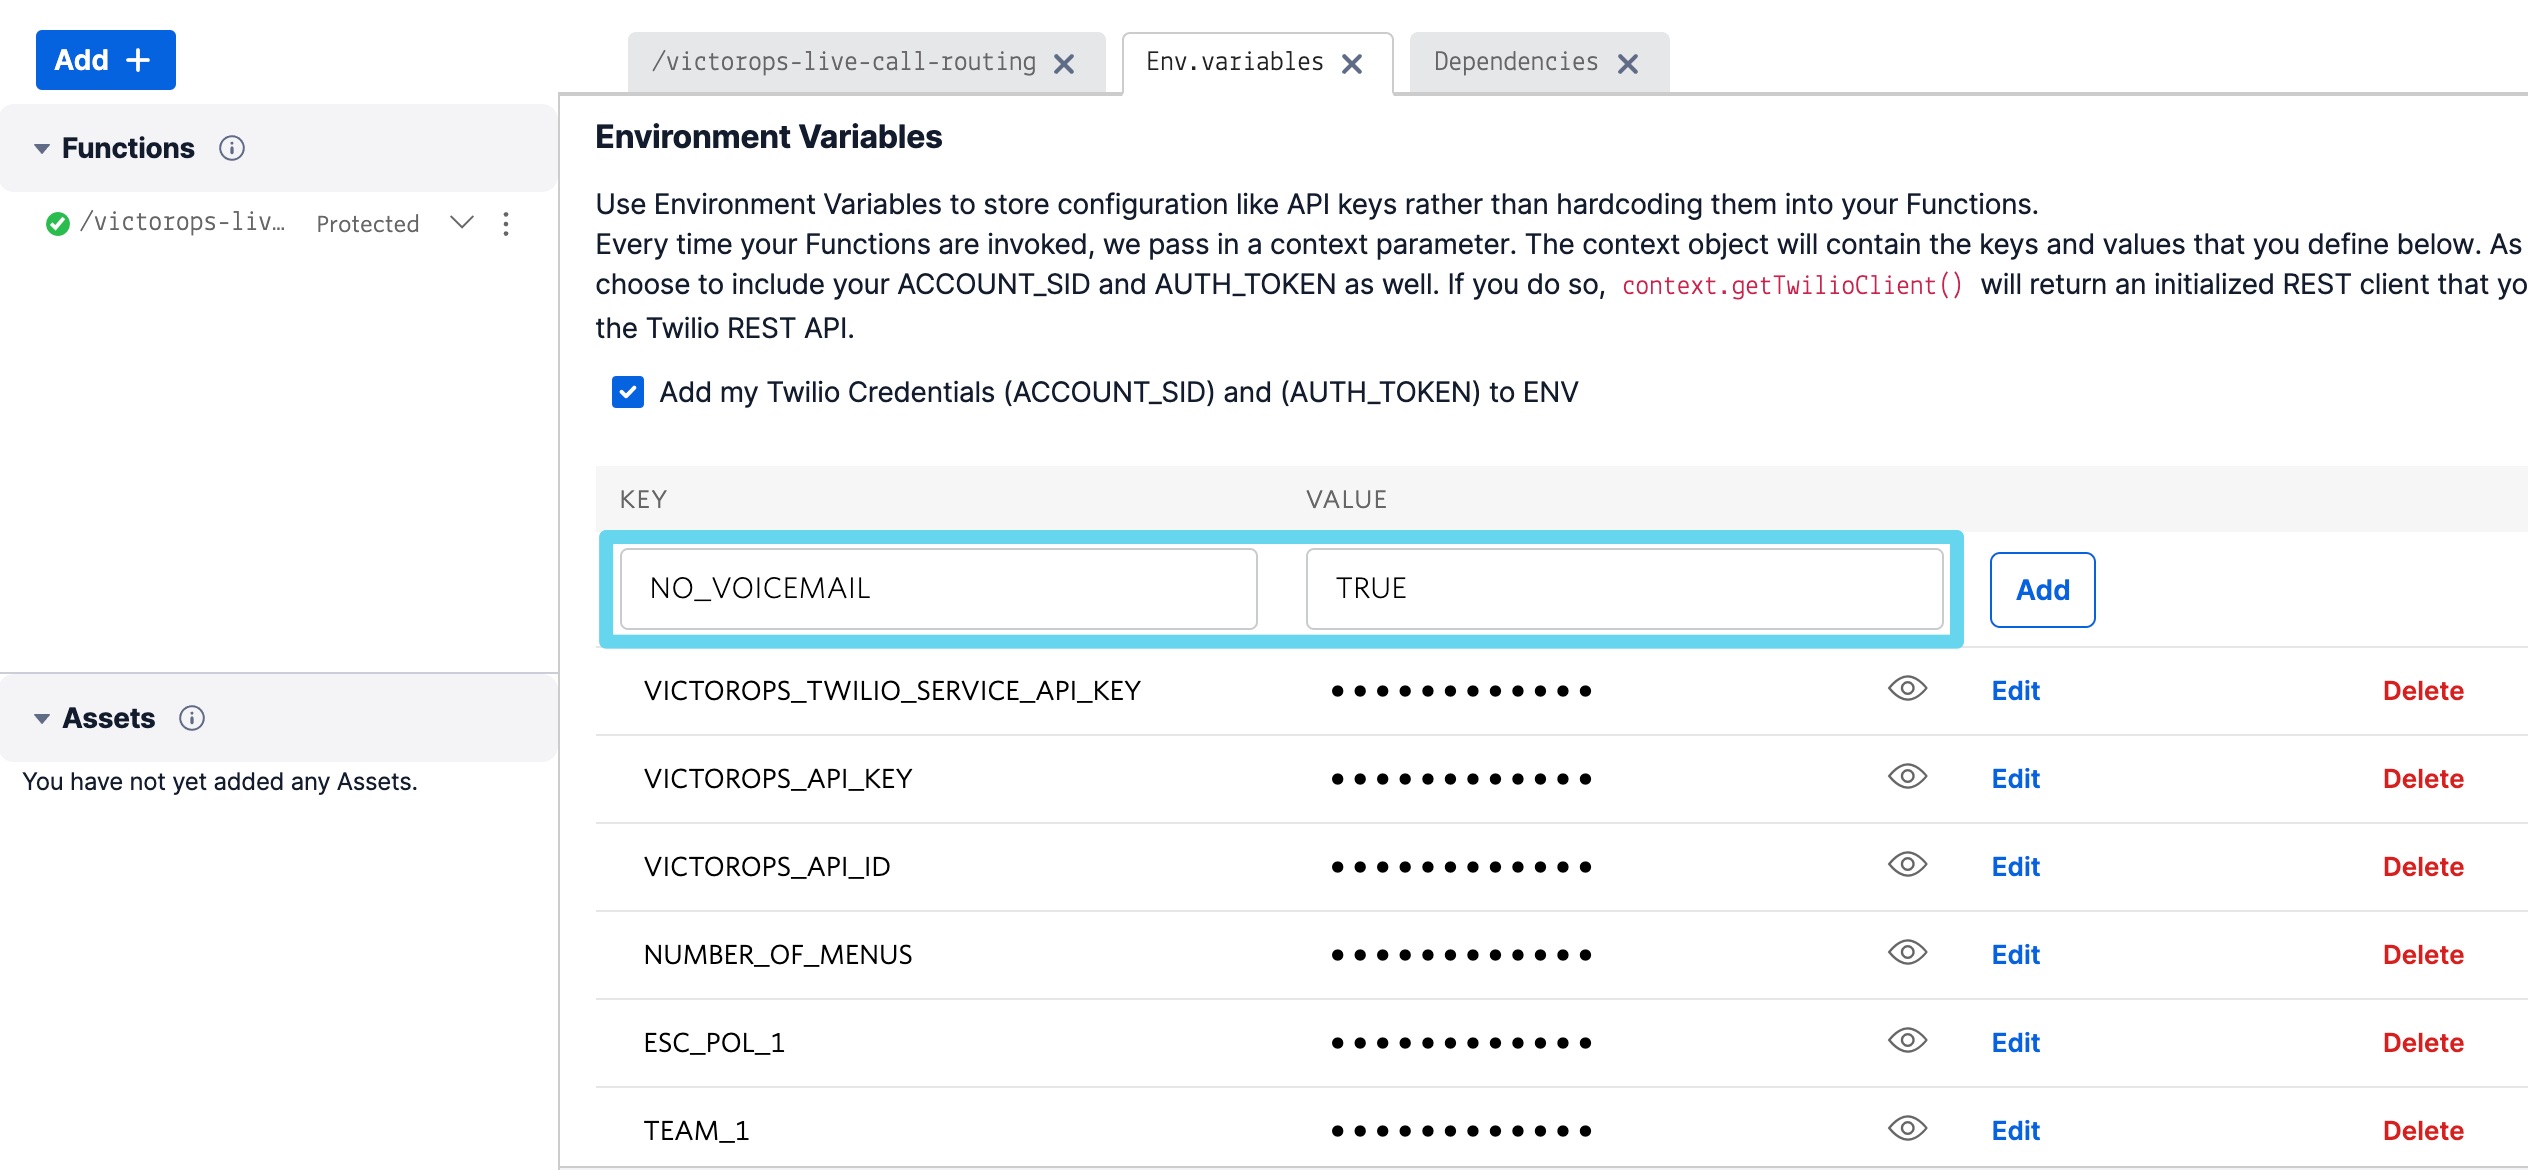
Once this is added, click the blue Deploy All button towards the bottom of the screen to push your changes.
Voicemail Transcription and Recording URL emailed to static email address
To email a recording URL and transcription of any voicemails to a static email address, a SendGrid account is necessary. While SendGrid is a Twilio-owned product, they presently stand as separate services with distinct logins. Fortunately, SendGrid offers a free plan if sending fewer than 100 emails per day, so it is likely that there will be no additional charges incurred by adding this functionality.
To start, navigate to https://sendgrid.com/ and click Start for free in the upper righthand corner. Provide an email address and password and click continue. Note: you’ll want to provide a different email address here than the one you intend to send the emails from.
After filling out your company information on the following screen, you’ll be successfully logged in. Towards the middle of the screen, a blue Create a Single Sender button is available. Click on it to get started.
Fill out the required information, specifying what email address you’ll want the email to be sent from, then click Create. A verification email will be sent to the one you’ve specified in order to ensure you have access to it.
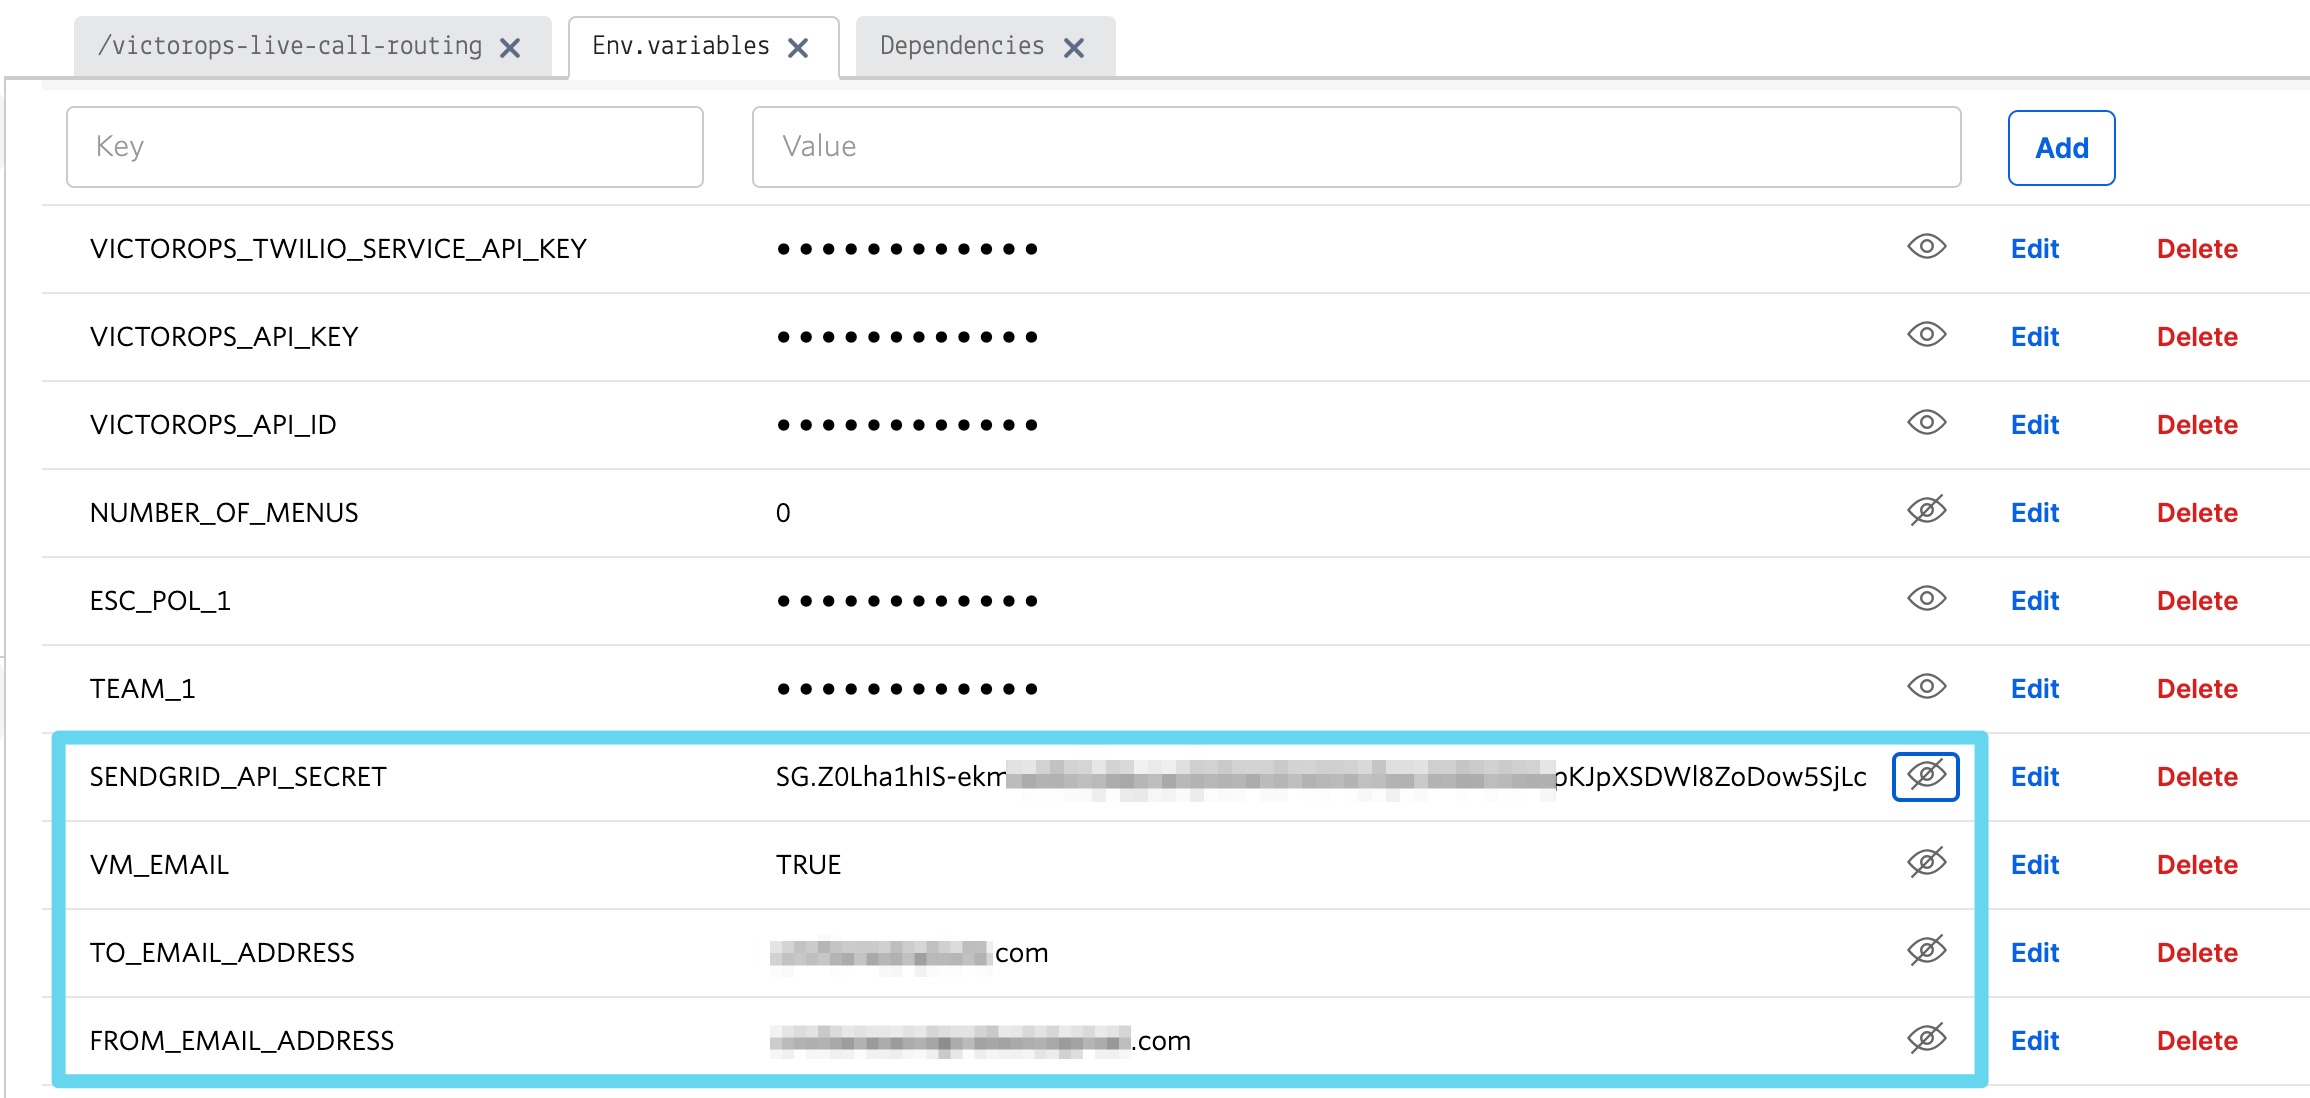
Once the email address is verified, in SendGrid click on Settings >> API Keys >> Create API Key. Give the API Key a name, select Full Access, and click Create & View. Copy the API Key value and store is somewhere secure – we’ll use it later on in the configuration.
The remainder of the configuration will take place in Twilio.
Navigate into the Twilio function you’ve created under Develop >> Functions >> Services >> VictorOps-Live-Call-Routing. Click on Environment Variables towards the bottom of the screen. Four new Environment Variables will be added in to ‘connect’ the Twilio account to the SendGrid one and achieve this emailing functionality. The “Key” column’s inputs are listed below for convenient copying/pasting:
| SENDGRID_API_SECRET | the API Key you'd previously copied from SendGrid |
| FROM_EMAIL_ADDRESS | the email address you verified in SendGrid |
| TO_EMAIL_ADDRESS | the static email address to send the email to |
| VM_EMAIL | TRUE |
The SENDGRID_API_SECRET value will be the API Key you’d previously copied in SendGrid, the TO_EMAIL_ADDRESS will be the email address you want the email send to (we recommend some kind of team distribution list), and the FROM_EMAIL_ADDRESS will be the email you verified in SendGrid. Order does not matter.
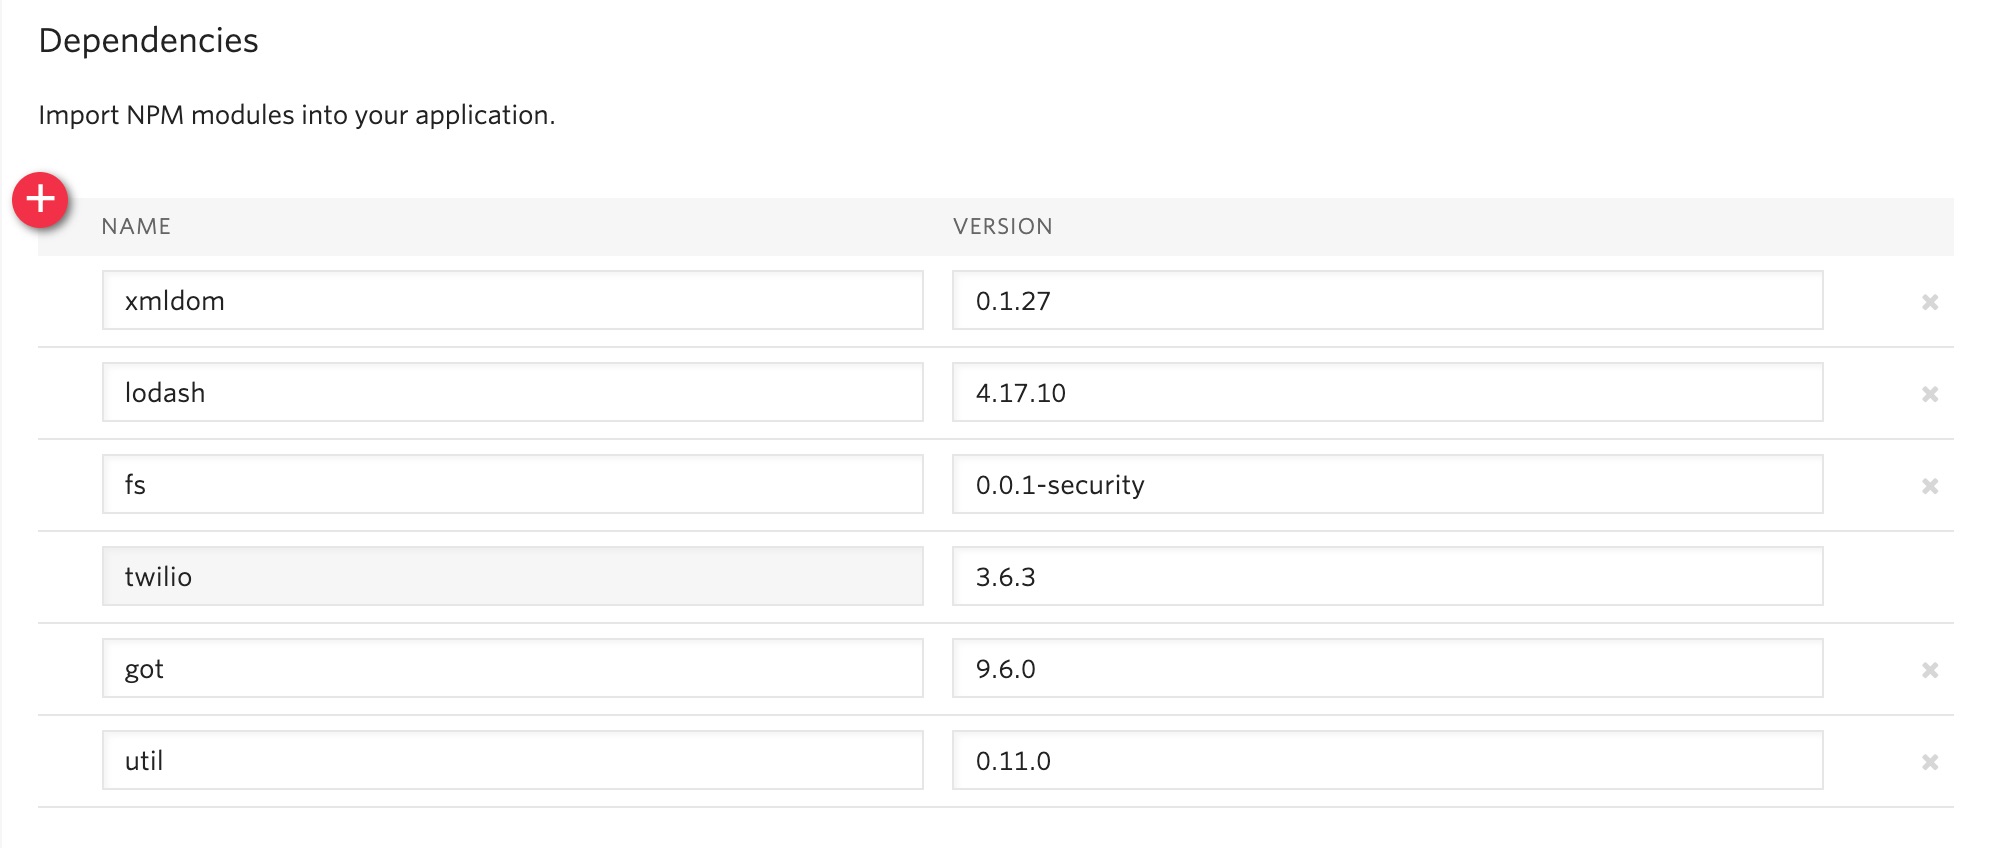
Next, click on Dependencies towards the bottom of the screen to add one new dependency in. Note: If the @twilio/runtime-handler Dependency doesn’t display, it will as soon as you click Deploy All.
| @sendgrid/mail | 7.6.0 |
Once you’ve added these new Environment Variables and new Dependency in, click on the blue Deploy All button at the bottom of the screen. Now, when a caller leaves a voicemail, an email will be sent to the TO_EMAIL you’ve specified that includes the voicemail transcription and recording URL.
Call or Voicemail Menu
If you would like to set an additional menu item that asks if the user would like to leave a voicemail or be connected directly to the on-call representative, set the NUMBER_OF_MENUS, created in the Multi Phone Tree step above, to 2.
Note: this is not compatible with the No Voicemail or No Call configurations.
Voicemail Transcription
Listen to Voicemail
Although voicemail will be transcribed and posted to your Splunk On-Call timeline, some users may prefer to listen to the actual voicemail. This can be done through the Twilio platform, which can be easily linked to from VictorOps using annotations. Create the below Rules Engine rule to easily link back to a specific call’s history and to listen to or download the voicemail.
When monitoring_tool matches Twilio
Annotate the alert with URL
- Label: Listen to Voicemail
- URL: https://www.twilio.com/console/voice/calls/logs/${{entity_id}}
When navigating to the link, users will need to first sign into the Twilio account.
Configuring Voice
If you set this integration up prior to May 7th, 2020, the voice that Twilio uses to speak will default to “woman”. For all that have set the integration up since then, the default voice will be “Polly.Salli” (a drastic improvement in our opinion, though does come with a marginal cost increase).
If you do not have the Polly.Salli voice and would like to enable it, follow the below walkthrough.
First, navigate to your VictorOps Function. Depending on whether you set this up in Twilio’s Functions Classic UI or their new Functions Services UI, it will be in slightly different places.
If you set up this integration in Twilio’s Functions Classic UI (likely if configured prior to August, 2020) go to Functions >> Overview >> Manage Services >> VictorOps Live Call Routing >> Functions.
If you set this up in Twilio’s new Services UI, go to Functions >> Services >> Manage Services >> VictorOps-Live-Call-Routing >> Functions.
In roughly line 82 in the code for the function, you should be able to locate a line that says:
: 'woman';
Change the text ‘woman’ to ‘Polly.Salli’ so that it shows like below:
: 'Polly.Salli';
There are additionally some pieces of text that will have to be changed to ensure proper voice readout. Specifically, in roughly line 28, there should be a line that says:
greeting: 'Welcome to Victor Ops Live Call Routing.',
Change the word ‘Live’ to ‘Lyve’ so that the end result looks like:
greeting: 'Welcome to Victor Ops Lyve Call Routing.',
An equivalent edit will be made on roughly line 38 where you will change the word ‘Live’ to ‘Lyve’. This forces the voice to pronounce the word as we’ve intended.
After completing these edits, click the blue Save button and then the blue Deploy All button (if in the new Services UI) or the red Save button (if in the old Functions Classic UI) at the bottom of the screen. It may take 15 seconds or so but you should see a confirmation message letting you know the deploy has been successful.
Note: Polly.Salli is one of the many Amazon Polly voices that can be leveraged for this integration. If you’d like to see how others sound, in the Twilio Console UI, navigate to Programmable Voice >> TwiML >> Text-to-Speech. A red plus button should appear under the Current Language Mapping heading. Click on it, select the appropriate language, select Amazon Polly as the Provider, and then select your desired voice. You are able to enter sample text to have it reach in order to test.
After settling on an Amazon Polly voice, follow the above instructions, simply replacing ‘Salli’ with the voice you’ve chosen.
Twilio Pricing
For a more detailed outline see their pricing pages here and here.
Phone Number: $1.00 per month (toll-free $2.00 per month)
Receive calls: $0.0085 per minute (toll-free $0.022 per minute)
Make calls: $0.0130 per minute (toll-free $0.013 per minute)
Recording: $0.0025 per minute
Transcription: $0.05 per minute
Amazon Polly Voice Readout: $0.0008/100 characters
Functions also have some cost. The first 10,000 are free followed by a $0.0001 charge per invocation. For more, see the Functions pricing page here.
Troubleshooting Twilio and Splunk On-Call
Problem 1: The on-call individuals do not receive phone calls. The caller hears “Trying next on-call representative, Trying next on-call representative, Trying next on-call representative… Please leave a message for the ${Team} and hang up when you are finished”
This may be because a Trial Twilio account is being used (as opposed to a paid Twilio account), and therefore the phone numbers attempting to be called will need to be verified within Twilio before they can be reached. Additionally, even with a paid Twilio account, phone numbers in certain countries (such as Slovakia) will still need to verify numbers before calling them.
You are able to verify the numbers you’re calling to by following the steps under the ‘Add a Verified Caller ID via the Console Site’ section HERE.
Problem 2: ‘There is a missing configuration value. Please contact your administrator to fix the problem.’
This message represents that either one of the Twilio Dependencies or Environment variables is incorrectly configured
Double check that these values in your Twilio account exactly match the recommended ones below:
Problem 3: ‘There was an error retrieving the list of teams for your organization.’
This message represents that the team attempting to be notified doesn’t exist, has not been specified properly, or that the VICTOROPS_API_KEY or VICTOROPS_TWILIO_SERVICE_API_KEY hasn’t been copied and pasted accurately.
Double check that the spelling of the team in VictorOps (including capitalization) is matched exactly within the Twilio Environment Variables and that the proper value is in place for the VICTOROPS_API_KEY and VICTOROPS_TWILIO_SERVICE_API_KEY.
Problem 4: ‘There was an error retrieving the on-call phone numbers. Please try again.’
This signifies that the number attempting to be called has not yet been verified in VictorOps
Verify the number by clicking the ‘Verify’ button next to it within the User’s VictorOps personal profile, and then enter in the verification code sent to the device
Problem 5: ‘Team ${team-name} does not exist. Please contact your administrator to fix the problem’
This indicates that the team spelling/capitalization in Twilio (under the Value column in Environment Variables) may not perfectly mirror the team spelling/capitalization in VictorOps
Double check this and correct if necessary.
Problem 6: The user attempting to be called does not receive a call. The integration skips to calling the next user specified in the escalation policy.
This situation can occur if the user who does not receive a call does not have a verified number entered into their VictorOps profile. Please enter/verify a number for this user, and then try again.
Problem 7: The integration only calls 3 users before prompting the caller to leave a voicemail.
This is an inherent limitation of the integration, and unfortunately cannot be adjusted.
Problem 8: There are multiple people on-duty for a given escalation policy step, but only one of them receive a call.
This is another inherent limitation of the integration, and unfortunately cannot be adjusted. If multiple people are on-duty at the same time for a given escalation policy step, the integration will choose one user at random each time a call is placed to route the call to.
Problem 9: Nobody is called. The caller is prompted to leave a message.
This may be caused by a mismatch between the values in Twilio’s Environment Variables and the corresponding values in VictorOps. Double check that the spelling of the Team and Escalation Policy in Twilio match exactly what is used in VictorOps.
Problem 10: ‘We were unable to reach an on-call representative’
This message represents that the team attempting to be notified either doesn’t exist, or has not been specified properly
Double check that the spelling of the team in Splunk On-Call (including capitalization) is matched exactly within the Twilio Environment Variables
This also may be because a Trial Twilio account is being used (as opposed to a paid Twilio account), and therefore the phone numbers attempting to be called will need to be verified within Twilio before they can be reached. Additionally, even with a paid Twilio account, phone numbers in certain countries (such as Slovakia) will still need to verify numbers before calling them.
You are able to verify the numbers you’re calling to by following the steps under the ‘Add a Verified Caller ID via the Console Site’ section HERE.
Problem 11: ‘An application error has occurred. Goodbye’ and/or you see 82002 and 11200 errors in the Twilio logs
This indicates that the code used within the Splunk On-Call function is not properly copied and pasted, that the path is not specified properly (i.e. the name for the path for the function needs to be: /victorops-live-call-routing), that the Dependencies haven’t all been copied over (oftentimes the ‘got’ module), that there’s a typo in the Environment Variables, that the defined Escalation Policy references an ‘Execute Policy’ step, or that the Splunk On-Call user attempting to be called doesn’t have a number in their user profile. Double-check these areas.
Problem 12: A Splunk On-Call user has multiple phone numbers configured within their profile and the wrong one is called by the integration
The phone number that has been in the Splunk On-Call user profile the longest will be the one used by the integration. It may be necessary to remove numbers you do not want called and then re-add them in order to have the one you do want called be the “oldest”.
Problem 13: ‘The number you have dialed is not in service. Please check the number and try again’
This message may mean that the function has not been properly assigned to your Twilio phone number. Ensure that the number is configured to perform the Splunk On-Call function when a call comes in.
Problem 14: After clicking ‘Save’ on the Functions >> Configure page, you see a “Failed to deploy your Function” message
If you encounter this error message when trying to save on the Configure page in Twilio (where Environment Variables and Dependencies are listed), this may be due to a recent change of the accepted values for the ‘got’ dependency. Previously, we recommended people leave the version for this ‘got’ dependency blank, though with a recent change to the v10 package of ‘got’, we now must specify this version as 9.6.0. Ensure all dependencies match the screenshot/table in the above “Configure Environment Variables” section and re-try saving.
Problem 15: The integration calls a seemingly random team, not the one you’ve specified within the Functions >> Configure section in Twilio
This may be because the code used in your Twilio function isn’t the one intended for your use case. If setting up the standard, single-phone number configuration, delete the existing code in place within Functions >> Manage >> VictorOps and replace it with the code found at https://github.com/victorops/twilio-live-call-routing/blob/master/victorops-twilio.js
Note:
In your escalation policy within VictorOps, live call routing will only call users or rotations referenced either by rotation or directly in the escalation policy. Live call routing will not recognize the step to execute a different escalation policy, rather, it will skip that step and immediately progress to the next one.
If you encounter any problems not listed here, please reach out to Splunk On-Call Support.