About StatusCast and VictorOps
The VictorOps and StatusCast integration allows you to automatically create and update StatusCast incidents based on VictorOps incidents. The below guide will walk through the setup process.
Versions Supported: N/A (SaaS)
VictorOps Version Required: Enterprise
Set up Outgoing Webhooks in VictorOps
In VictorOps, navigate to Integrations >> Outgoing Webhooks and click the blue “+ Add Webhook” button. You’ll end up creating two separate Outgoing Webhooks as part of the setup.
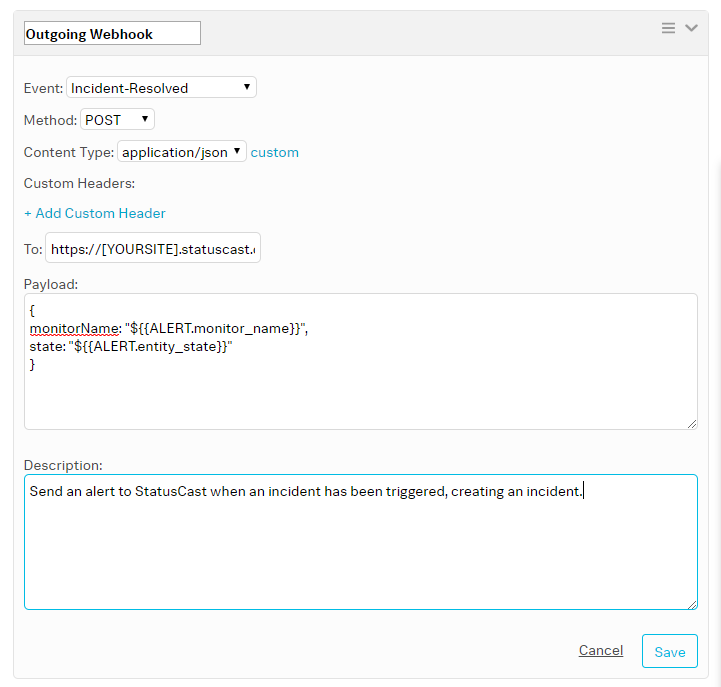
Event – During the setup of the first Outgoing Webhook, set it to Incident-Triggered. For the second, set it to Incident-Resolved
Method – set this to POST
Content Type – set this application/json
Custom Headers – you do not need to add any values to this
To: – set this to https://[yourapp].statuscast.com/webhook/victorops , just replace [yourapp] with your status page name.
Payload – Your payload will tell StatusCast what resource is affected and what the current status is. While you can customize these values we recommend starting out with:
{

monitorName: "${{ALERT.monitor_name}}",
state: "${{ALERT.entity_state}}"

}
The monitor name will correspond to a template in StatusCast. Feel free to customize the payload values, however the property names listed above are required. The monitorName property will map to a corresponding template in StatusCast.
Description – Not required but we recommend leaving a description in case any other VictorOps users may access your webhooks.
Repeat the above steps to create another Outgoing Webhook, this time with an Event value of Incident-Resolved.
StatusCast Setup
With that saved you can complete the setup in your StatusCast account, log into the administrative portal in a new tab and navigate to the Monitors section. Here you can create an entry for each monitor in your VictorOps account that you want StatusCast to automatically create incidents for.
Select New Monitor and in the Choose Provider drop down select VictorOps:

Next enter the Alert Name for the monitor. This corresponds to the monitor name that set off an alert.

Then enter the Authored by which defines who is the author of the incident. Don’t worry though, if you page is set to hide authors they will still remain hidden.

The other Incident settings including Type, Affected components, Subject, and Message reflect the same general options you have when creating an incident. For more information on this process please refer to StatusCast’s How do I post a new incident or status article.
With the incident settings finished, define the actual workflow of the incident being posted:
Notify theses employees – select which employees StatusCast will notify when this type of incident gets created. Please note that you can select multiple employees.
Wait time – is the amount of time StatusCast waits before actually creating your incident. This is typically used to buffer out incidents that are quickly resolved, usually in a matter of a few minutes. If your monitoring service already has this built in, then you can set this value to 0 and StatusCast will post the incident when it’s received.
Combine alerts – in case your monitoring services sends out multiple requests you can choose to combine them to prevent redundant incidents from being reported.
Auto-publish – if selected your incident will be automatically published, which notifies all subscribers. If this option is turned off then your employees will need to activate the post manually, either by logging into StatusCast and activating it within the Dashboard or by simply replying to the notification email.
Auto-close – if selected your incident will be closed when your monitoring service sends an update. By selecting this you can also enter a Closing Comment that will be posted.
Once you have all the configurations set please Submit to save the configuration.